Windows 10 Virtual Machine
Windows 10 Virtual Machine
Requirements
The basic requirements to access the Azure portal and to use the software and services provided by Azure are as follows: A subscription to Azure that may be provided by the institution; A local Windows, Mac or Android tablet, laptop or desktop computer
There is a host of software available in Azure to download free of charge. Among them, Microsoft Access, Microsoft Visio, and Microsoft project would be beneficial to business students. These three software apps can be downloaded and installed on a virtual computer similar to downloading them and installing them on a personal computer.
Overview of Steps


Diagram 1 Procedure for Creating a Windows 10 Virtual Machine in Azure
Step 1: Accessing the Azure Portal
There are two different ways to access the Azure portal. One is to enter the portal address directly in the browser. The other is to access the portal via the instructor’s website. In order to access the portal directly, the following address should be entered in the browser: http://portal.azure.com.
To access the portal through the instructor’s website, use the following web address: http://www.ganesan.com. Select the tab entitled Resources and then select the option entitled Azure under this tab as shown in the following diagrams.
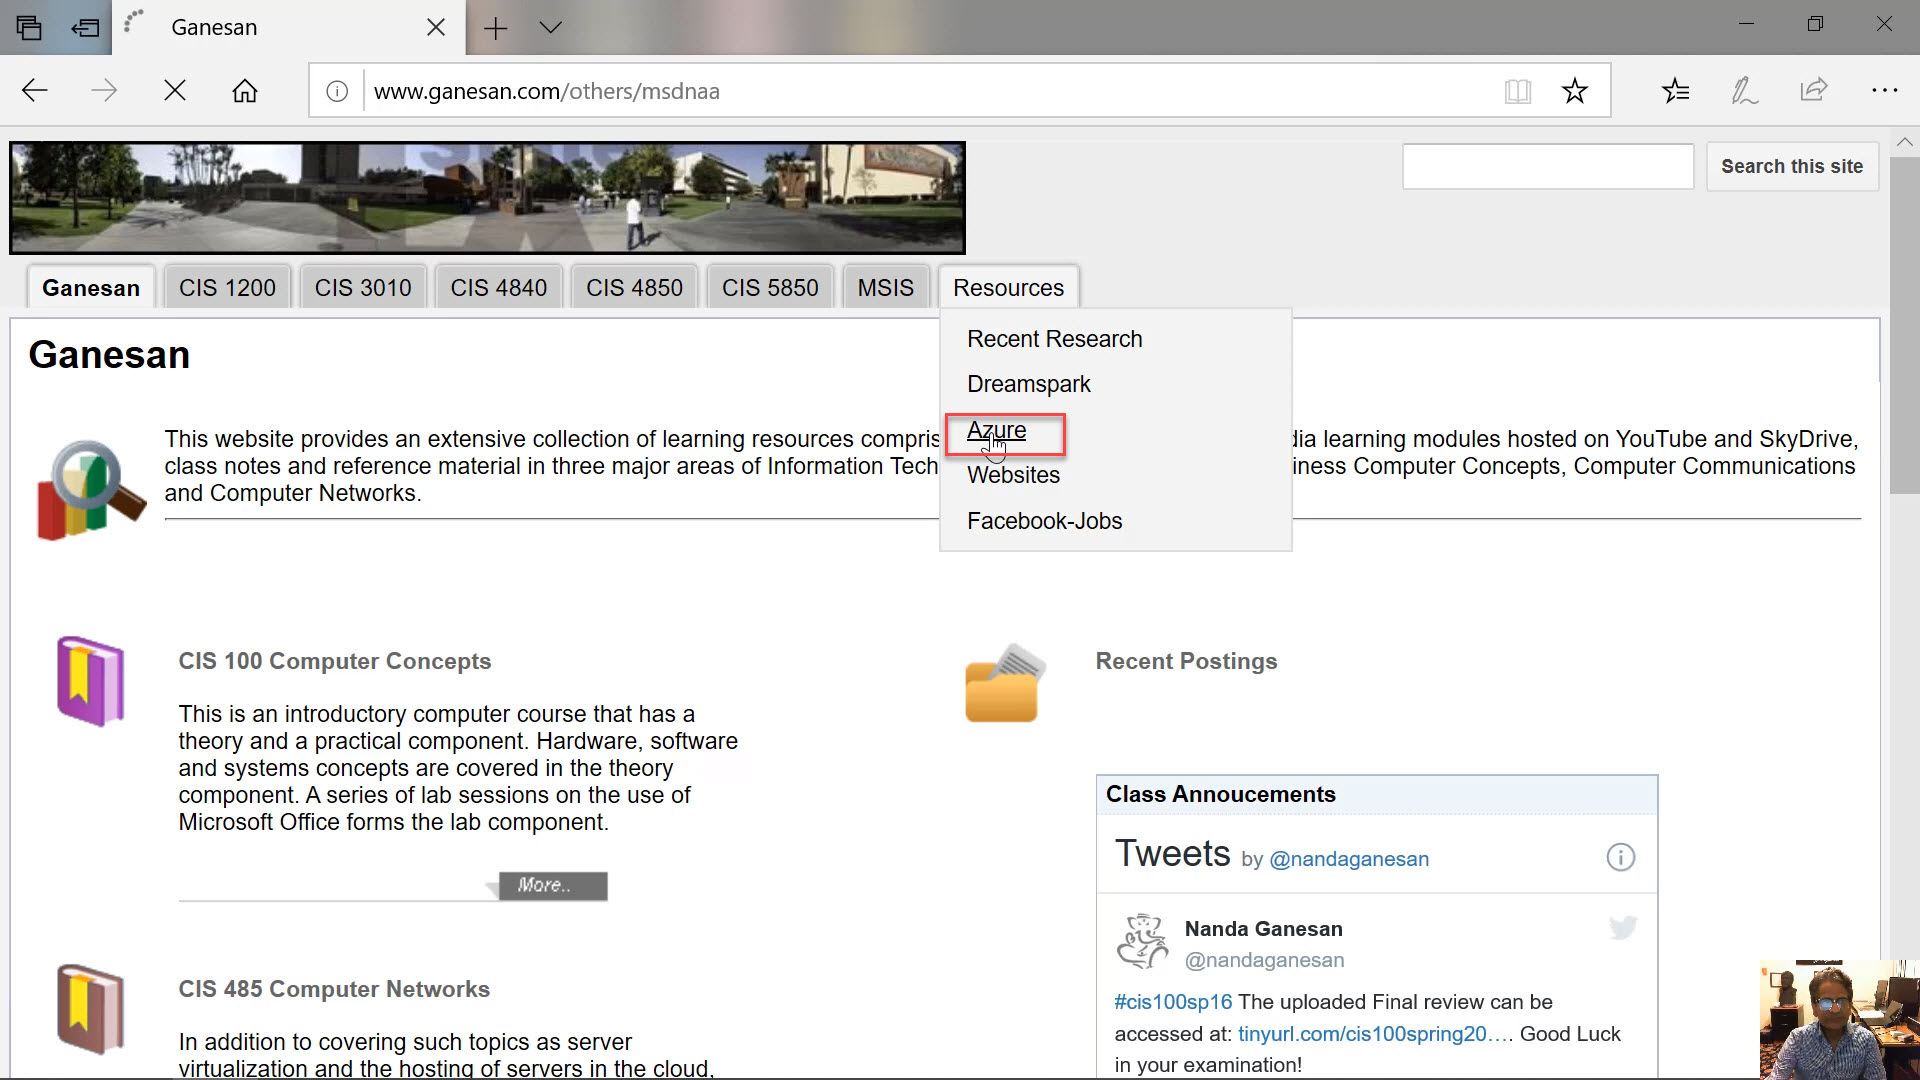
Diagram 2 Accessing Azure Via the Instructor’s Website
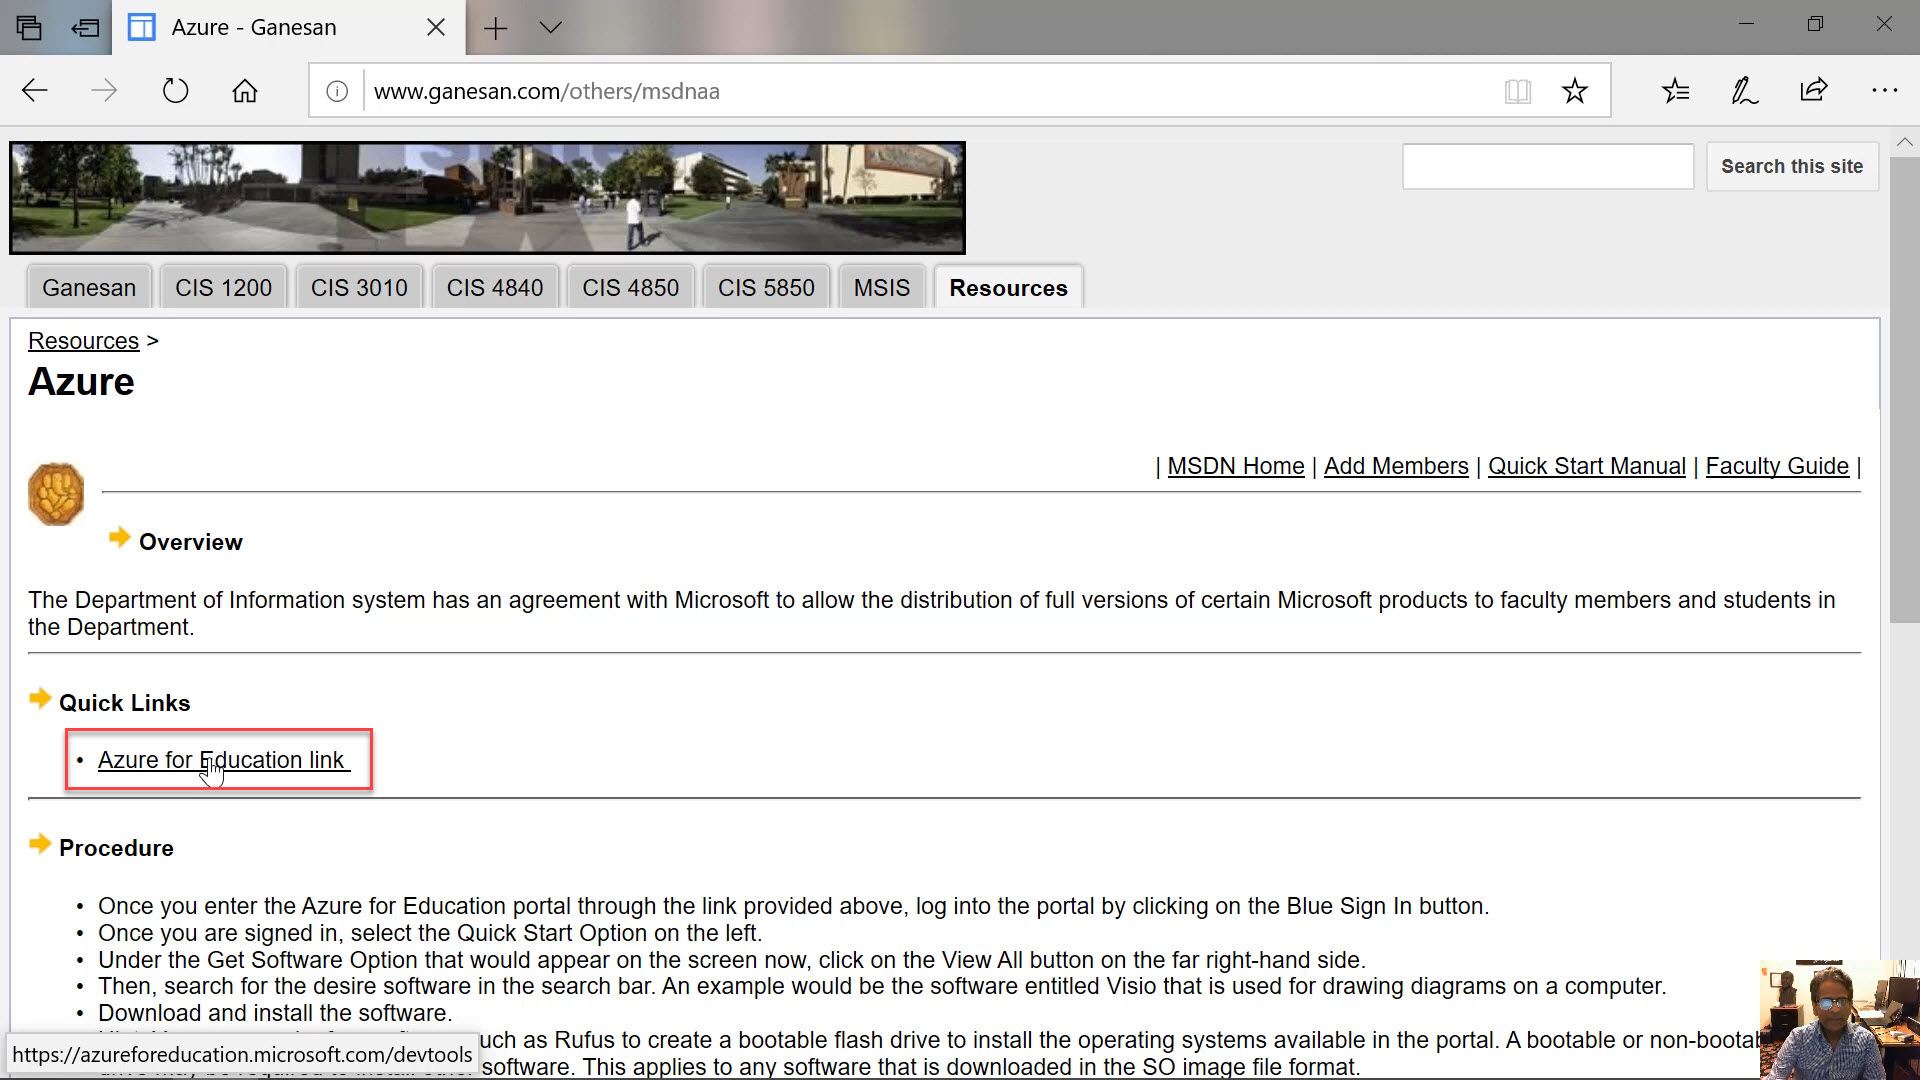
Diagram 3 Accessing Azure (Continued)
Step 2: Signing into the Portal
Sign into the portal using the appropriate credentials. The credentials provided by the University should be used to log into the website. The email to be used as the username must end with the .edu suffix.

Diagram 4 Signing into the Portal
It is important to note that the blue button must be clicked to sign into the portal, as highlighted in the above diagram. Do not click the black button on the top to sign into the portal. Then click Next button at the bottom of the screen.
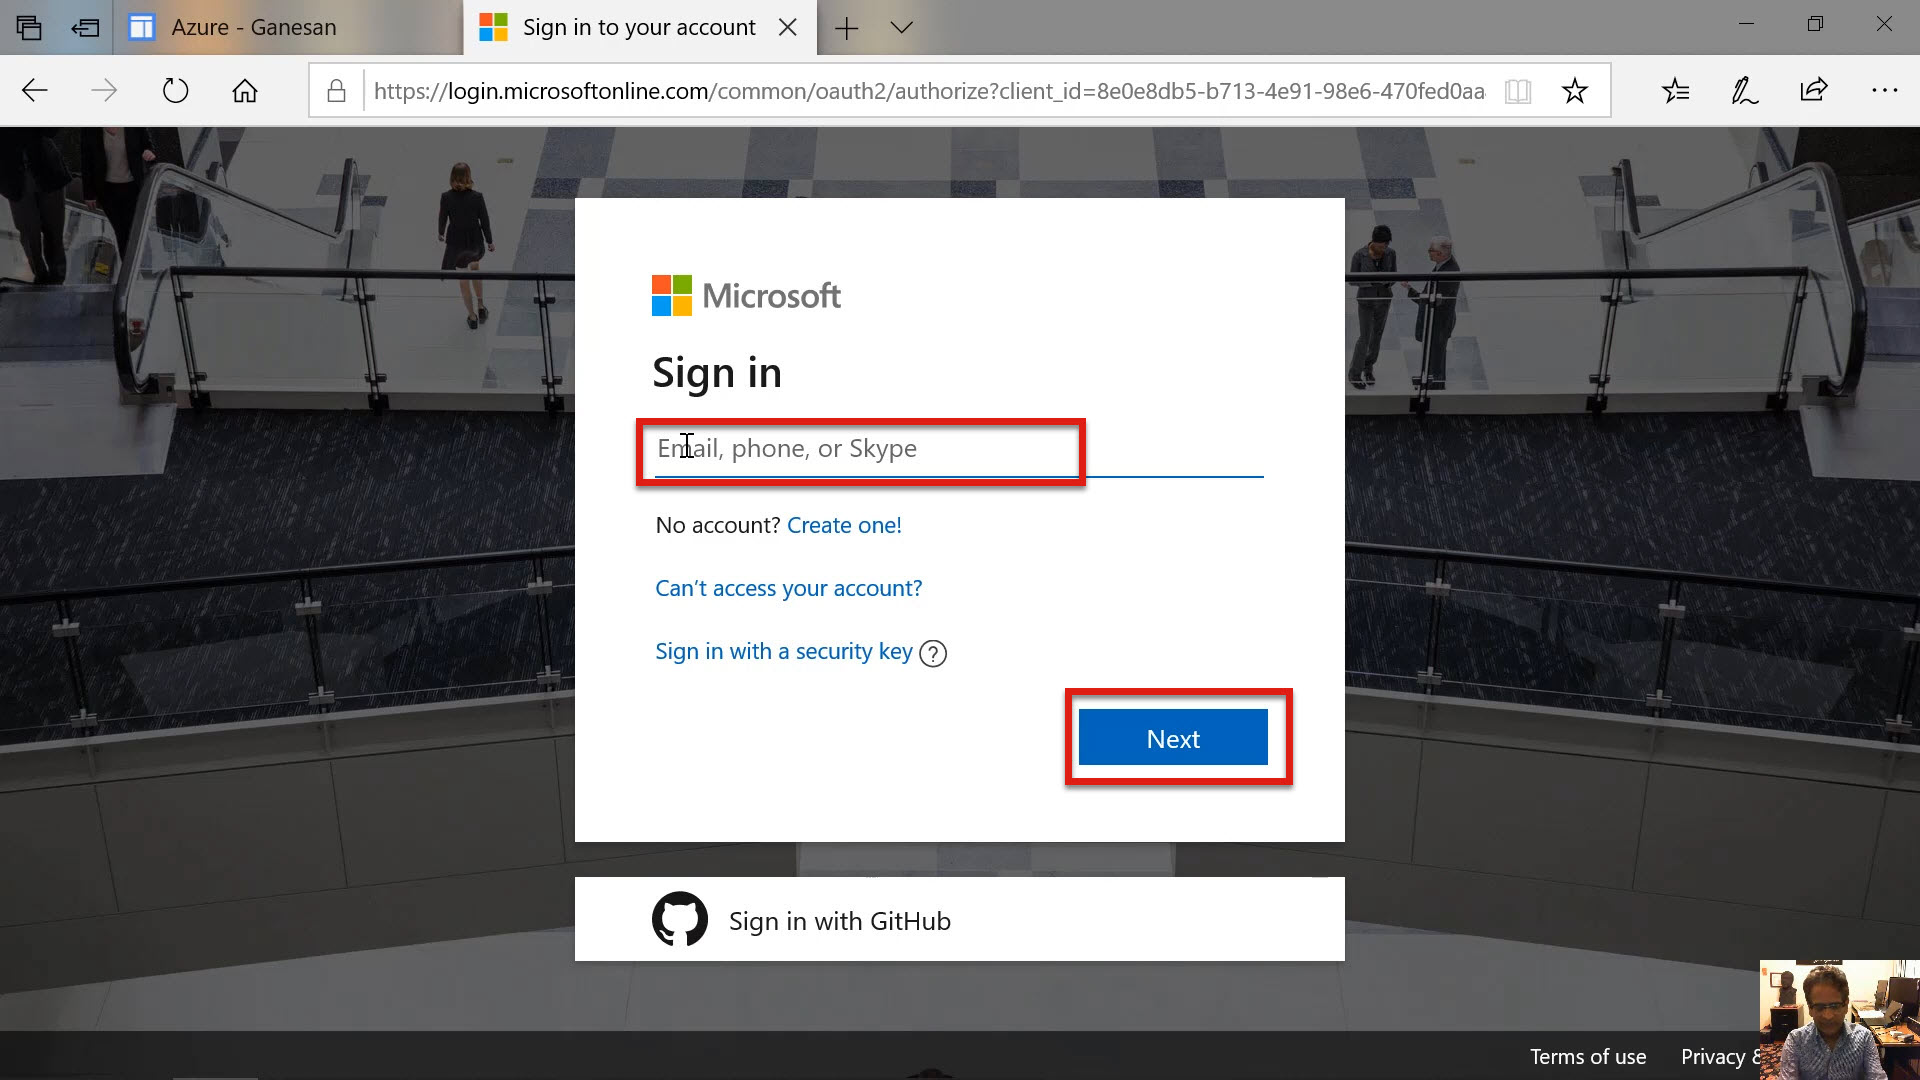
Diagram 5 Logging-in with University Credentials
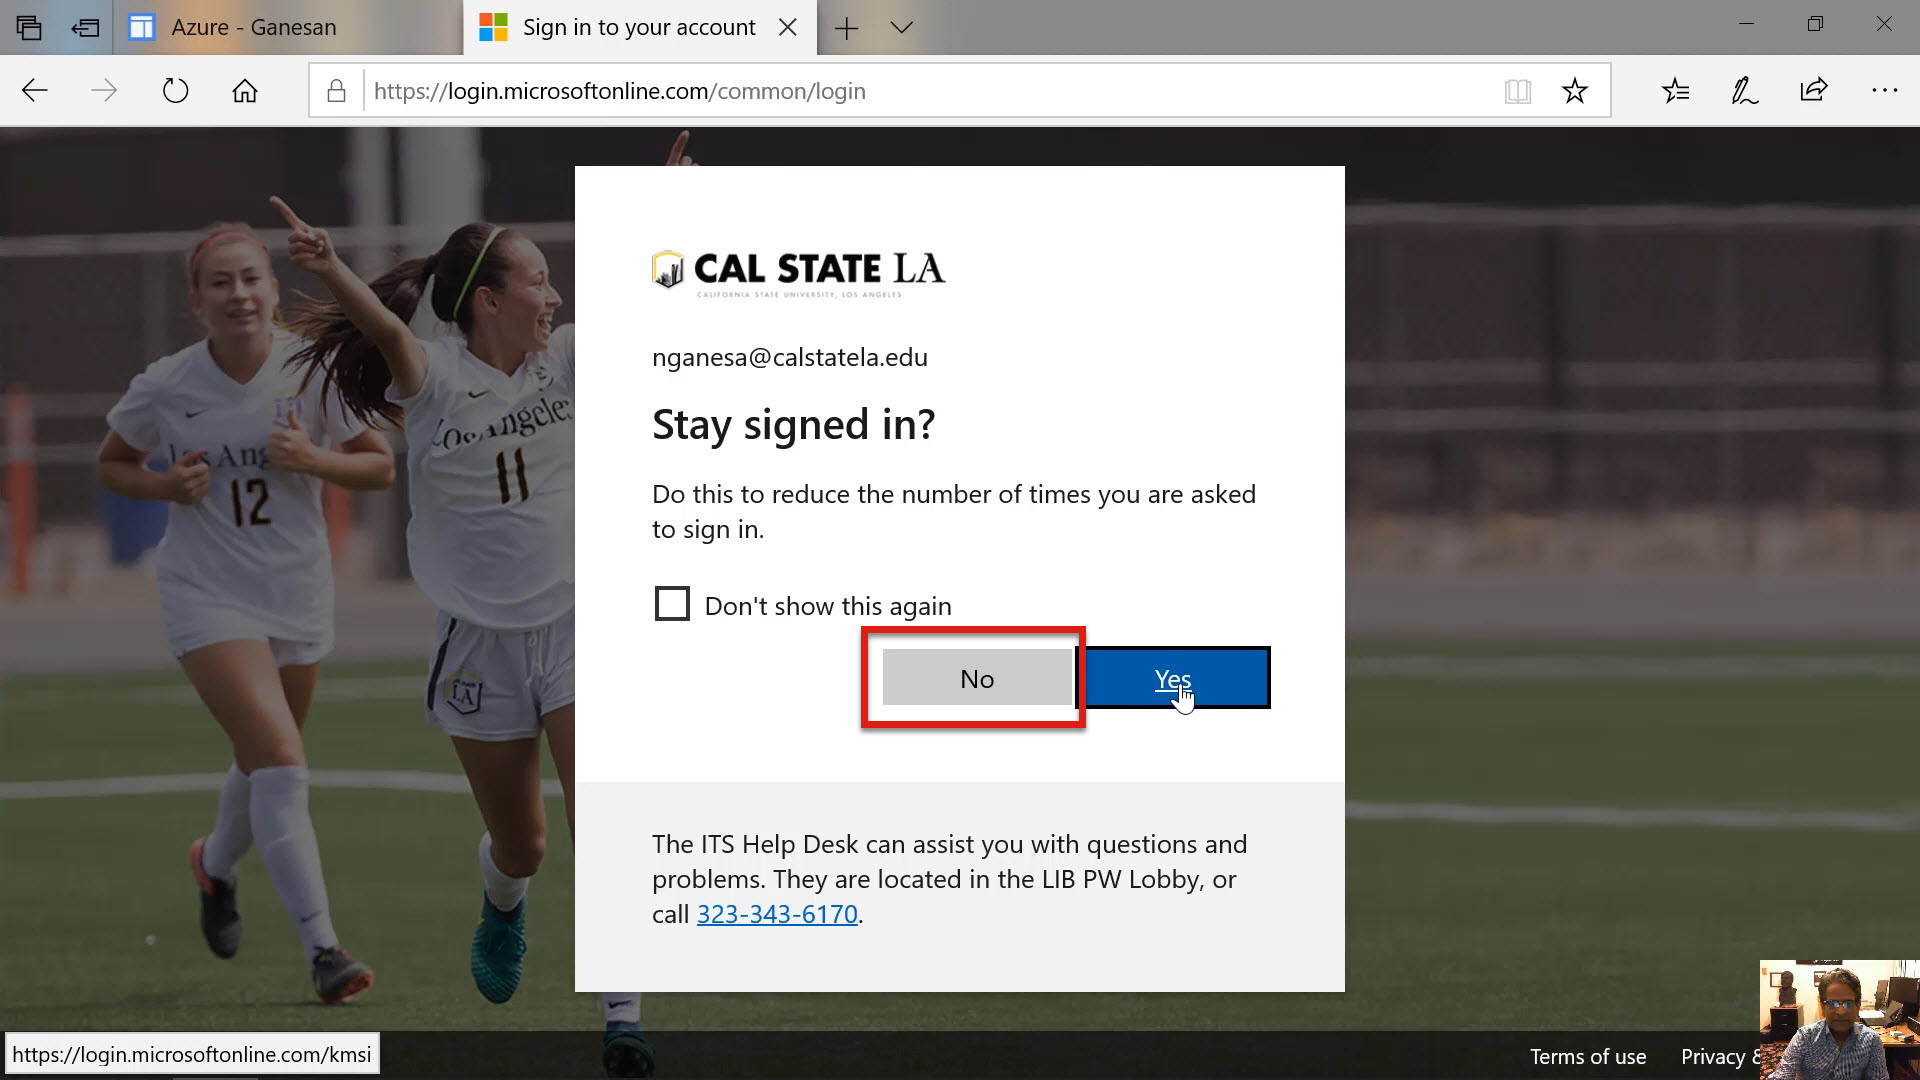
Diagram 6 Selecting the Option to Stay Signed In
After signing into the portal, the initial welcome screen will be displayed as shown in the following diagram. If a student is logging into the portal for the first time, then a window in the middle may appear requiring the student to redeem the free $200 credit given by Azure before proceeding further. Before starting to use Azure, the students must redeem the credit by following the step-by-step instructions displayed on the screen.
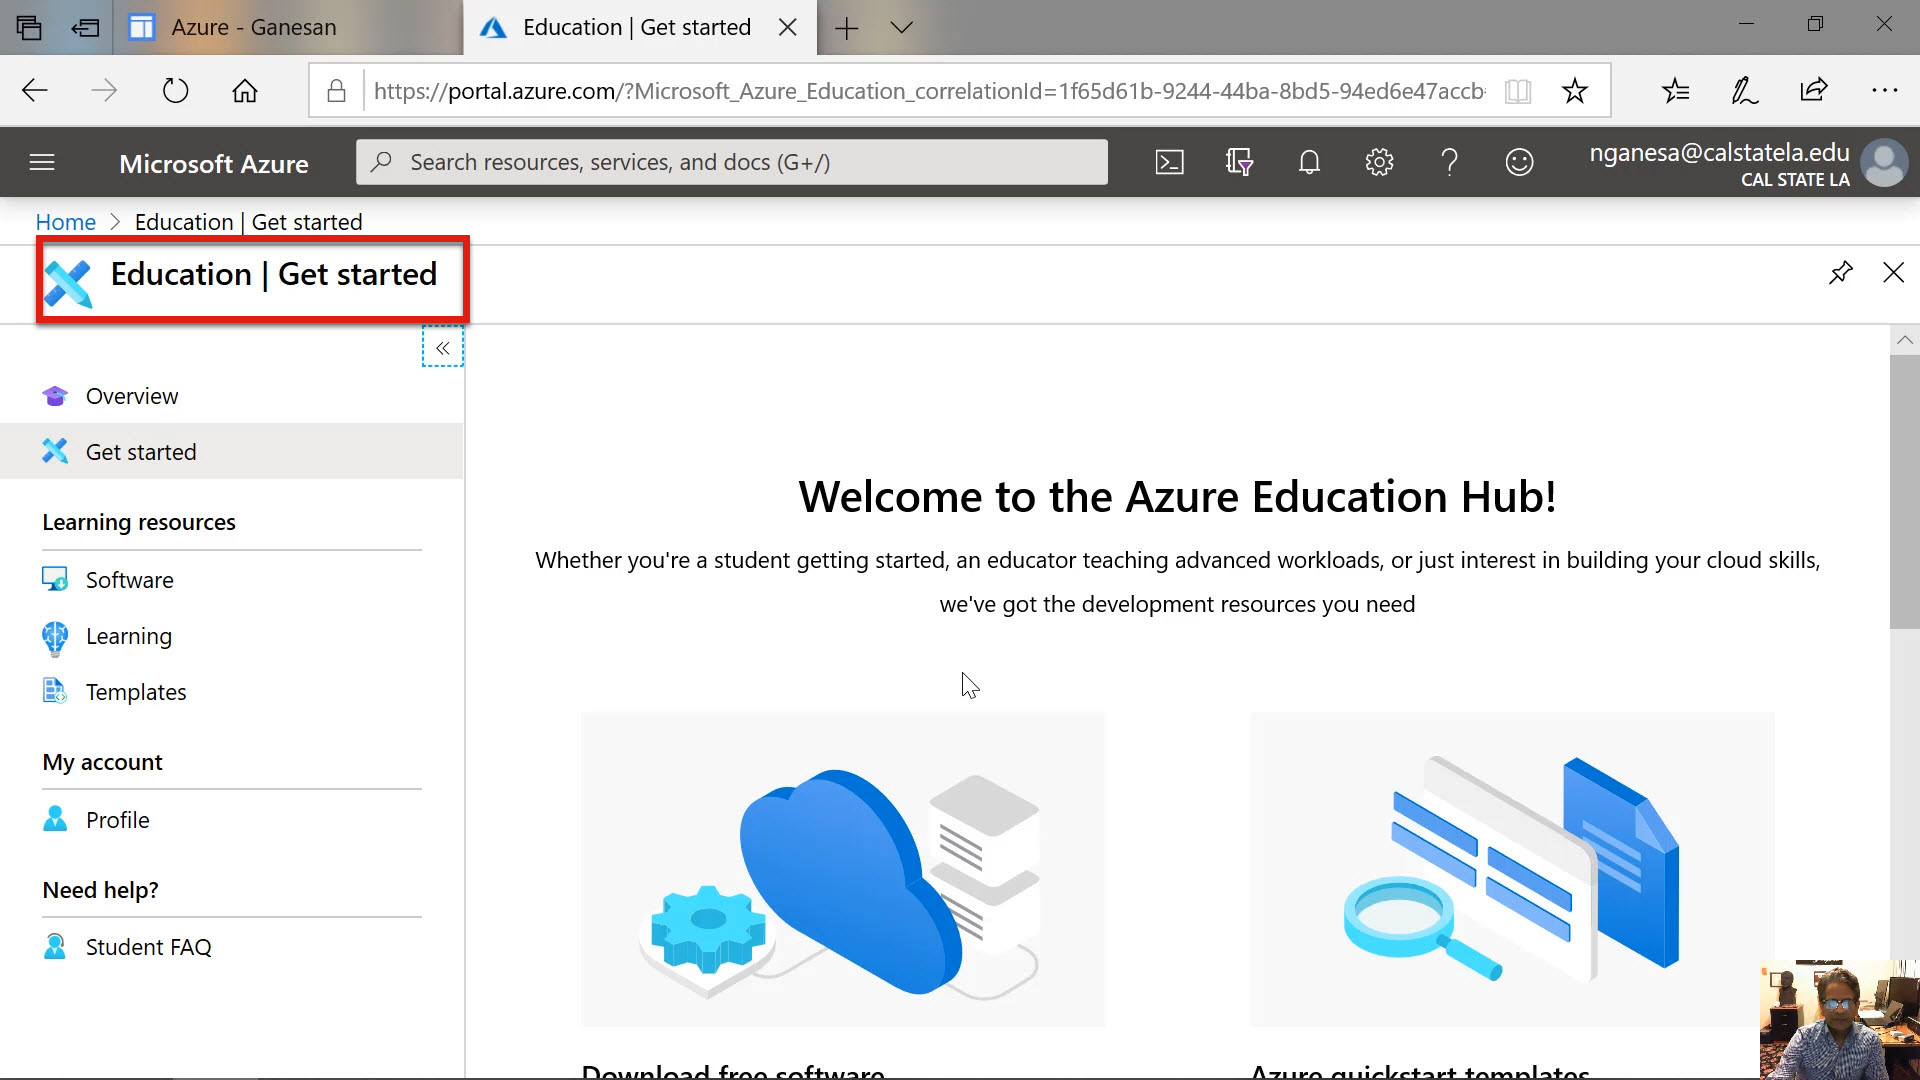
Diagram 7 Azure Initial Welcome Screen
Step 3: Initiating the Process for Creating the Virtual Machine Service in Azure
Now, the virtual machine services must be selected to create a virtual machine. To access the virtual machine services, click the home button on the top. Incidentally, the home button is displayed at the top left-hand corner just above the highlighted box shown in the above diagram. In the subsequent screen shown in the following diagram, select the virtual machine option as highlighted.
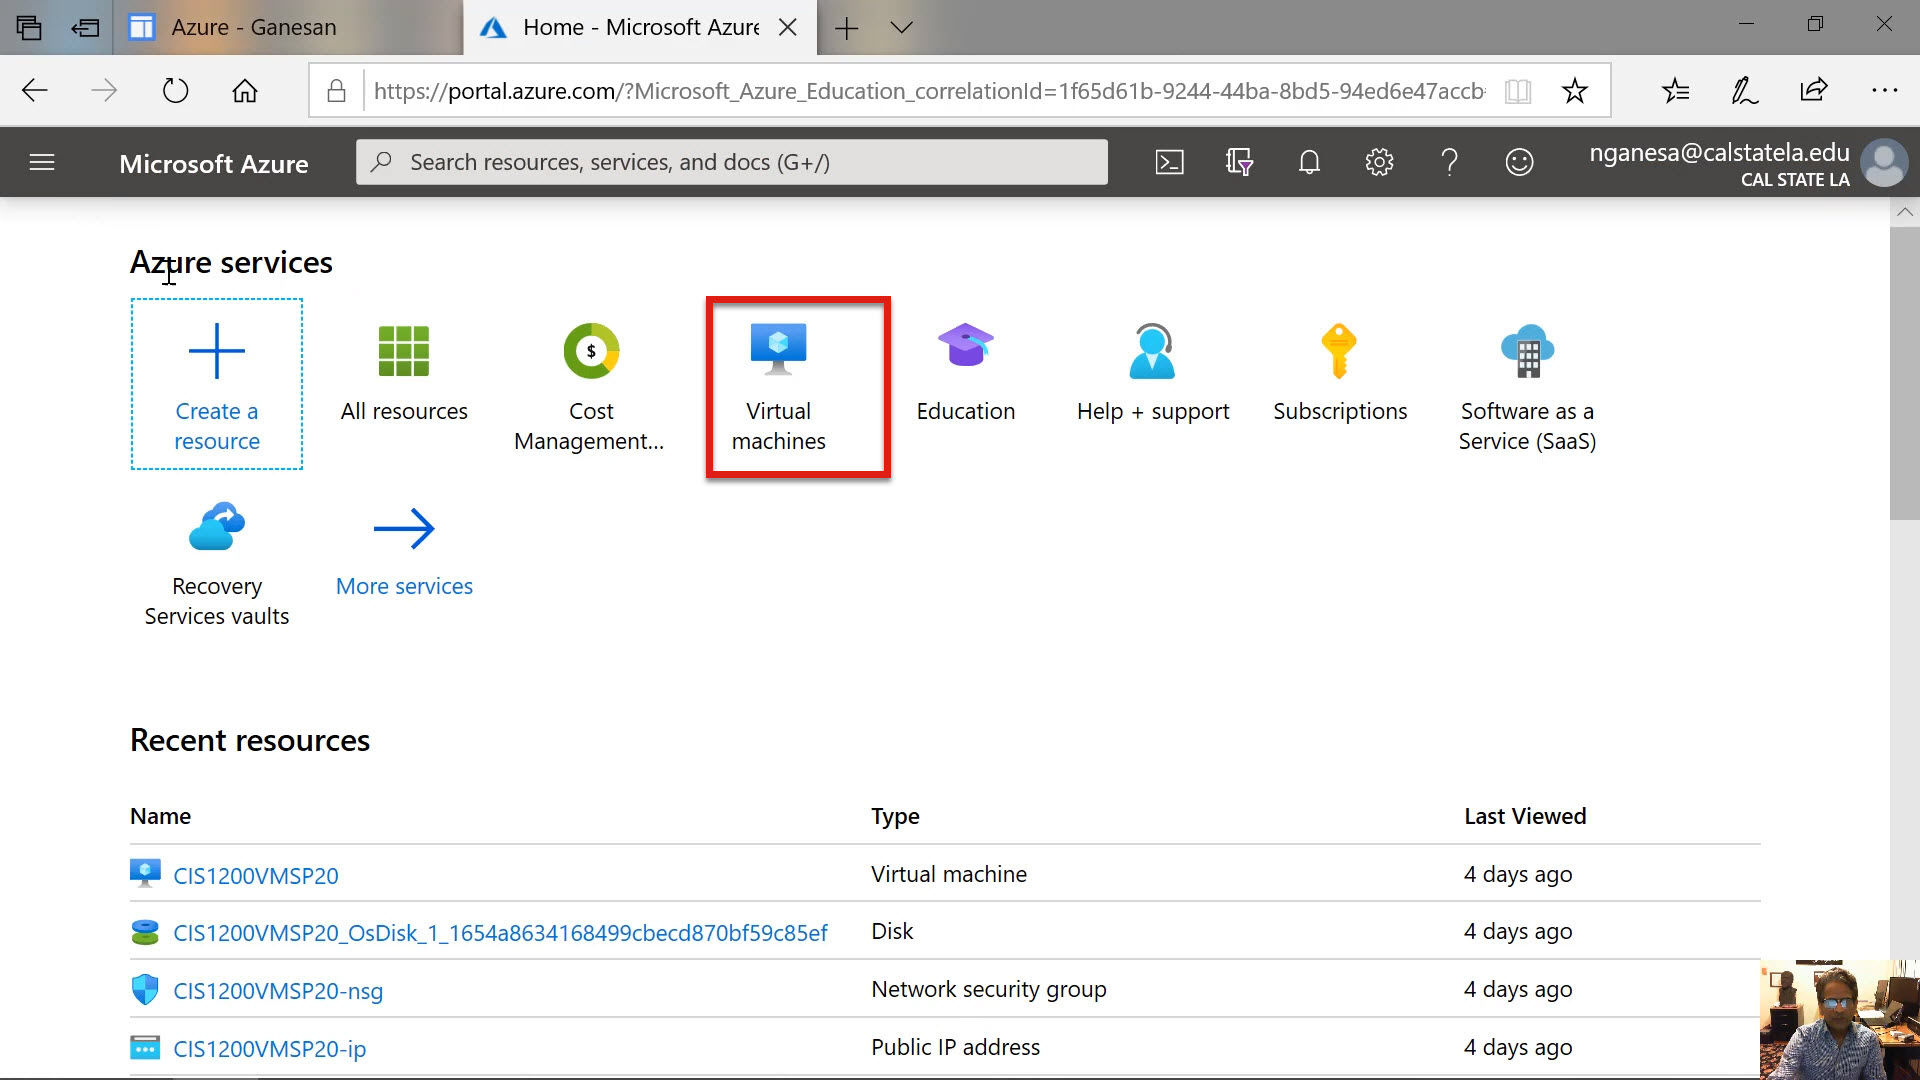
Diagram 8 Selecting the Virtual Machine Creation Option
Click on the create button to start creating the virtual machine as shown in the next diagram.

Diagram 9 Selection to Create the Virtual Machine
Step 4 The Basics: Defining the VM Size
As mentioned earlier, there are seven stages of creating the actual virtual machine. The first stage is to provide a basic configuration. During this stage, and in all other stages as well, several step-by-step selections are to be made.
The diagram below shows the first selection to be made by choosing an appropriate type of subscription. In most cases, there will only be one subscription available in the drop-down menu that would be the Azure for Students subscription.
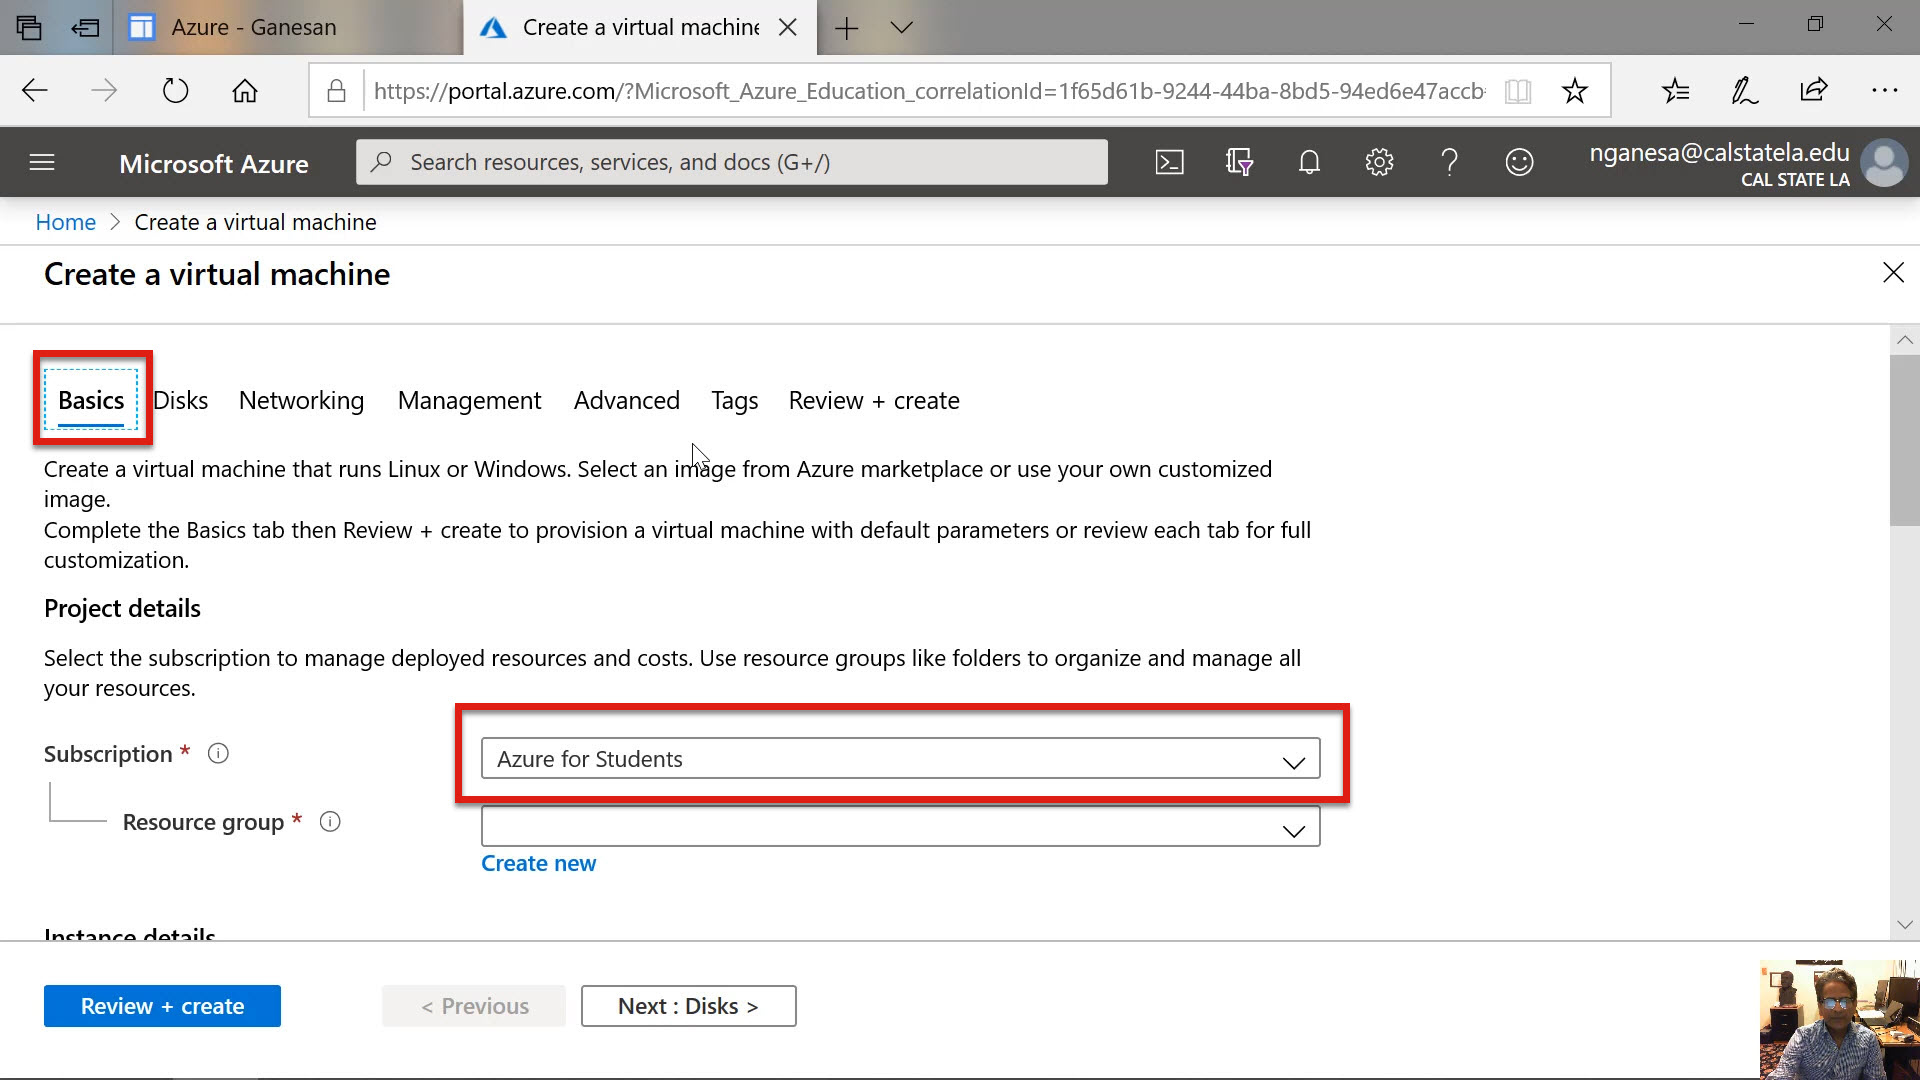
Diagram 10 Selecting the Subscription
Select the Azure for Students subscription, as shown in the diagram above.
The next step is to select a resource group. Since this is the first time a virtual machine is being created, there will be no resource groups already defined. In this case, define a new resource group. It is also possible to choose a resource group from the dropdown menu provided the group has already been created. The resource group is where all the resources that are defined and used for running the virtual machine is grouped. For this example, the resource group CIS1200Spring 2020 is created. Incidentally, a new resource group is created by selecting the option entitled Create New that appears just below the box corresponding to the resource group.
The next step is to name the virtual machine. The name given, in this example, is VM12 as shown in the next diagram. The reason for giving the virtual machine a name is because there can be multiple virtual machines created under Azure. To select and run a particular virtual machine, the name of the machine is required to locate the machine.
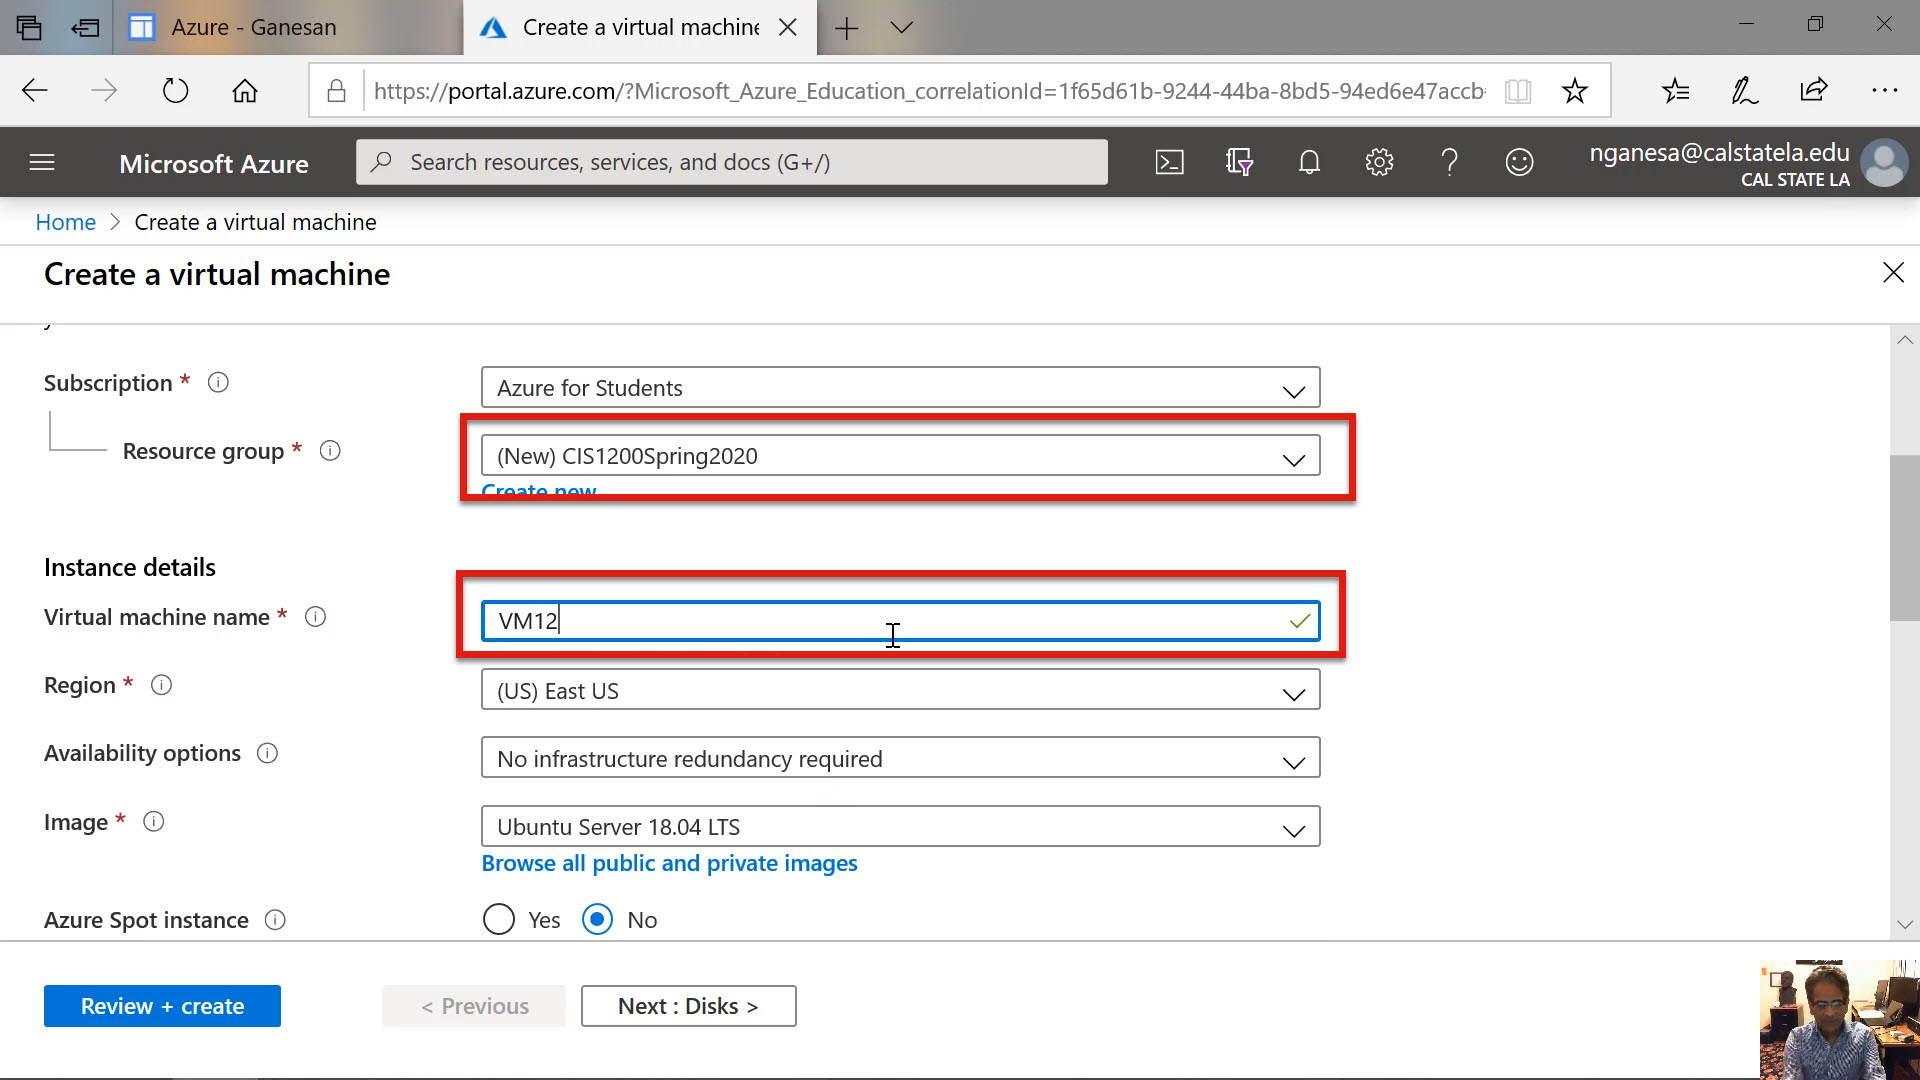
Diagram 11 Selecting the Resource Group
The next selection would be to choose the region where the virtual machine will be hosted. Microsoft runs several data centers in different parts of the United States and in different countries around the world. In this example, the Western United States region is selected as shown in the next diagram. Selecting a region closest to the geographic location of the user is generally preferred.
The next step is to select an operating system. The default operating system Ubuntu is displayed on the screen. In our case, the virtual machine will be configured to run the Windows 10 Pro operating system. From the dropdown menu, choose the Windows 10 Pro operating system as the image to be installed. The next diagram illustrates the selection.
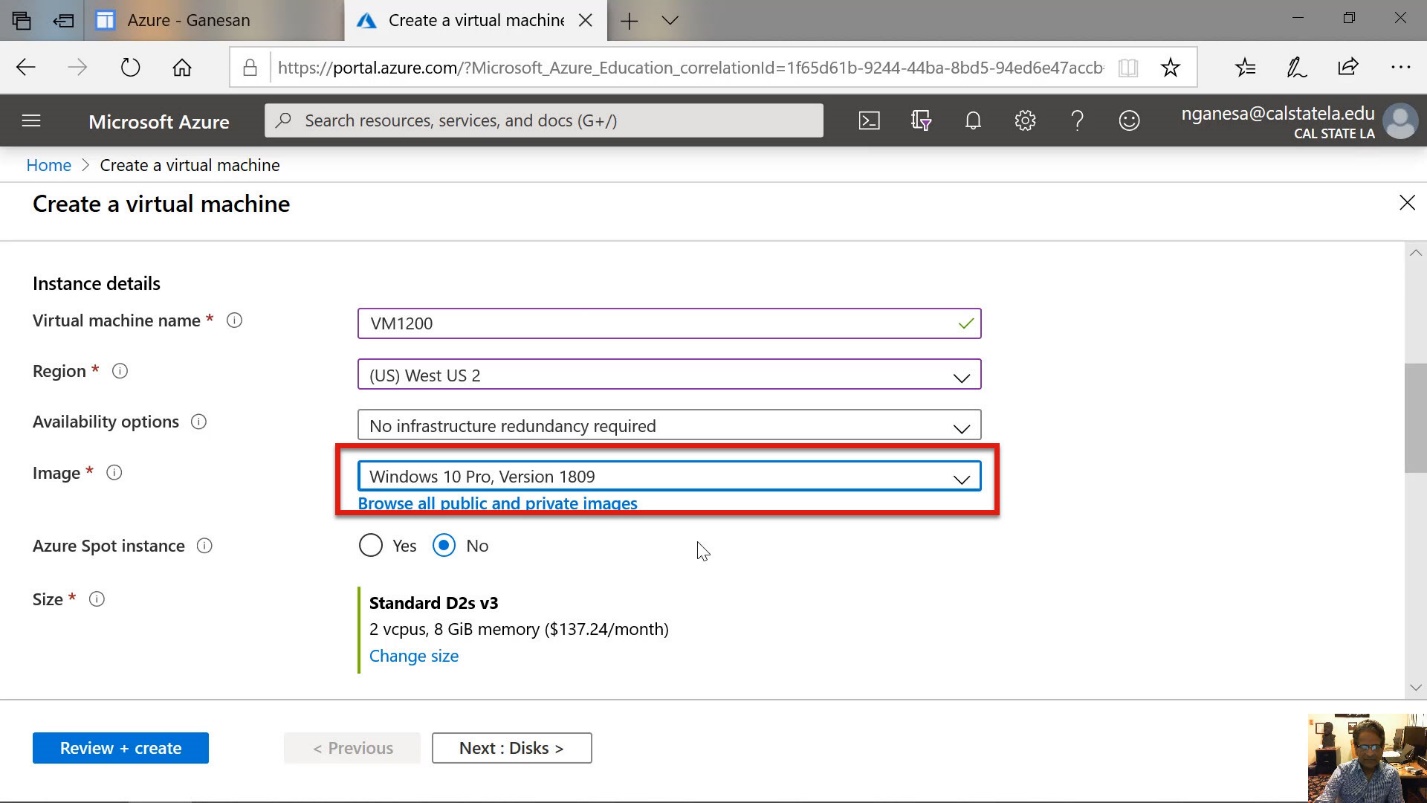
Diagram 12 Selecting the Operating System
The default processor/memory combination of the Virtual Machine (VM) is displayed below the box for selecting the operating system. The next step is to choose a different processor/memory combination if needed. The power of each combination varies. Each processor/memory combination is associated with a service charge expressed in dollars per minute.
Azure refers to the processor/memory specification as the size of the Virtual Machine (VM). Depending on the size of the VM, the charges differ. More powerful machines are obviously more expensive. To change the VM size, click on the option below the processor description that says Change Size, as shown in the following diagram.
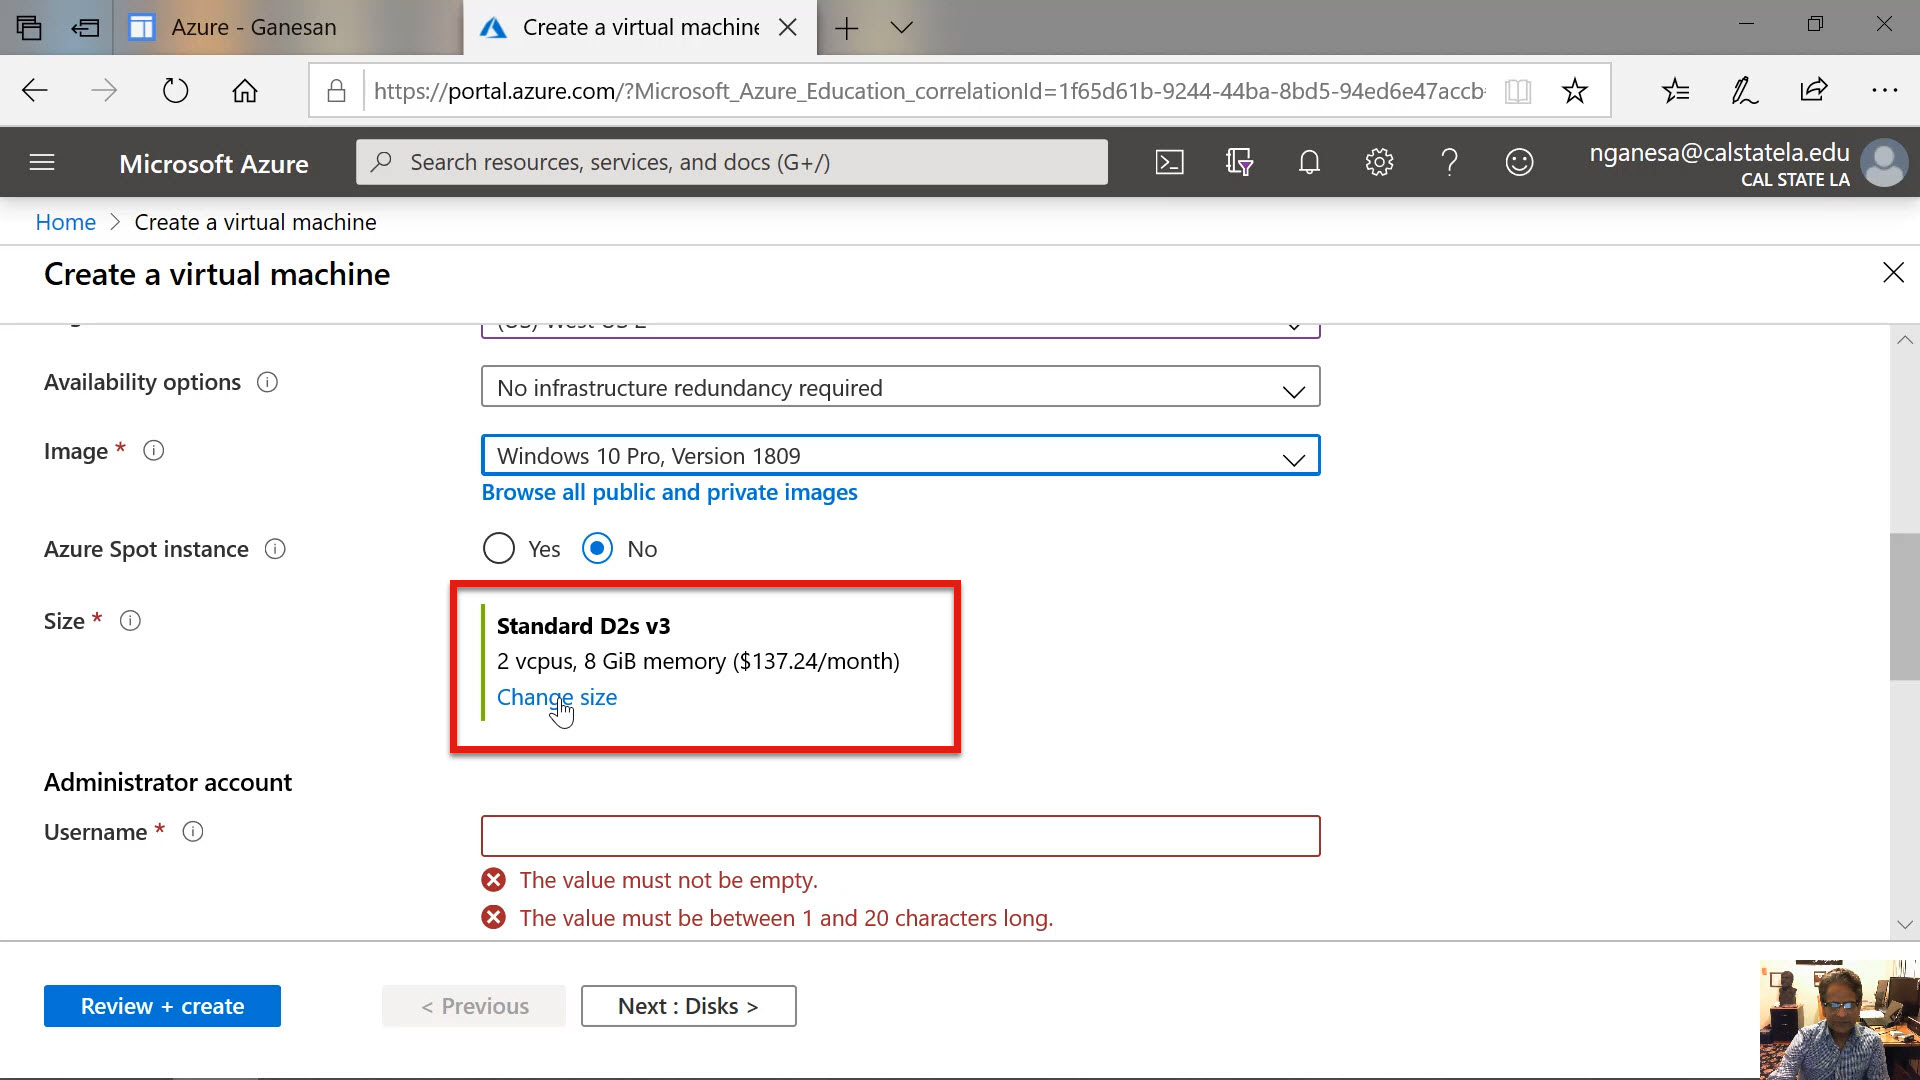
Diagram 13 Selecting the VM Size
It is important to note that the memory capacity is also chosen along with the processor. Consider the VM size labeled A2V2, for example. The VM, in this case, will have two virtual CPUs. The associated memory is 4 Gigabytes. Four data disks are associated with the selection. There are also other attributes, such as the maximum Input Output Operations per Second or (IOPS), applicable to this selection. At the very end of the selection, the cost of using the VM machine, corresponding to each VM size, is displayed.

Diagram 14 VM Sizes and Service Costs
The next diagram shows the cost structure. As anticipated, higher-powered VM machines are more expensive. For example, the VM size labeled A2MV2 will cost higher to use compared to the VM size labelled A2V2. It is because A2MV2 has more memory than A2V2. For this lab exercise, the A2V2 machine is sufficient to run the required programs. Therefore, select the A2V2 virtual machine configuration.

Diagram 15 Selected the VM Size (A2V2)
The diagram shows that the A2V3 virtual machine has been chosen.
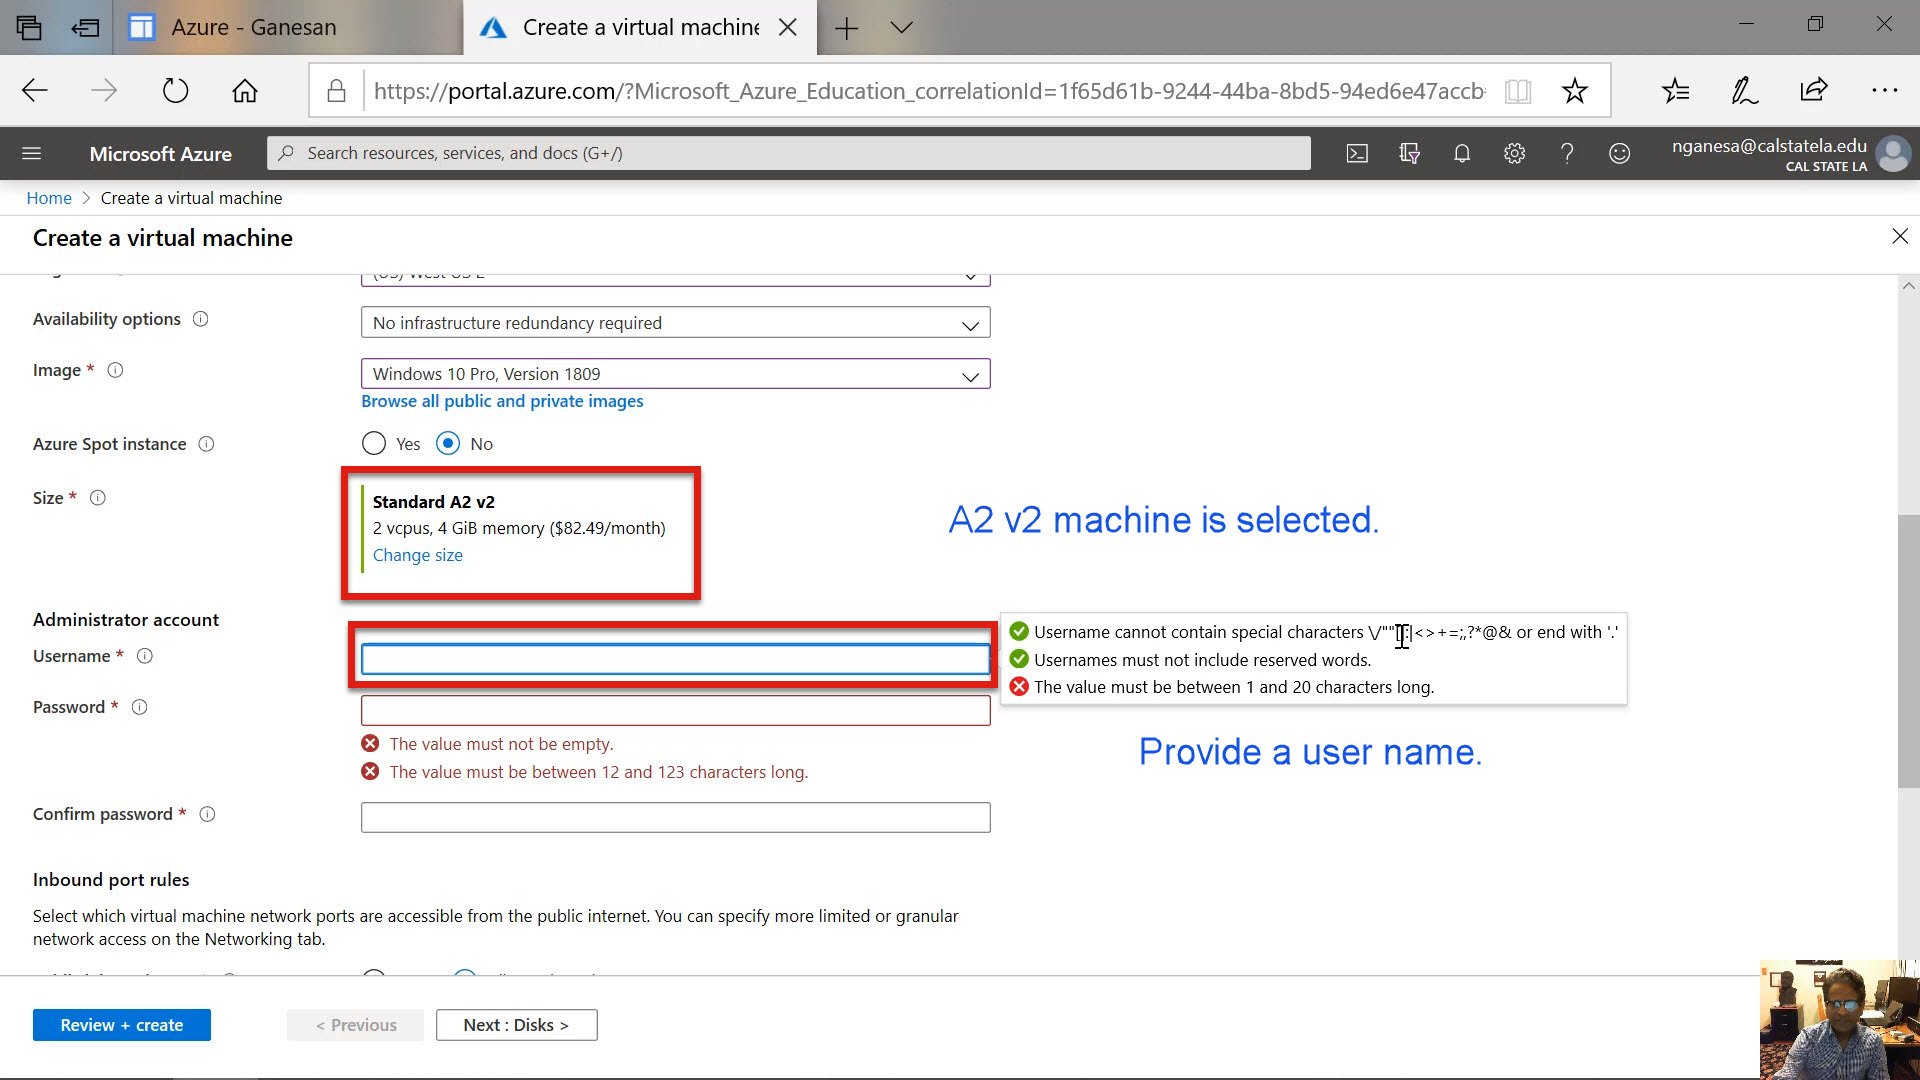
Diagram 16 Providing Username and Password for the Administrator
The next step is to specify the administrator’s username and password. These are the credentials needed to first log into the virtual machine. As in similar instances, there are specific restrictions that apply to the username and the password. They are displayed in the previous diagram. It is essential to follow the guidelines to be able to specify an acceptable username and password. The masked username and password entries are shown in the next diagram.
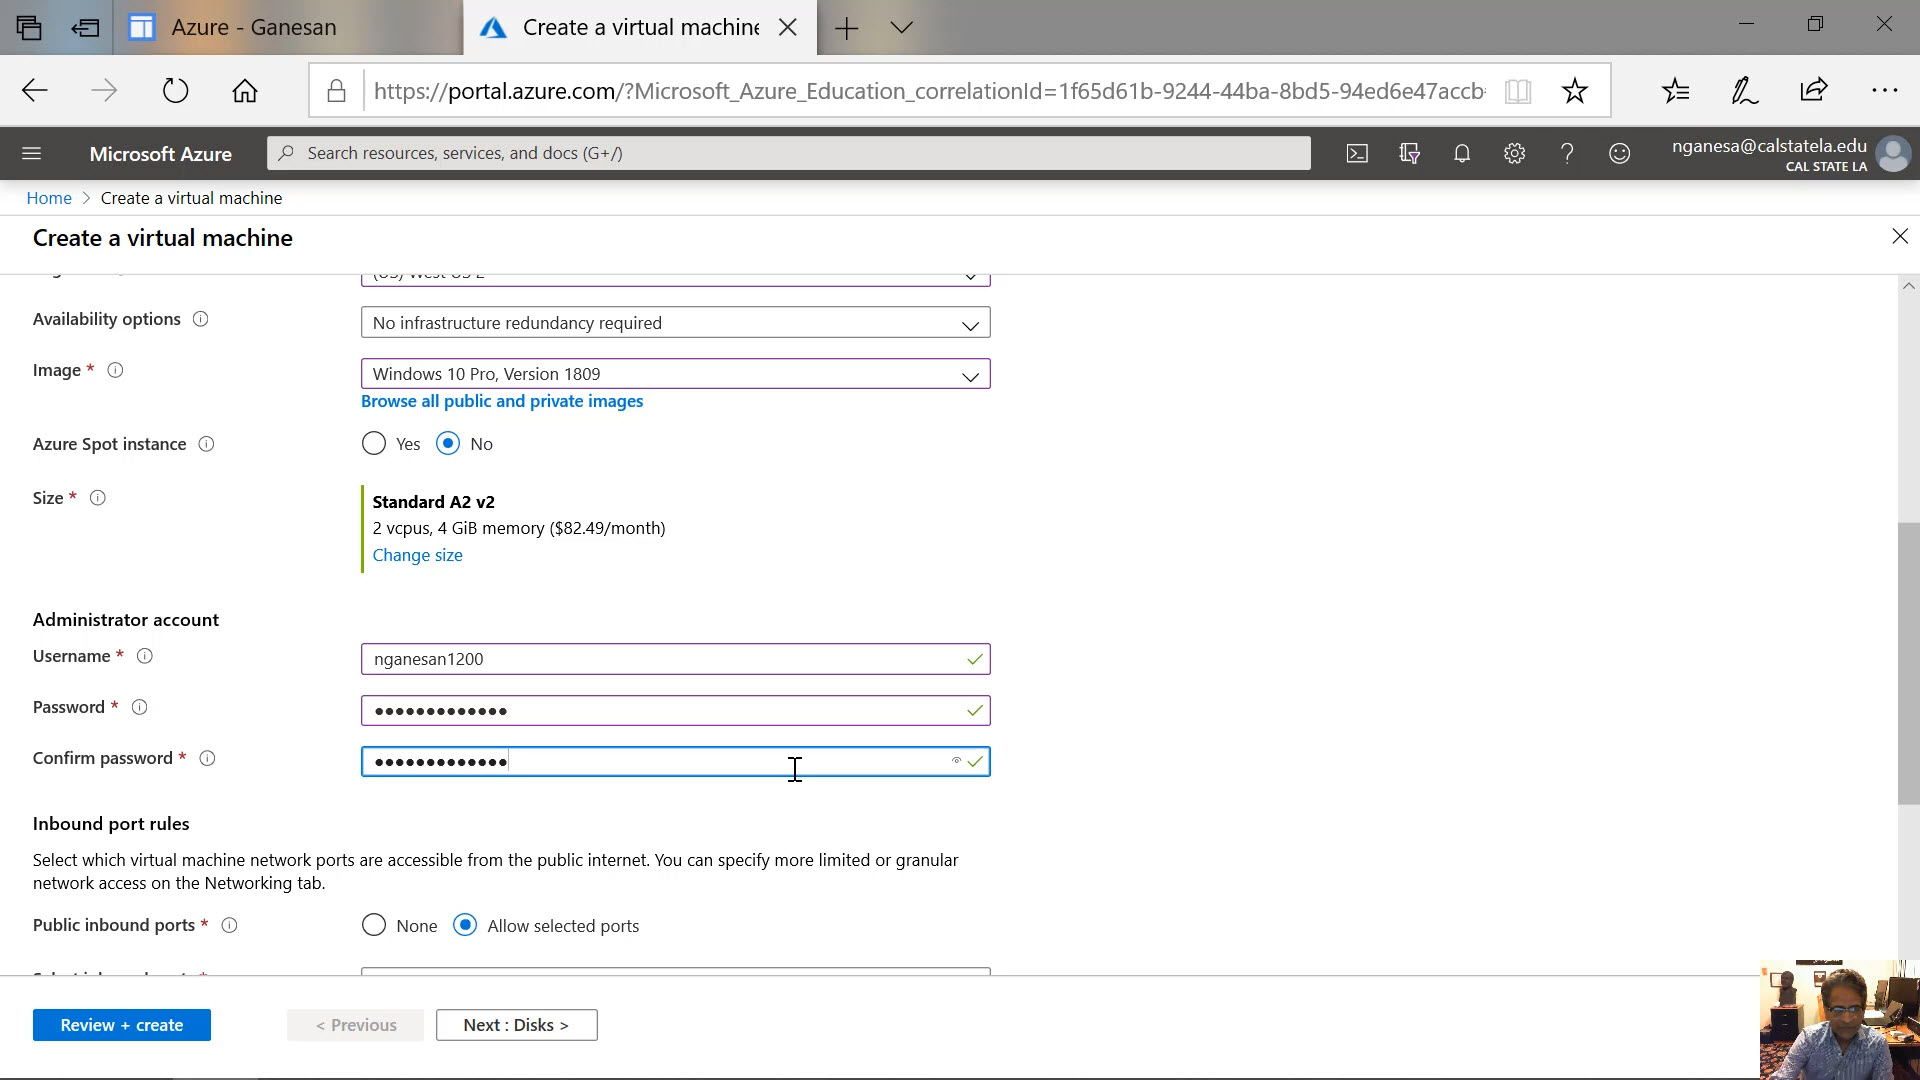
Diagram 17 Username and Password Entered According to the Guidelines
The next step is to facilitate access through the firewall to some of the ports. One of the ports is already designated to allow access to the computer for communications involving the RDP protocol. The associated port number, in this case, is 3389. The port would allow the virtual machine to be accessed and configured, as needed, using the Remote Desktop app. It is, therefore, necessary to leave the selection intact. Again, a warning message is displayed indicating that access through this port should be limited to only testing the VM. In another tutorial, the proper way to access the virtual machine, other than accessing it through the port 3389 using the Remote Desktop app, is discussed.
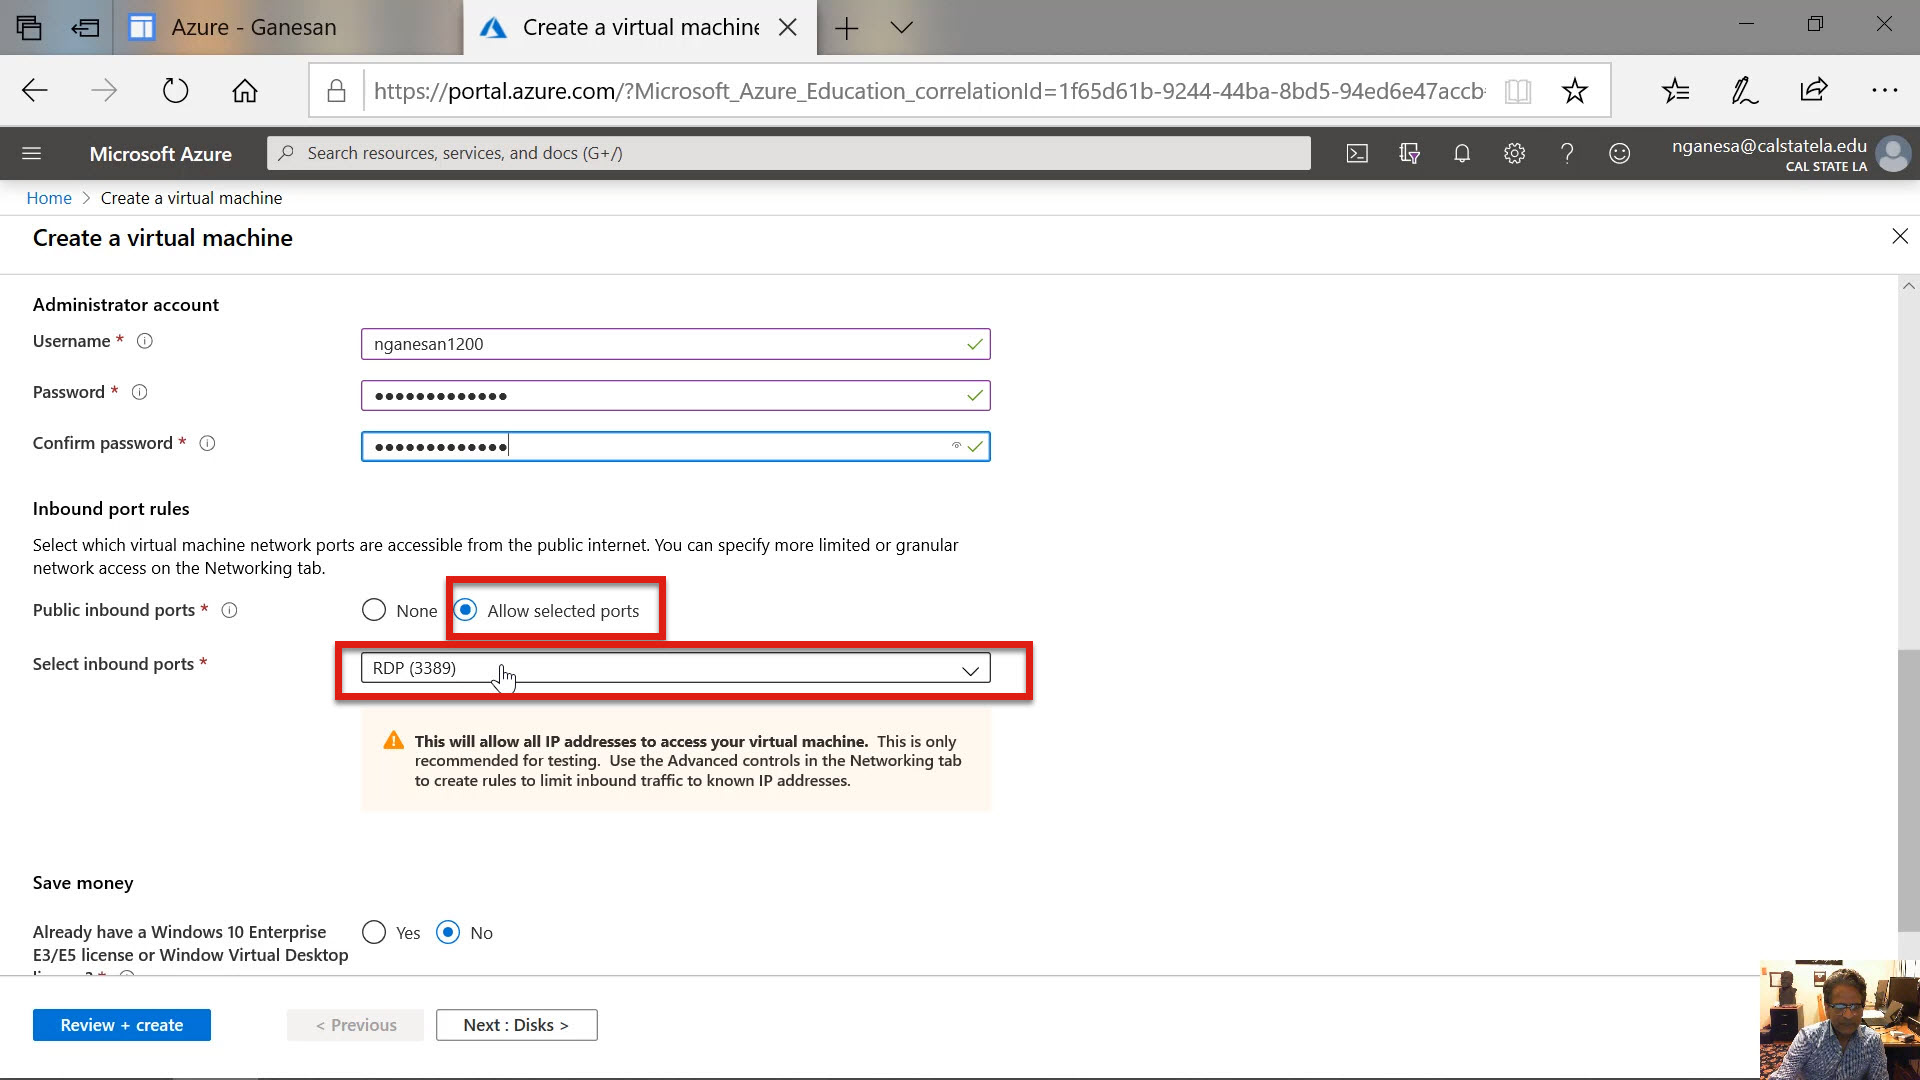
Diagram 18 Opening the RDB Port for Accessing the Virtual Computer
At this time, a license key for the Windows 10 Pro operating system can be provided. In this case, the user must already possess a license to the operating system. By providing the license key, the cost of using the virtual machine can be reduced. For this example, a key will not be provided.
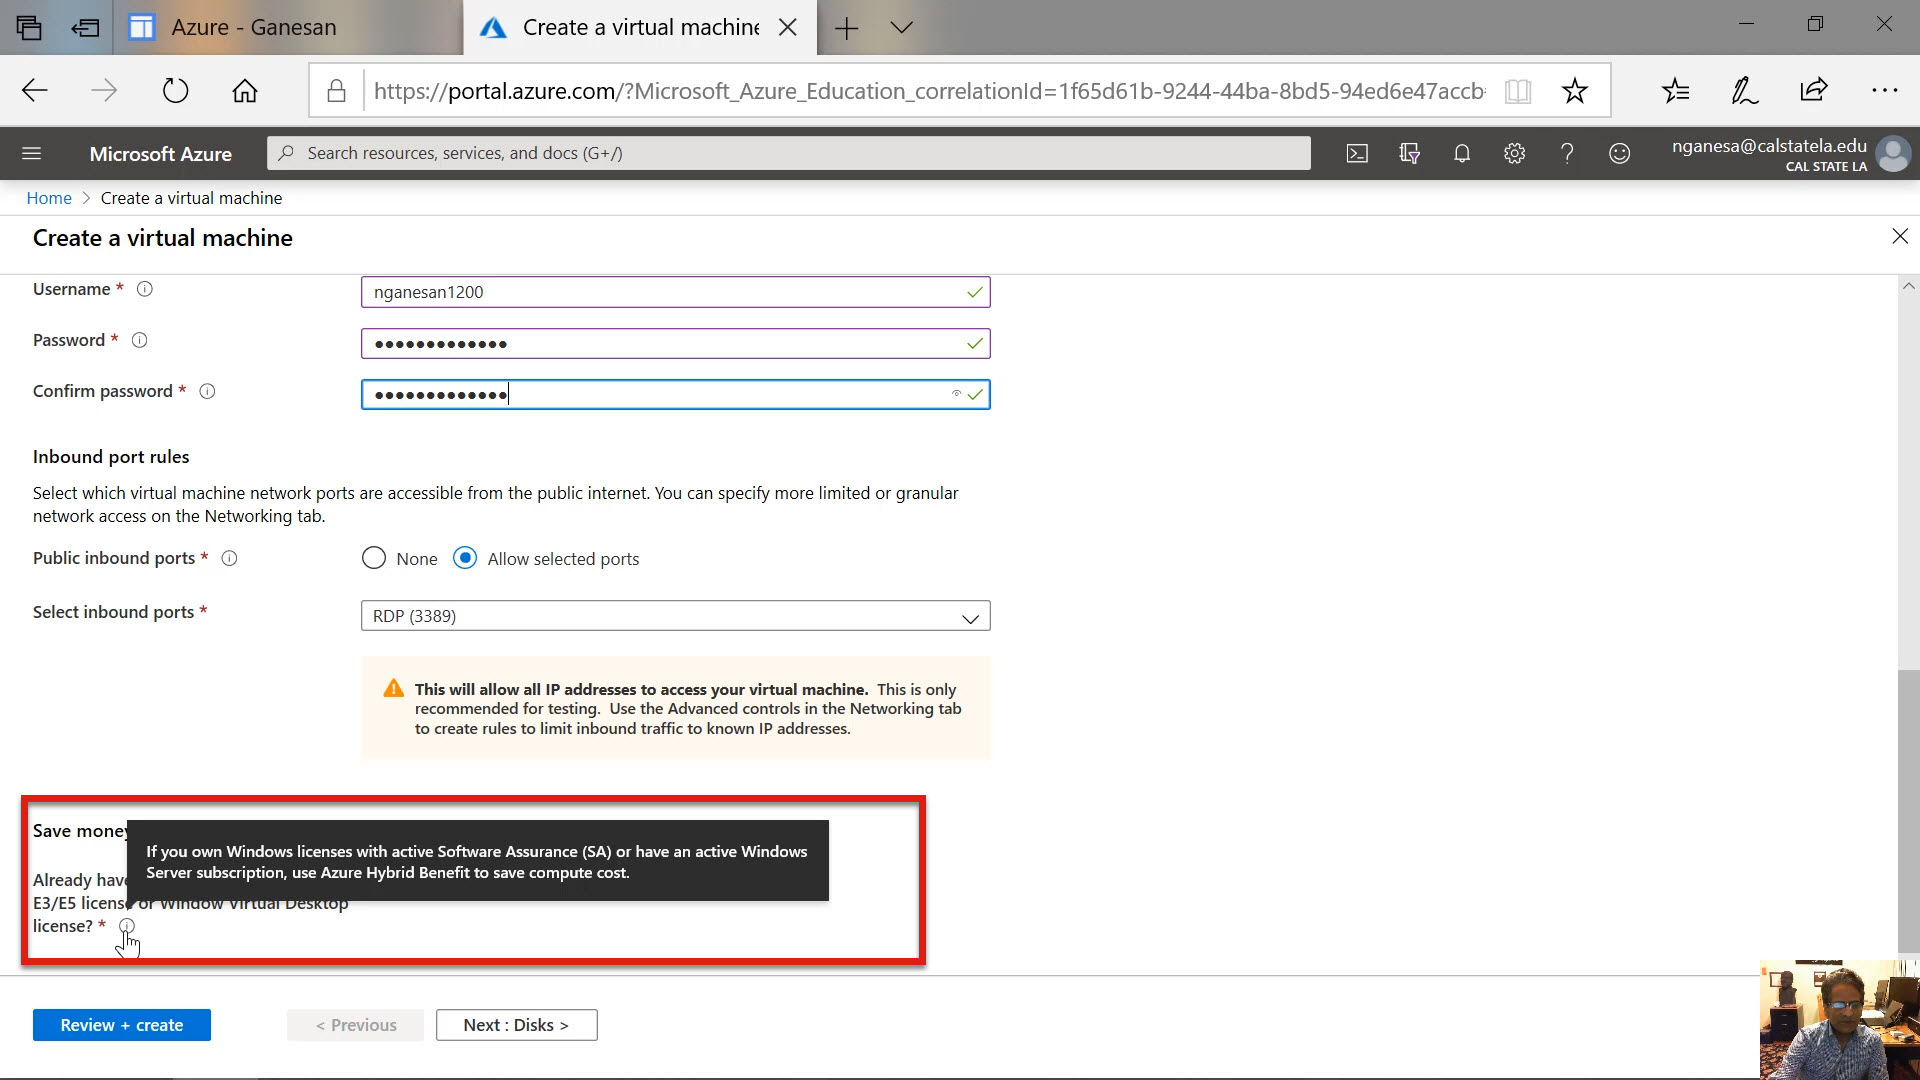
Diagram 19 Providing the Windows Key If Available
Step 5: Creating and Attaching Disk Storage
The next step is to select and attach a disk storage by first clicking on the Next Disks button. There are different types of disks available for selection. They include the standard HDD and the SSD disks. A premium version of SSD is also available. In general, the SSD disks provide better fault tolerance. Therefore, select the standard SSD disk as the storage device for the VM, as shown in the next diagram.
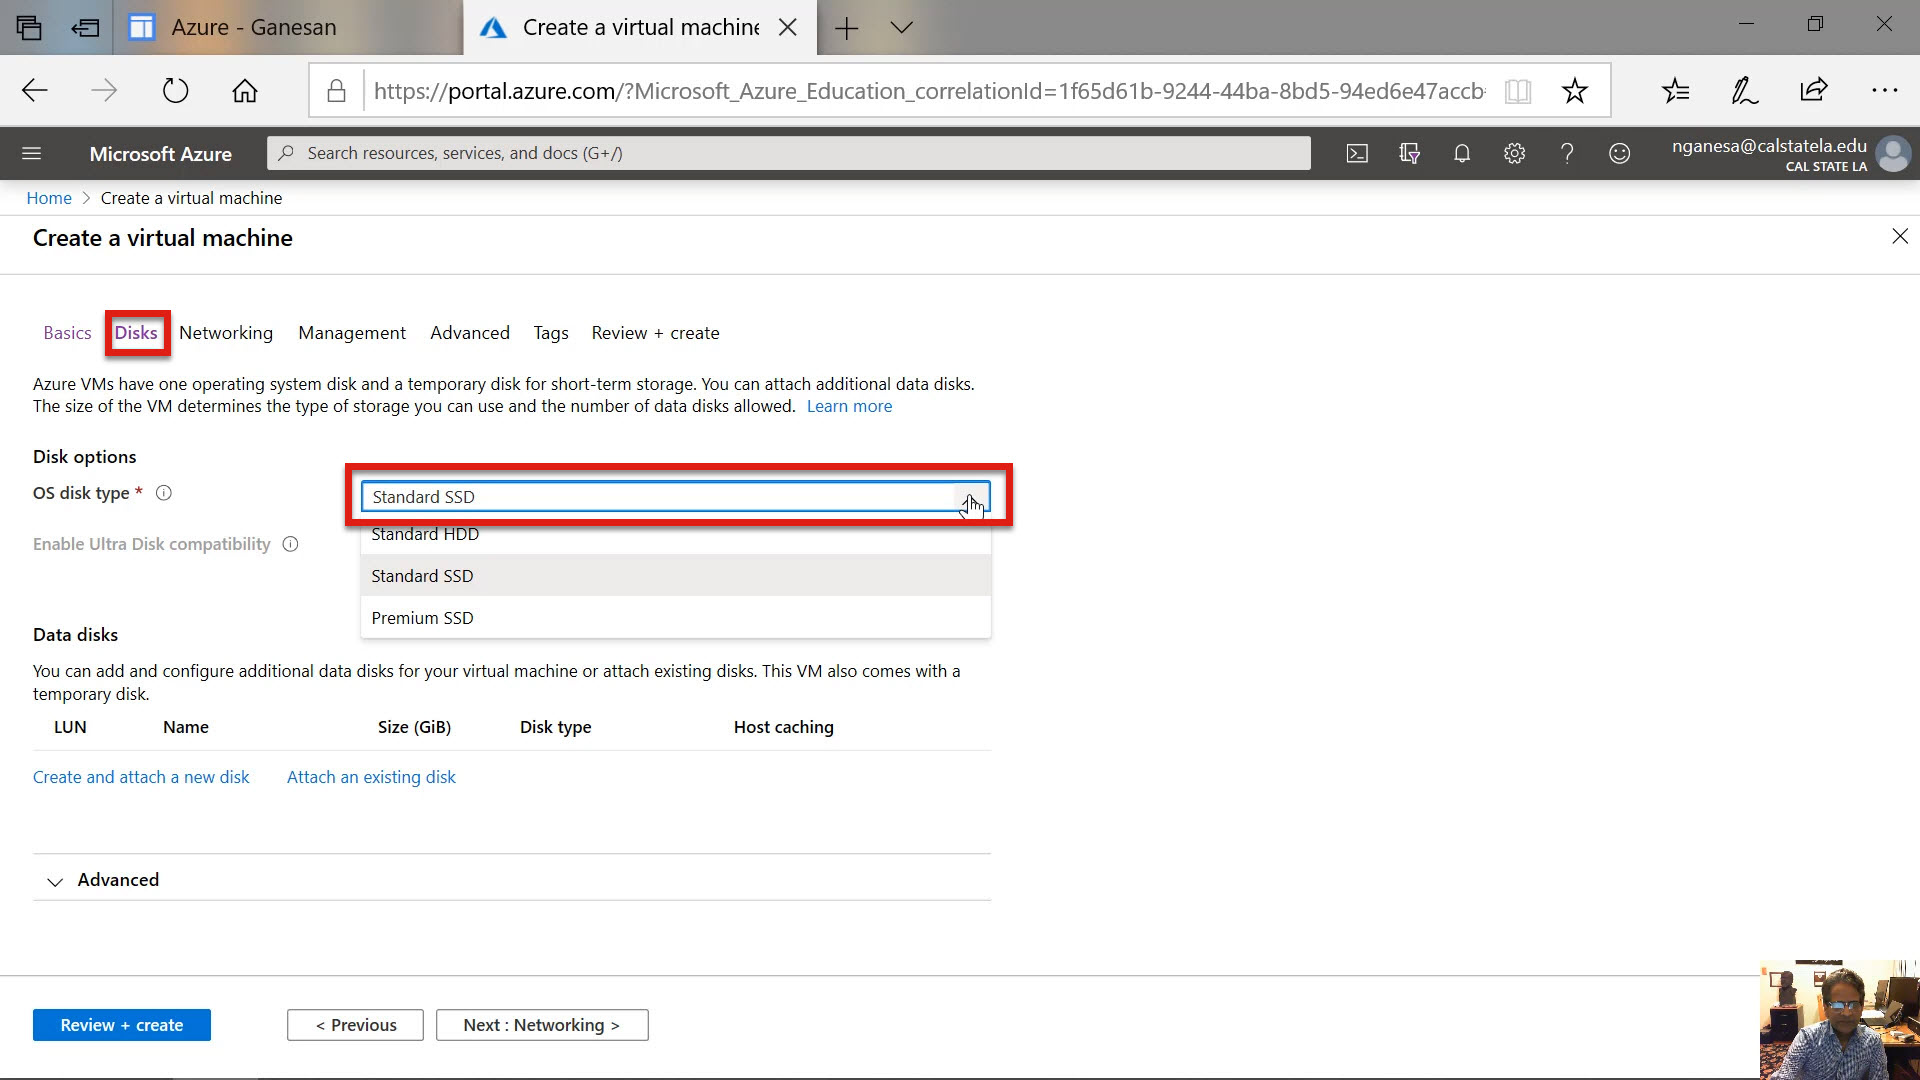
Diagram 20 Selecting a Standard SSD Disk
Once the disk is chosen, the next step is to state whether the disk is to be managed or not managed. Select the Use Managed Disks option because it provides better performance, reliability, and scalability.
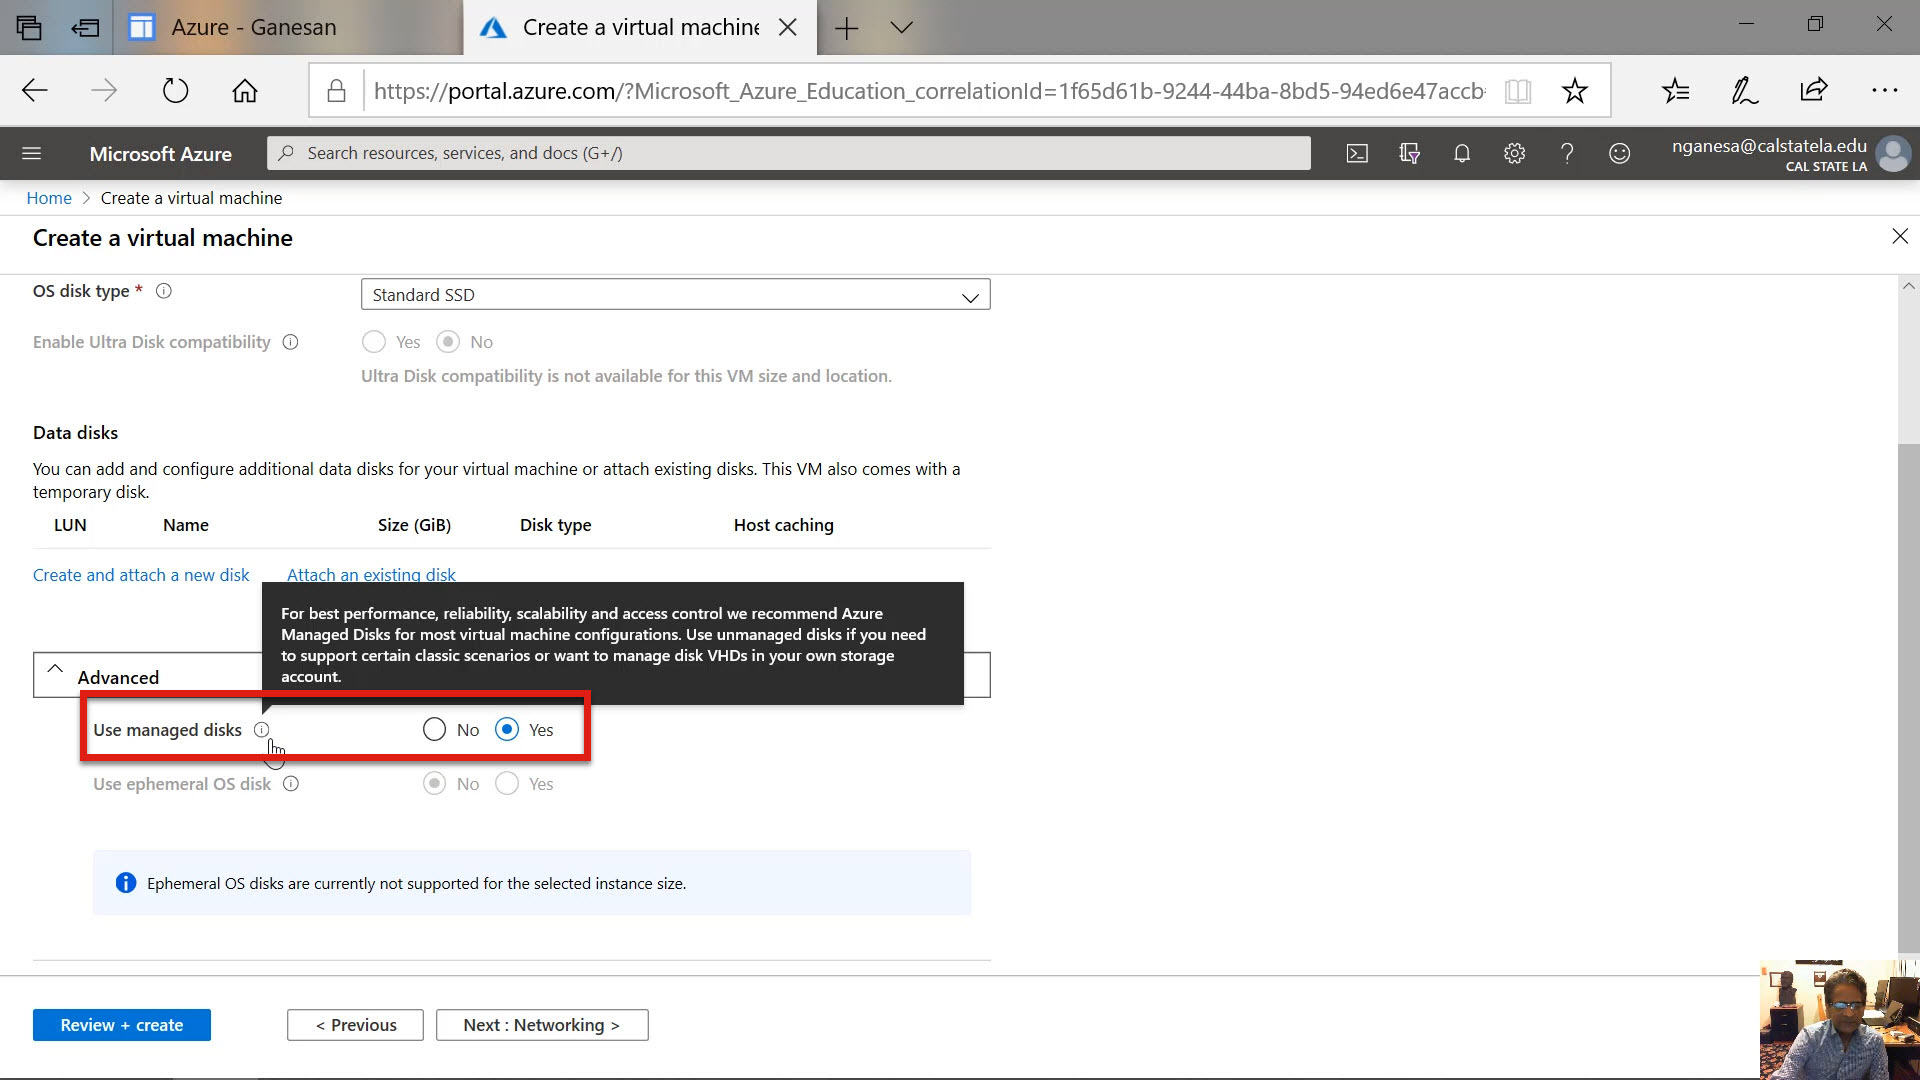
Diagram 21 Selecting the Option to Use Managed Disks
Step 6: Defining the Network
The next step is to define the network for the computer to join. Since a standalone Windows 10 virtual computer is being created, the de facto values are acceptable as the computer need not be technically connected to a network. Therefore, the values displayed for the different options on the screen can left unchanged, as shown in the next two diagrams.
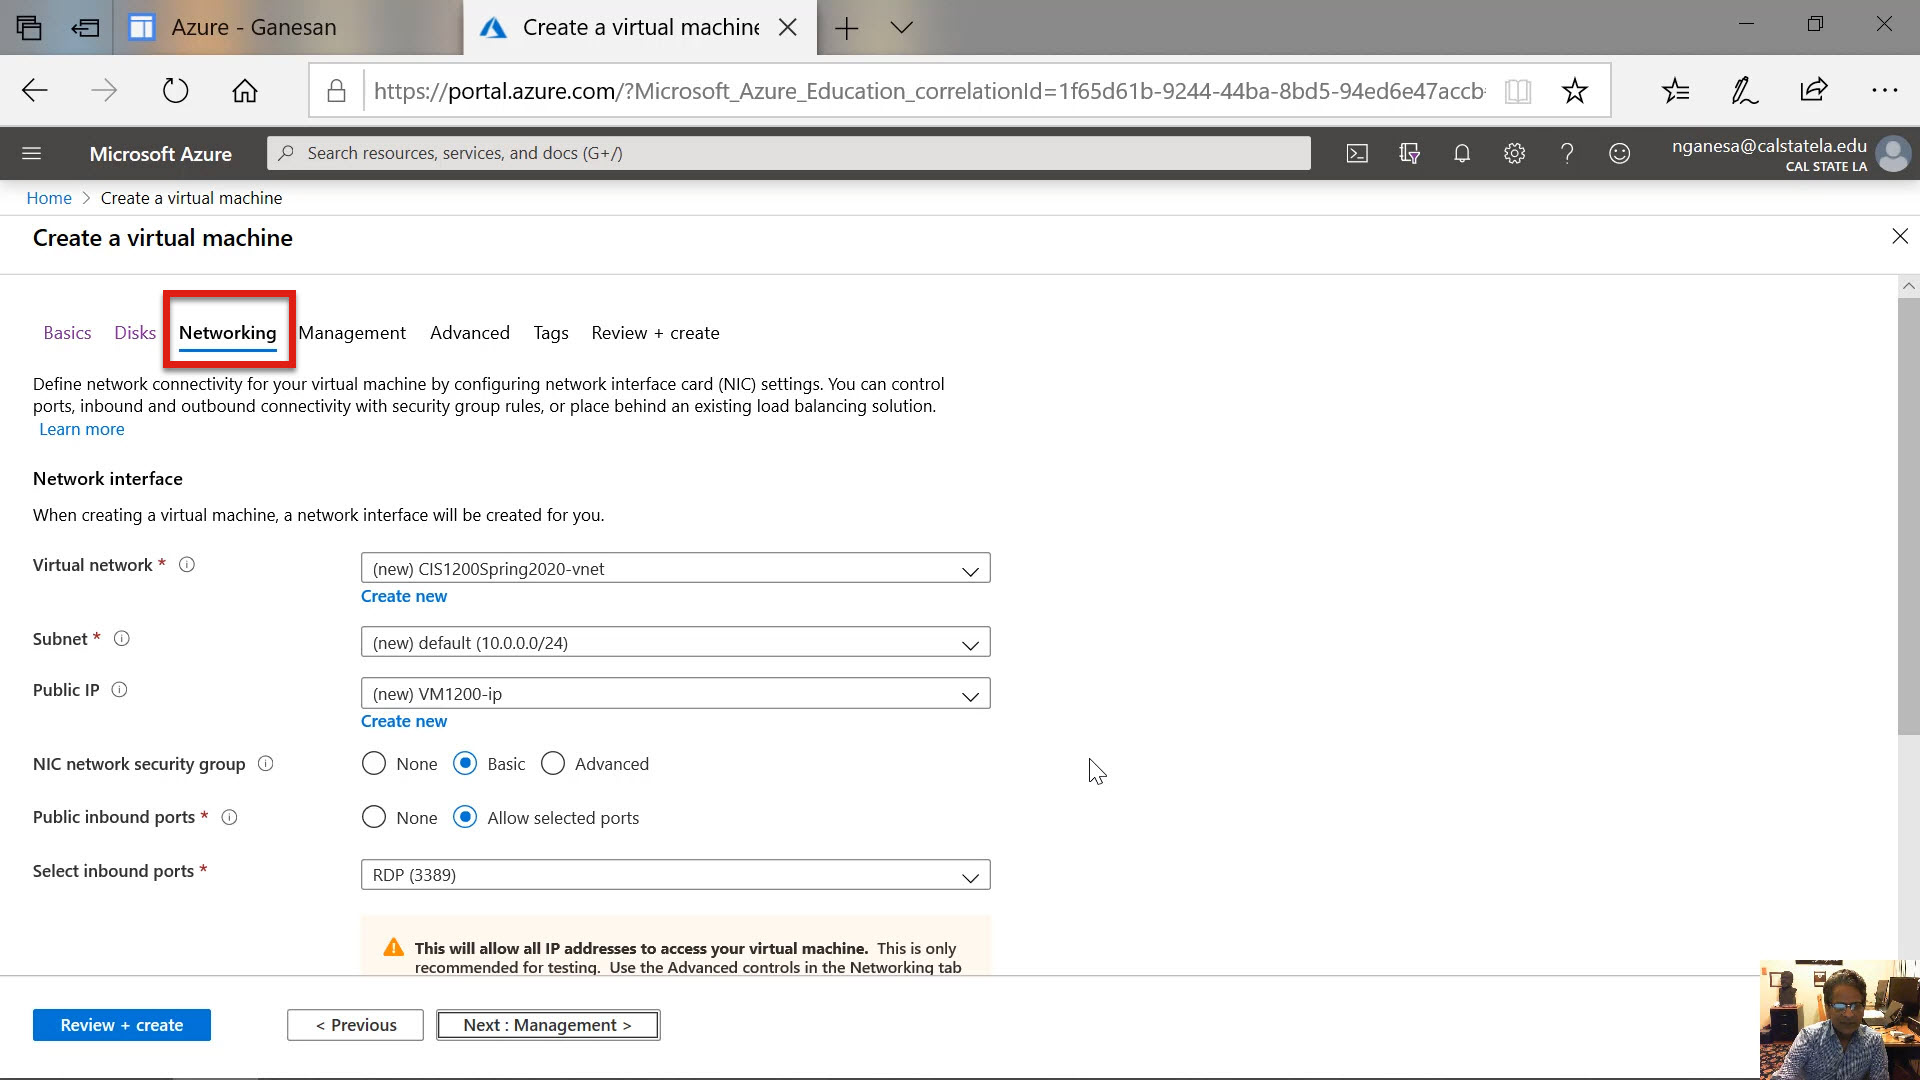
Diagram 22 Moving to the Next Stage to Define the Networking Parameters
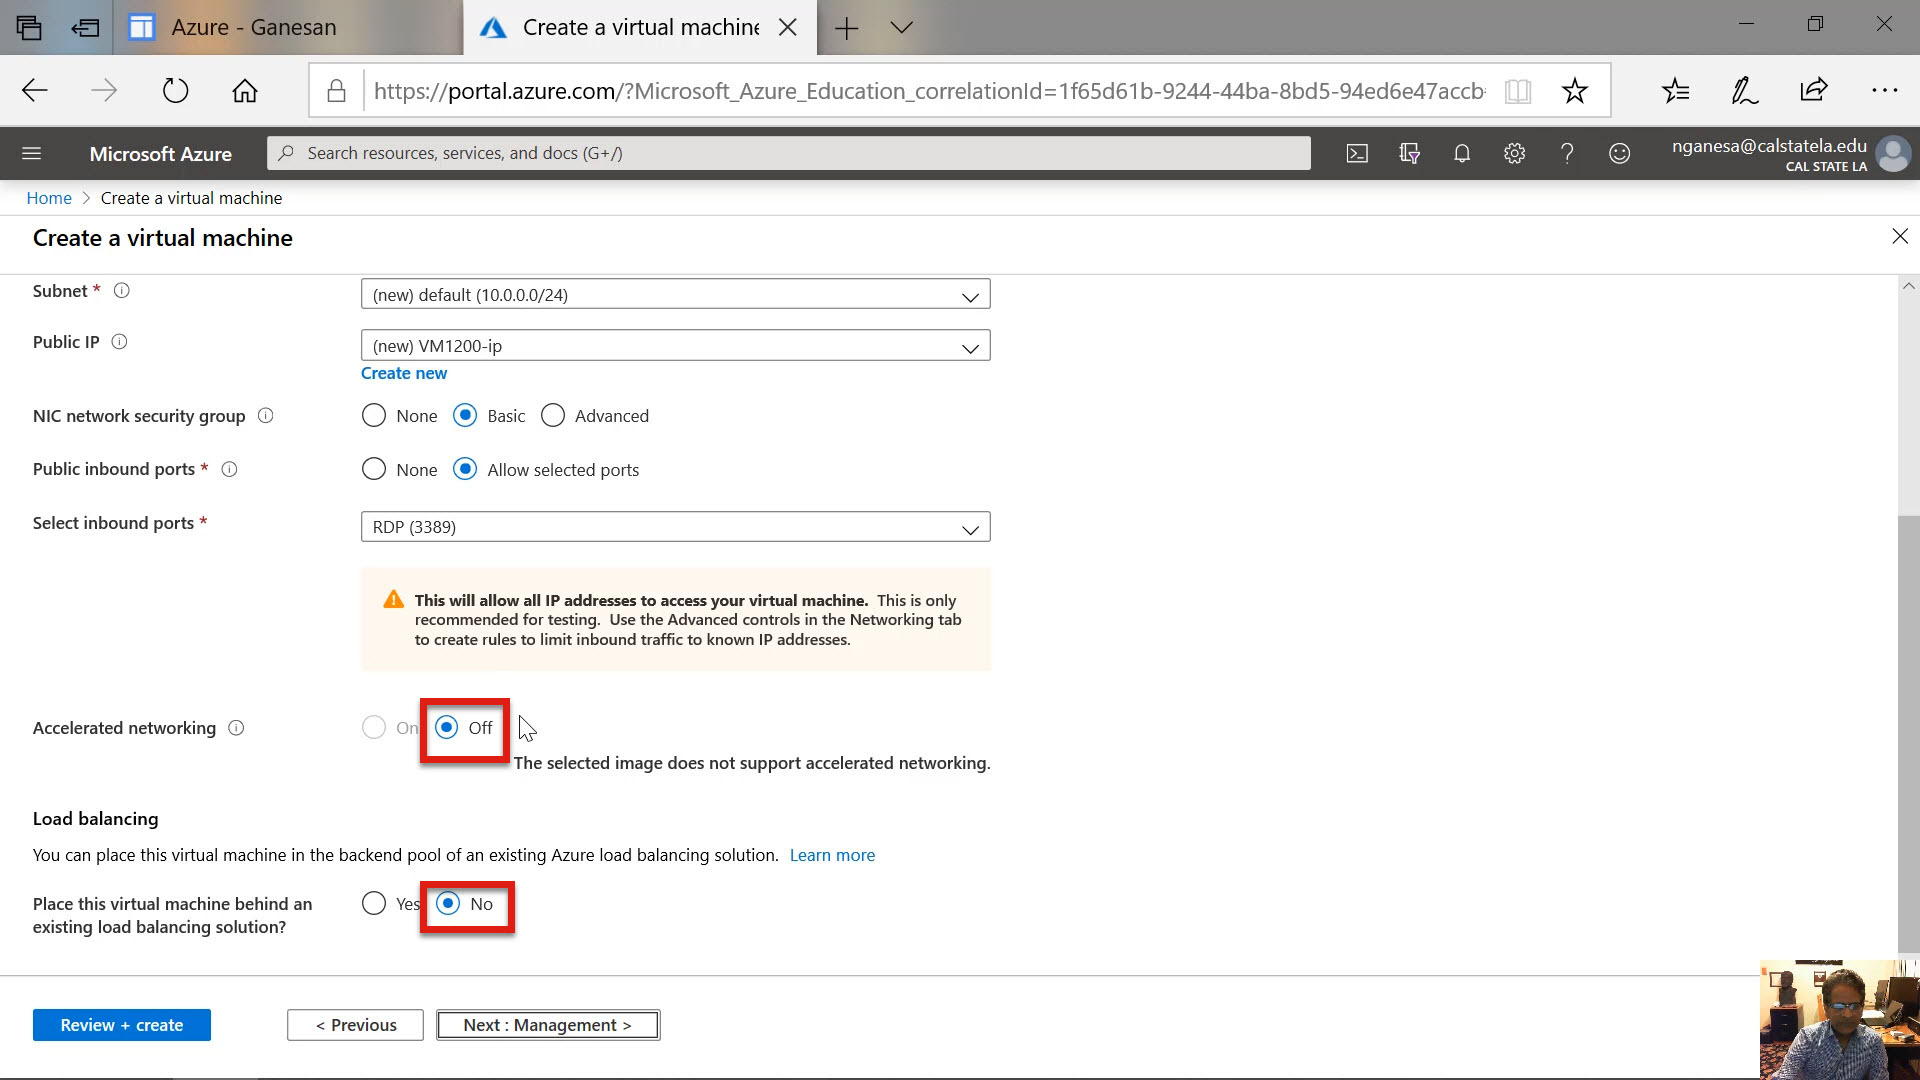
Diagram 23 Leaving the Default Values Unchanged
Step 7: Configuring the Management of the VM
The next step is to specify the management attributes for the virtual machine. Here again, most of the pre-selected values are acceptable except for the default setting of the auto-shutdown option. By default, the auto-shutdown option is turned off. It needs to be turned on. The reason is to prevent the virtual machine from running unnecessarily incurring additional costs when it is not being used or utilized. In a subsequent tutorial, the proper way to start and stop a virtual machine will be discussed. It is important to manage the virtual machine by properly starting and stopping the machine in order to reduce the cost of using the machine. At this stage, therefore, click the button to turn on the auto-shutoff feature. The next two diagrams show the upper part and the lower part of the management screen indicating the selections in force for various options. The lower part of the management screen shows that the auto-shutdown feature is now turned on.
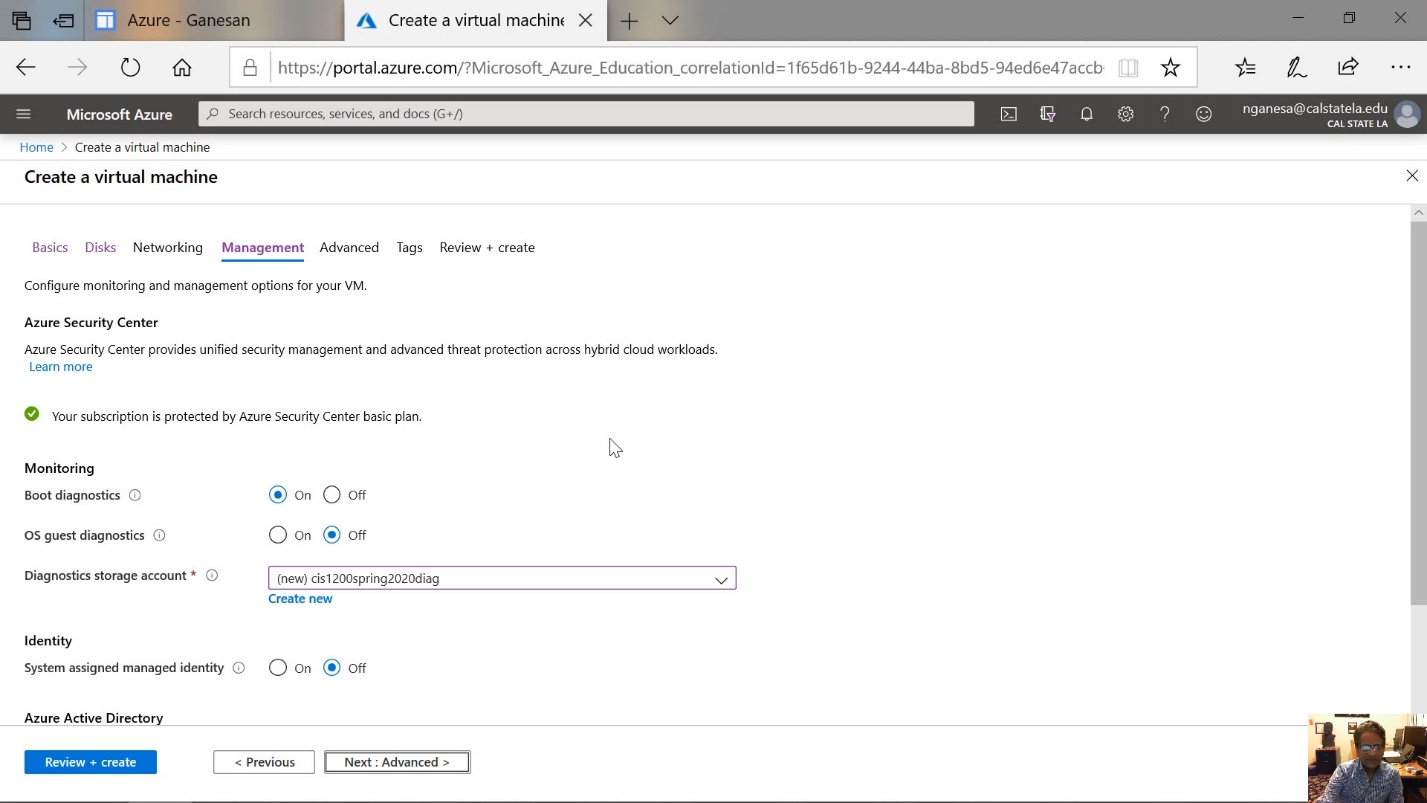
Diagram 24 Moving to the Management Stage to Define the Parameters
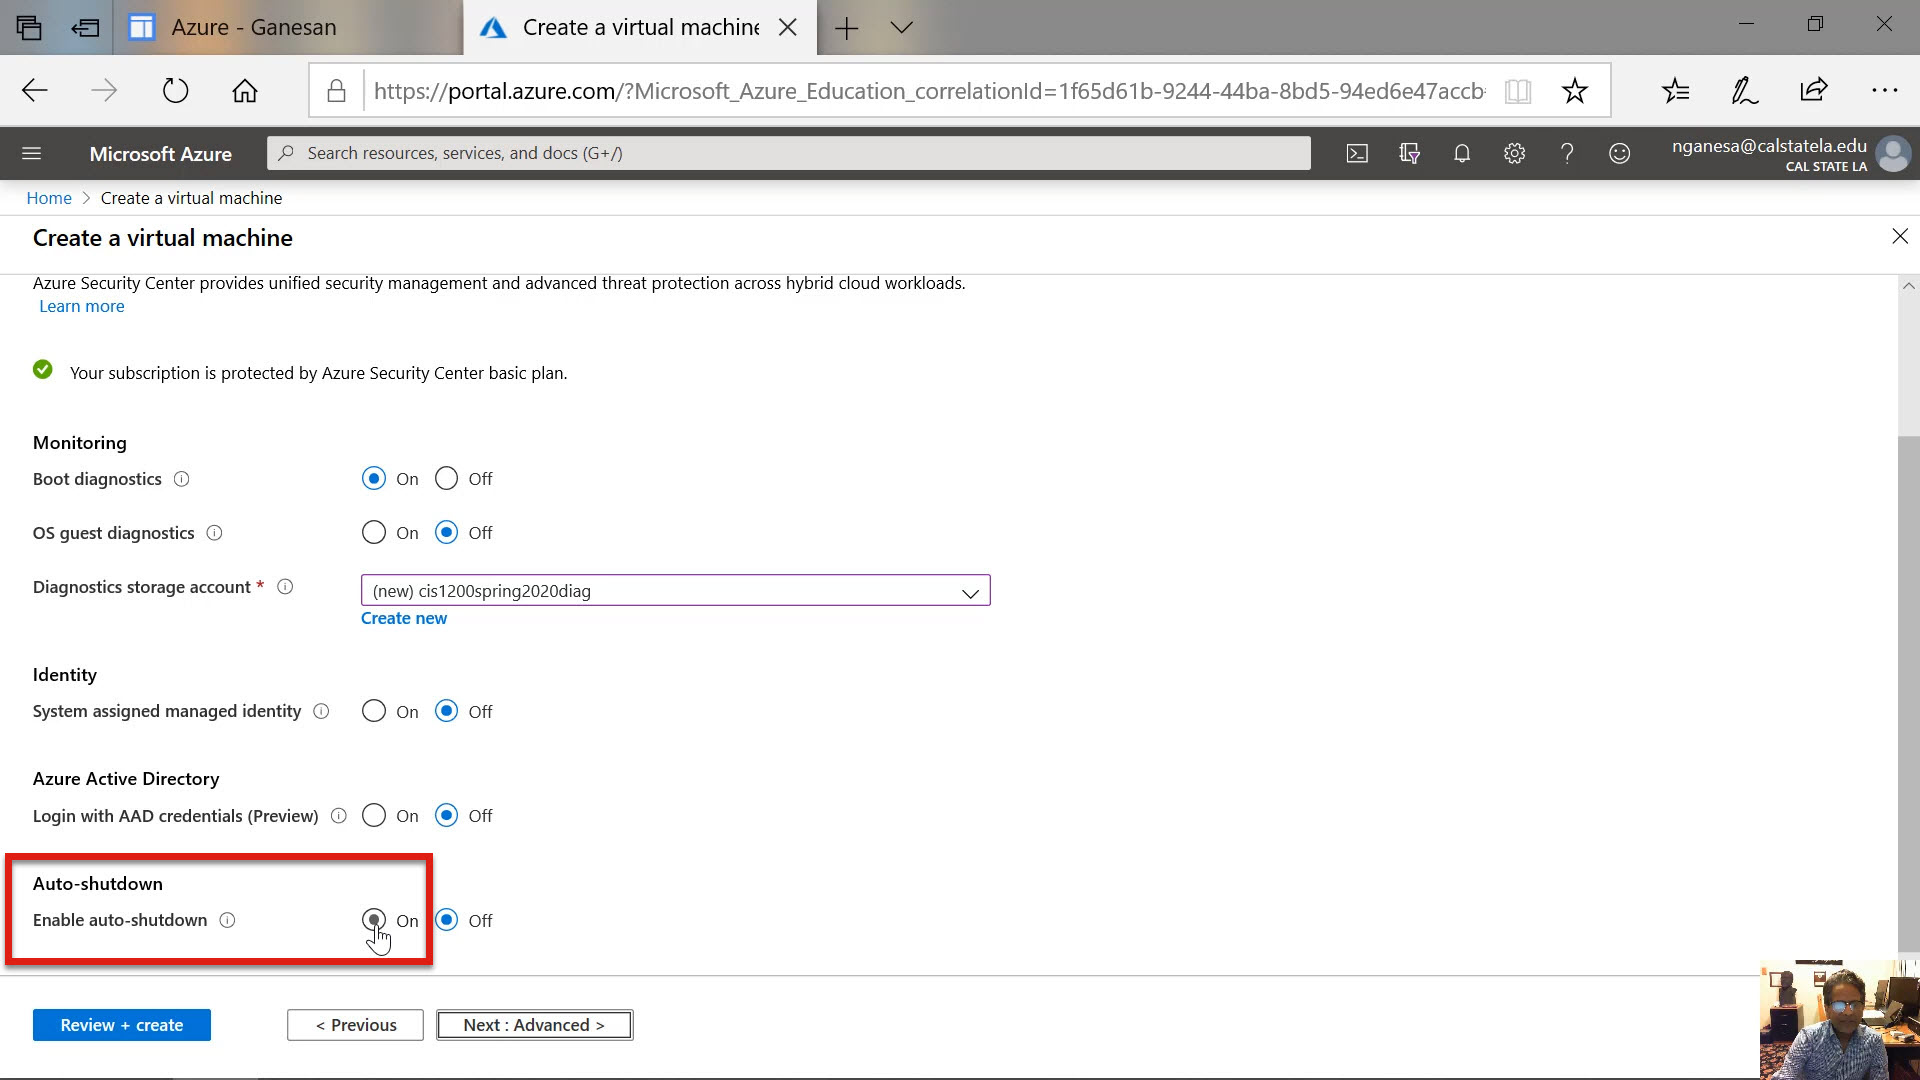
Diagram 25 Enabling Auto-Shutdown
Step 8: Configuring the Advanced Features
Step 9: Assigning a Tag
Now, click the next button shown in the previous diagram to move to the next step where, if needed, a tag can be assigned to the virtual machine. When there are numerous virtual machines and resources configured, it is sometimes easier to identify the machines or the resources by using tags. Since only one virtual machine is now being created, it is not necessary to assign a tag to the machine. Therefore, the button for reviewing and creating the machine can now be clicked. This would move the virtual machine creation process to its final stage. It might sometimes take some time for the next screen to display because Azure will now start validating all the selections that were made previously.
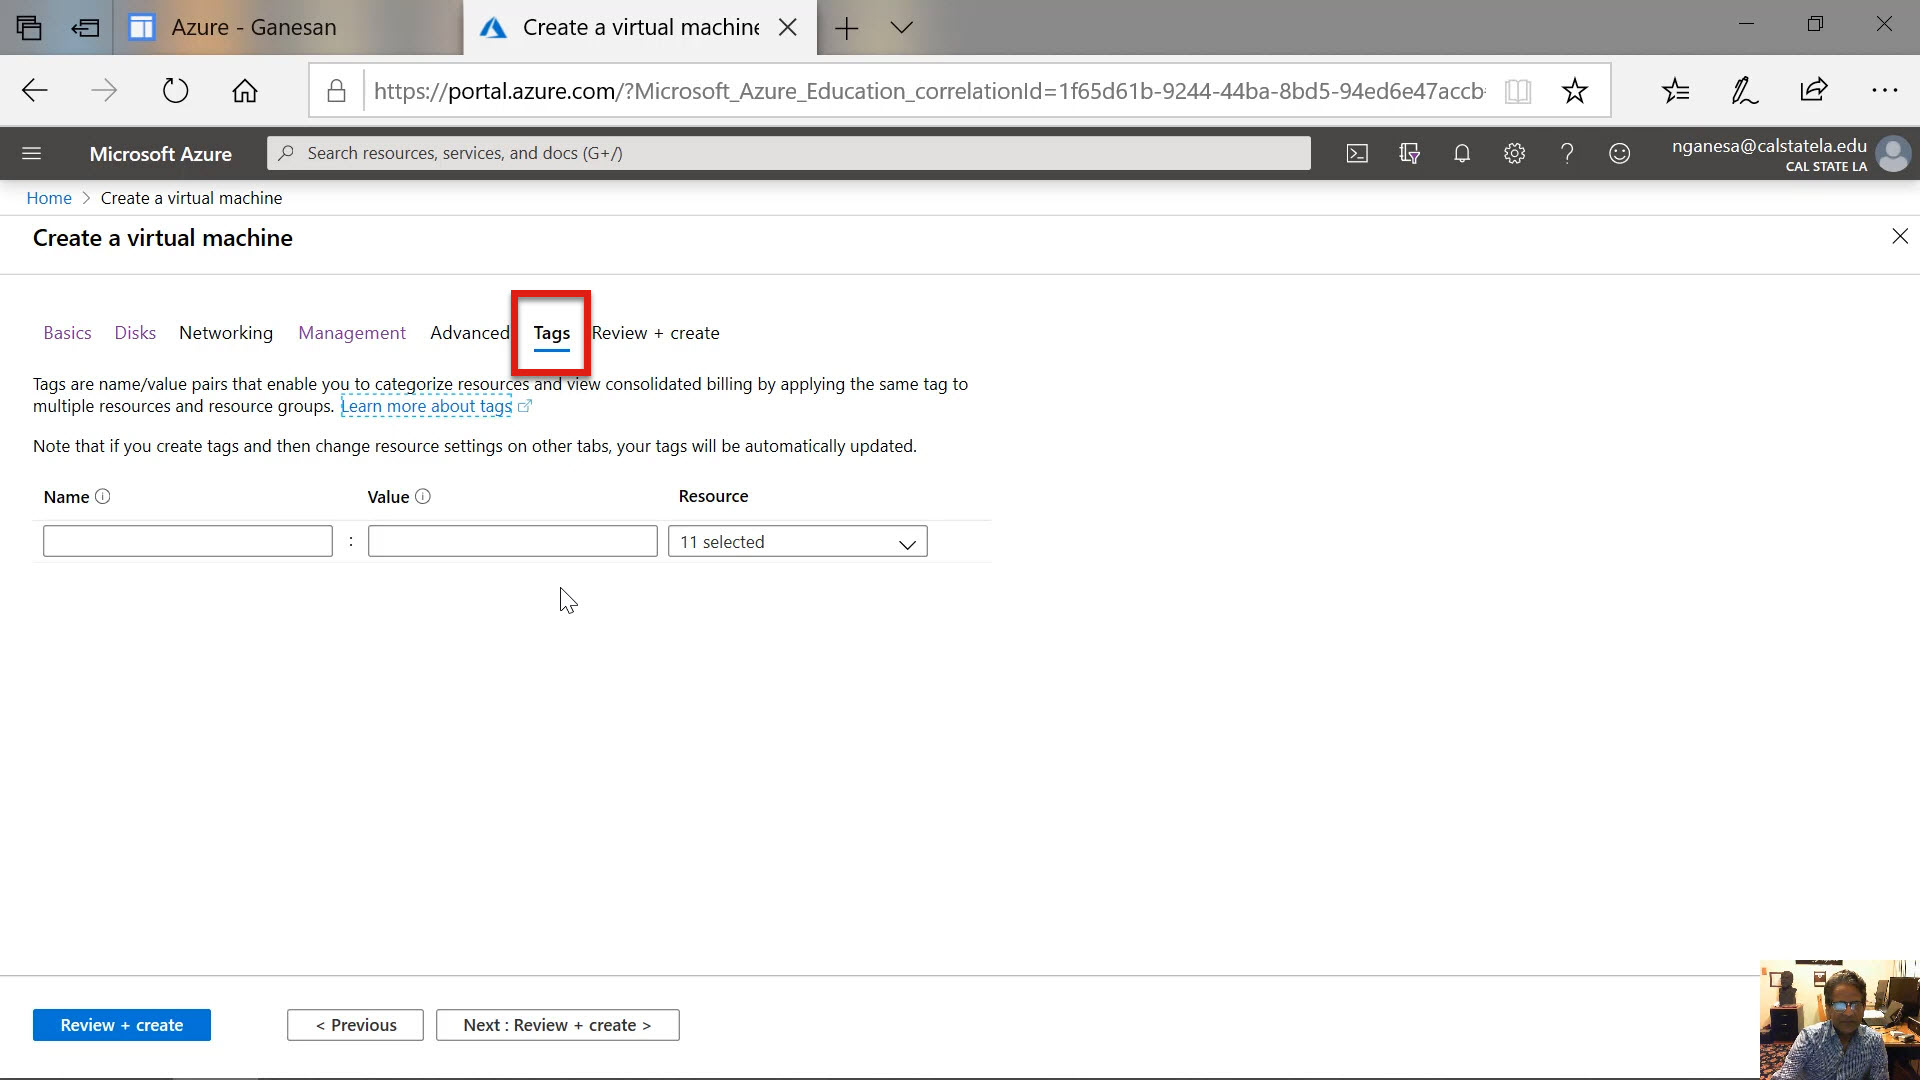
Diagram 26 Moving to Define the Tags If Needed
Step 10: Validate, Review and Create the VM
If the validation is successful and complete, the screens shown in the following diagrams will be displayed. These screens simply summarize the selections that were made in the previous stages of creating the VM. After reviewing the selections, if needed, one or more of the selections can be changed by tracing back to the earlier stages of creating the virtual machine. The tabs labeled as Basic, Disks, etc. that appear on the top of the screen can be clicked to jump to a certain stage of the VM creation process. The following diagrams summarize all the selections made in each of the previous stages.
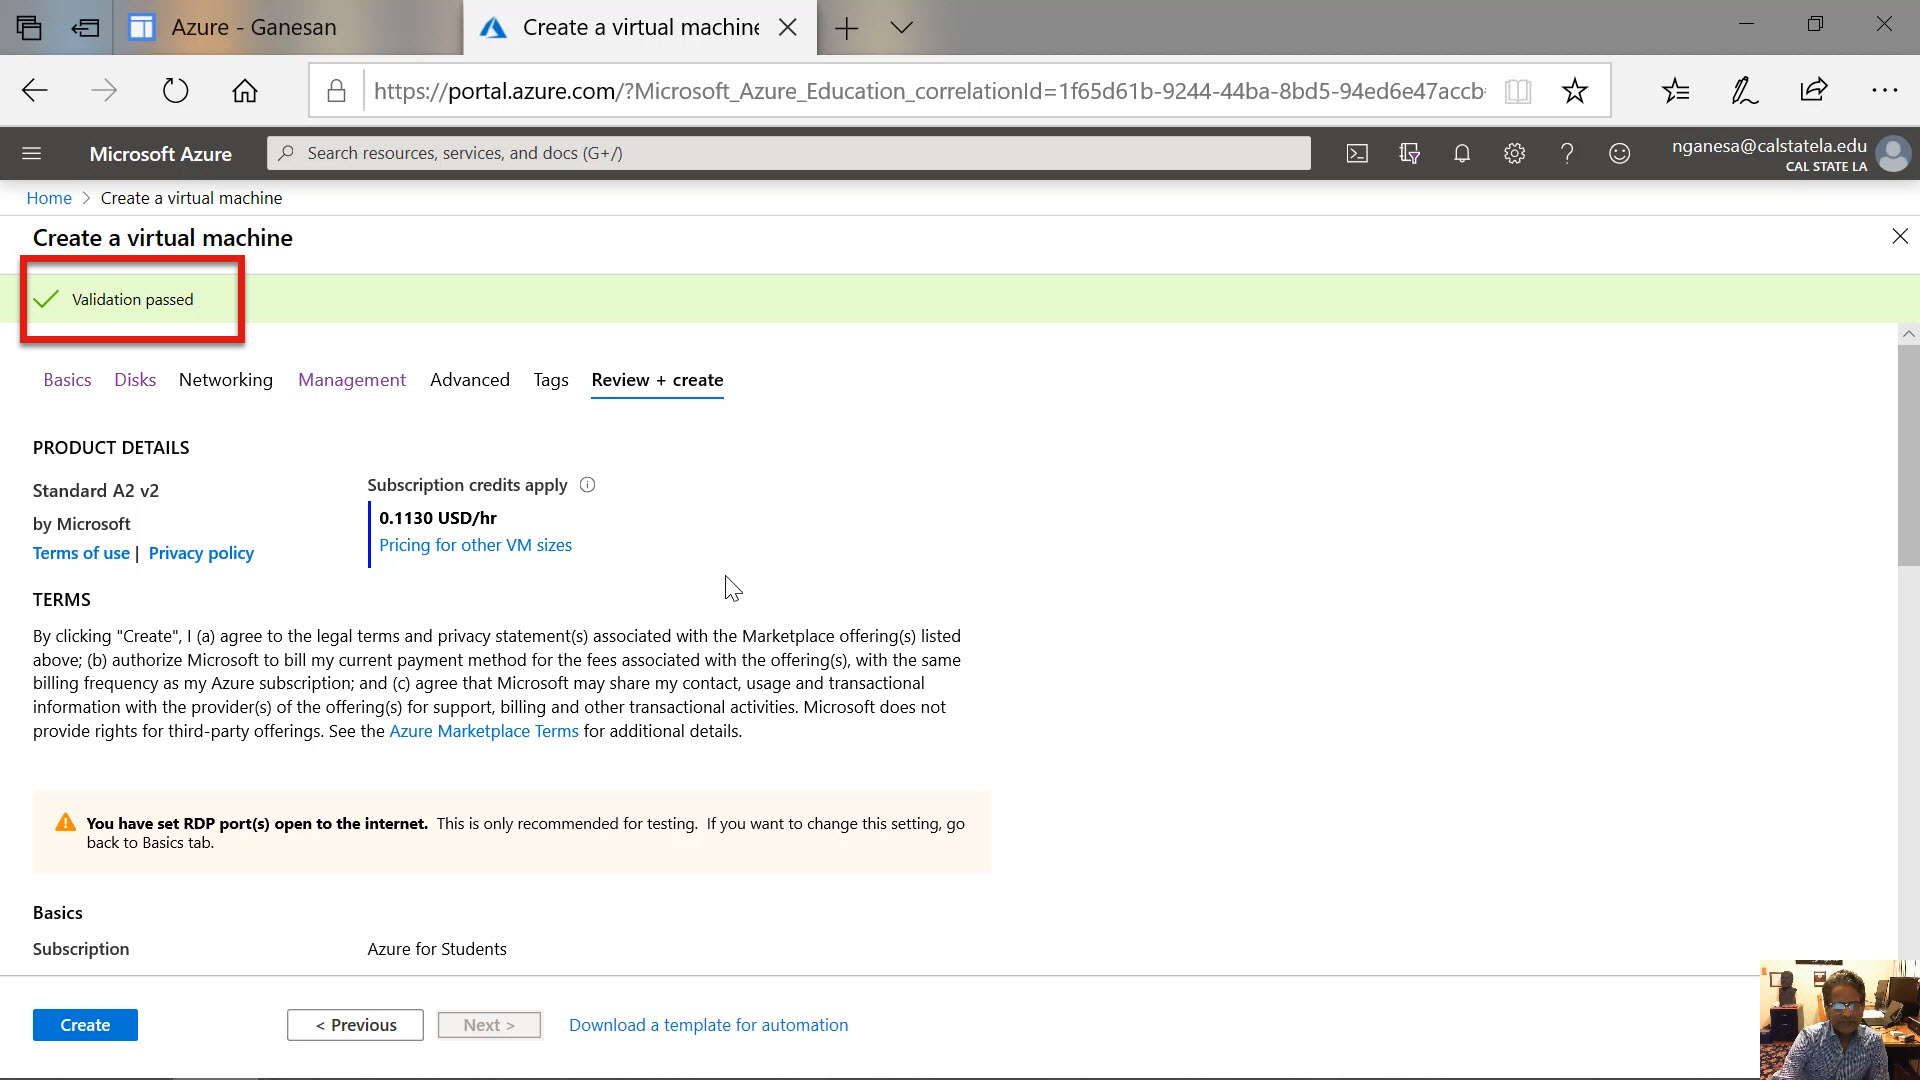
Diagram 27 Completed Validation Screens Process the First Screen
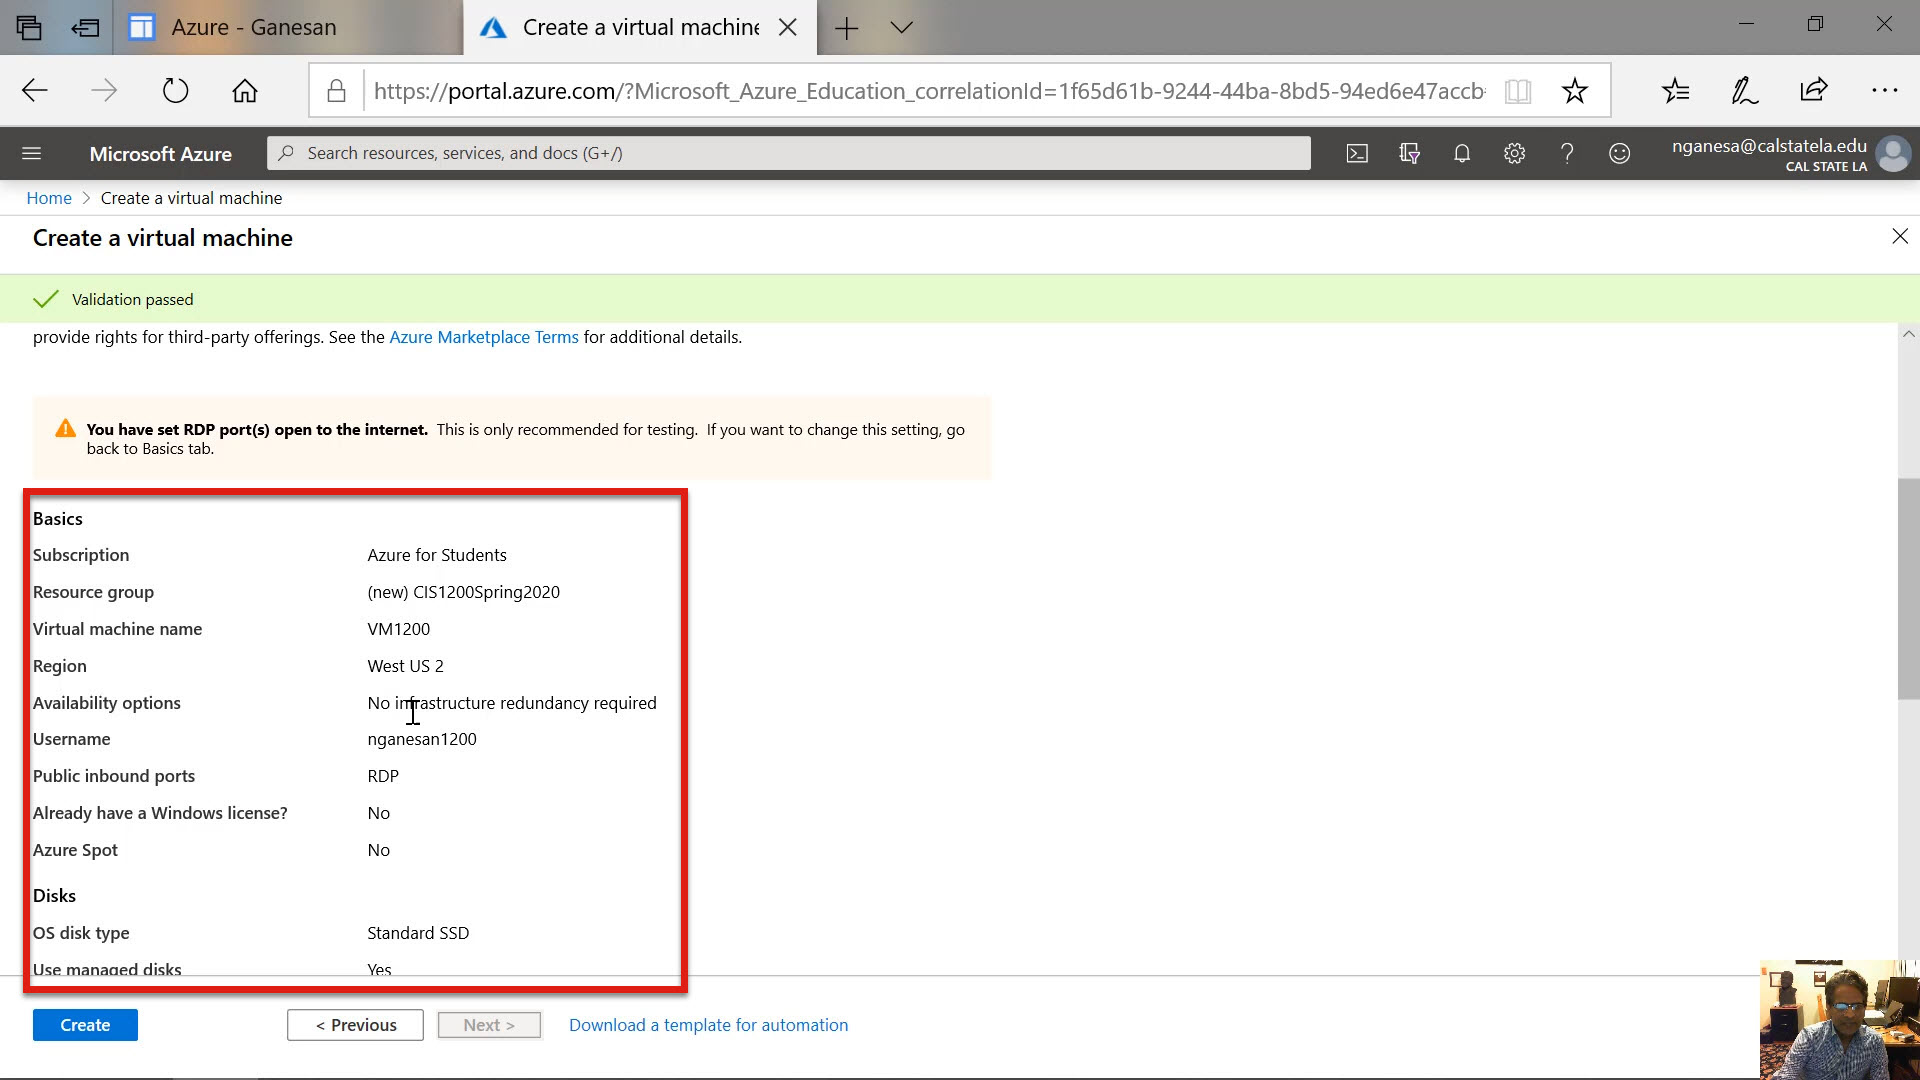
Diagram 28 Summary One of the Parameters Defined
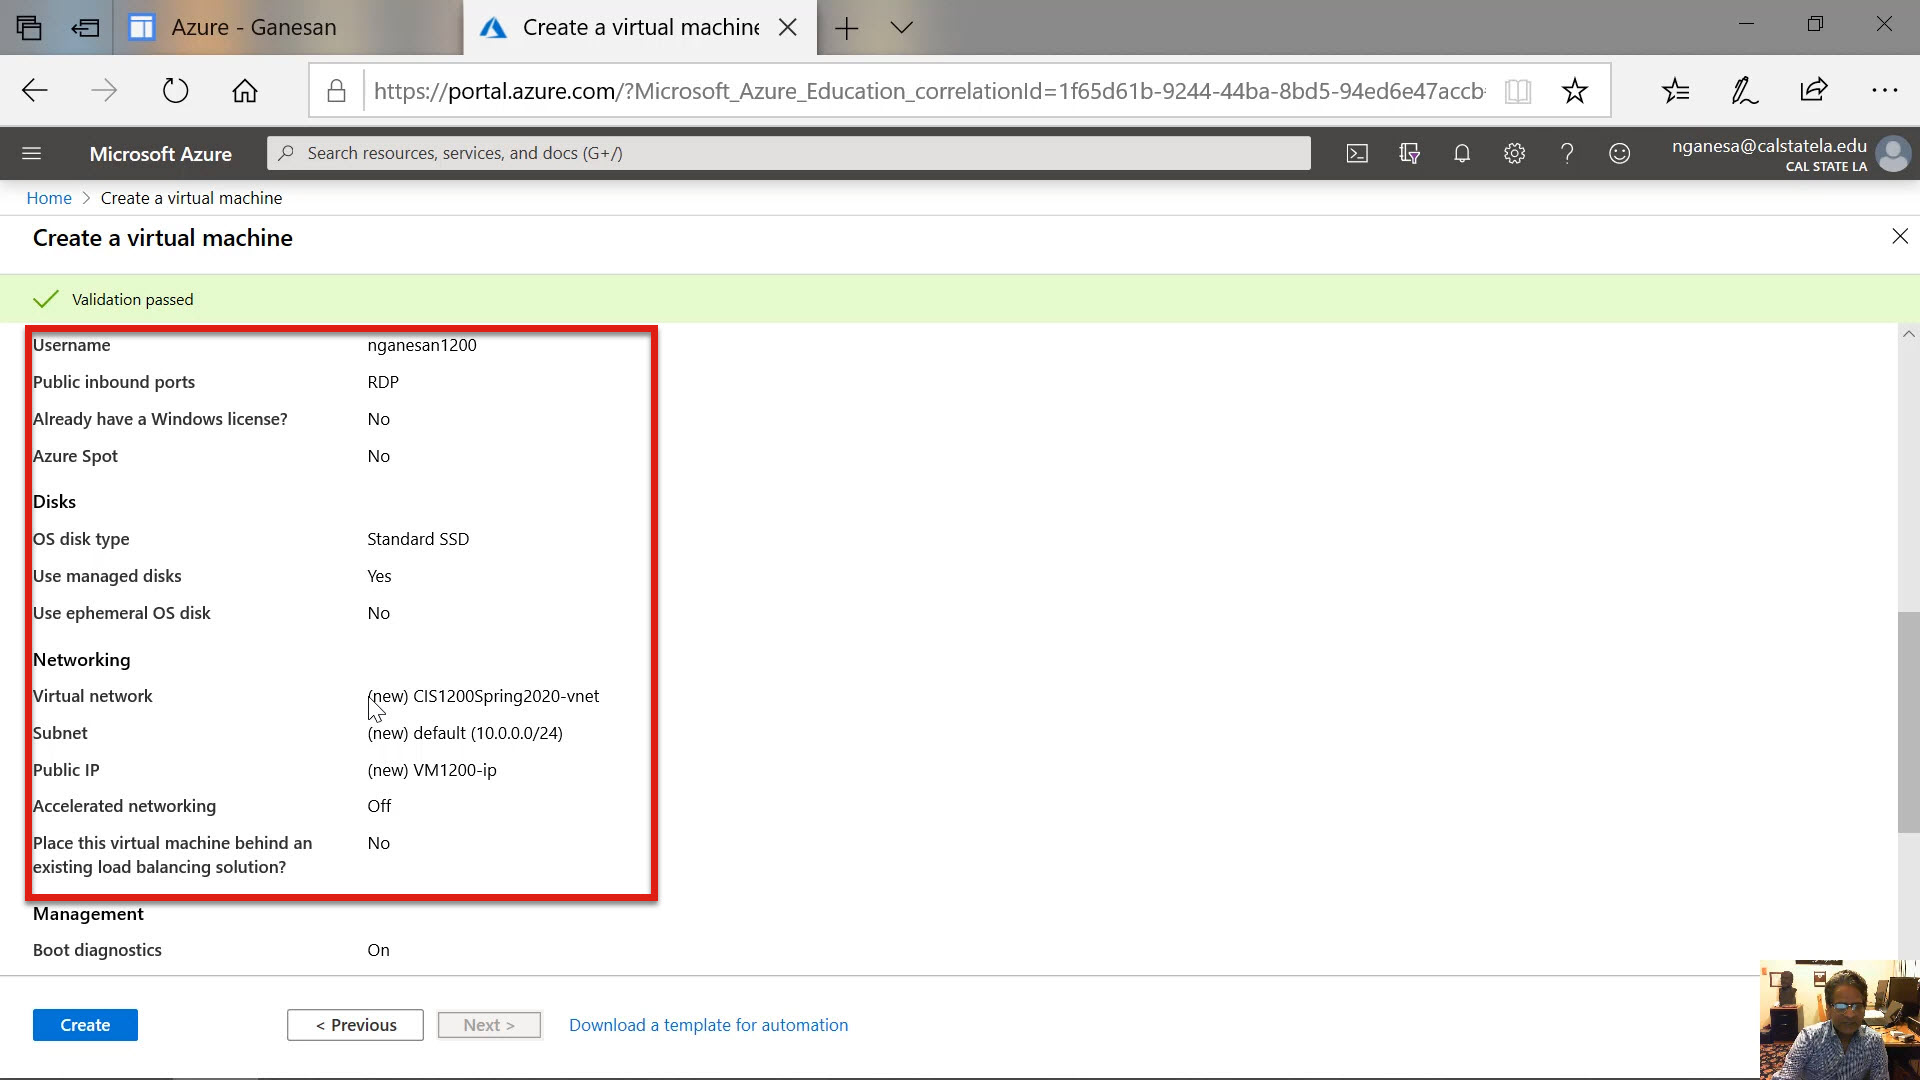
Diagram 29 Summary Two of the Parameters Defined
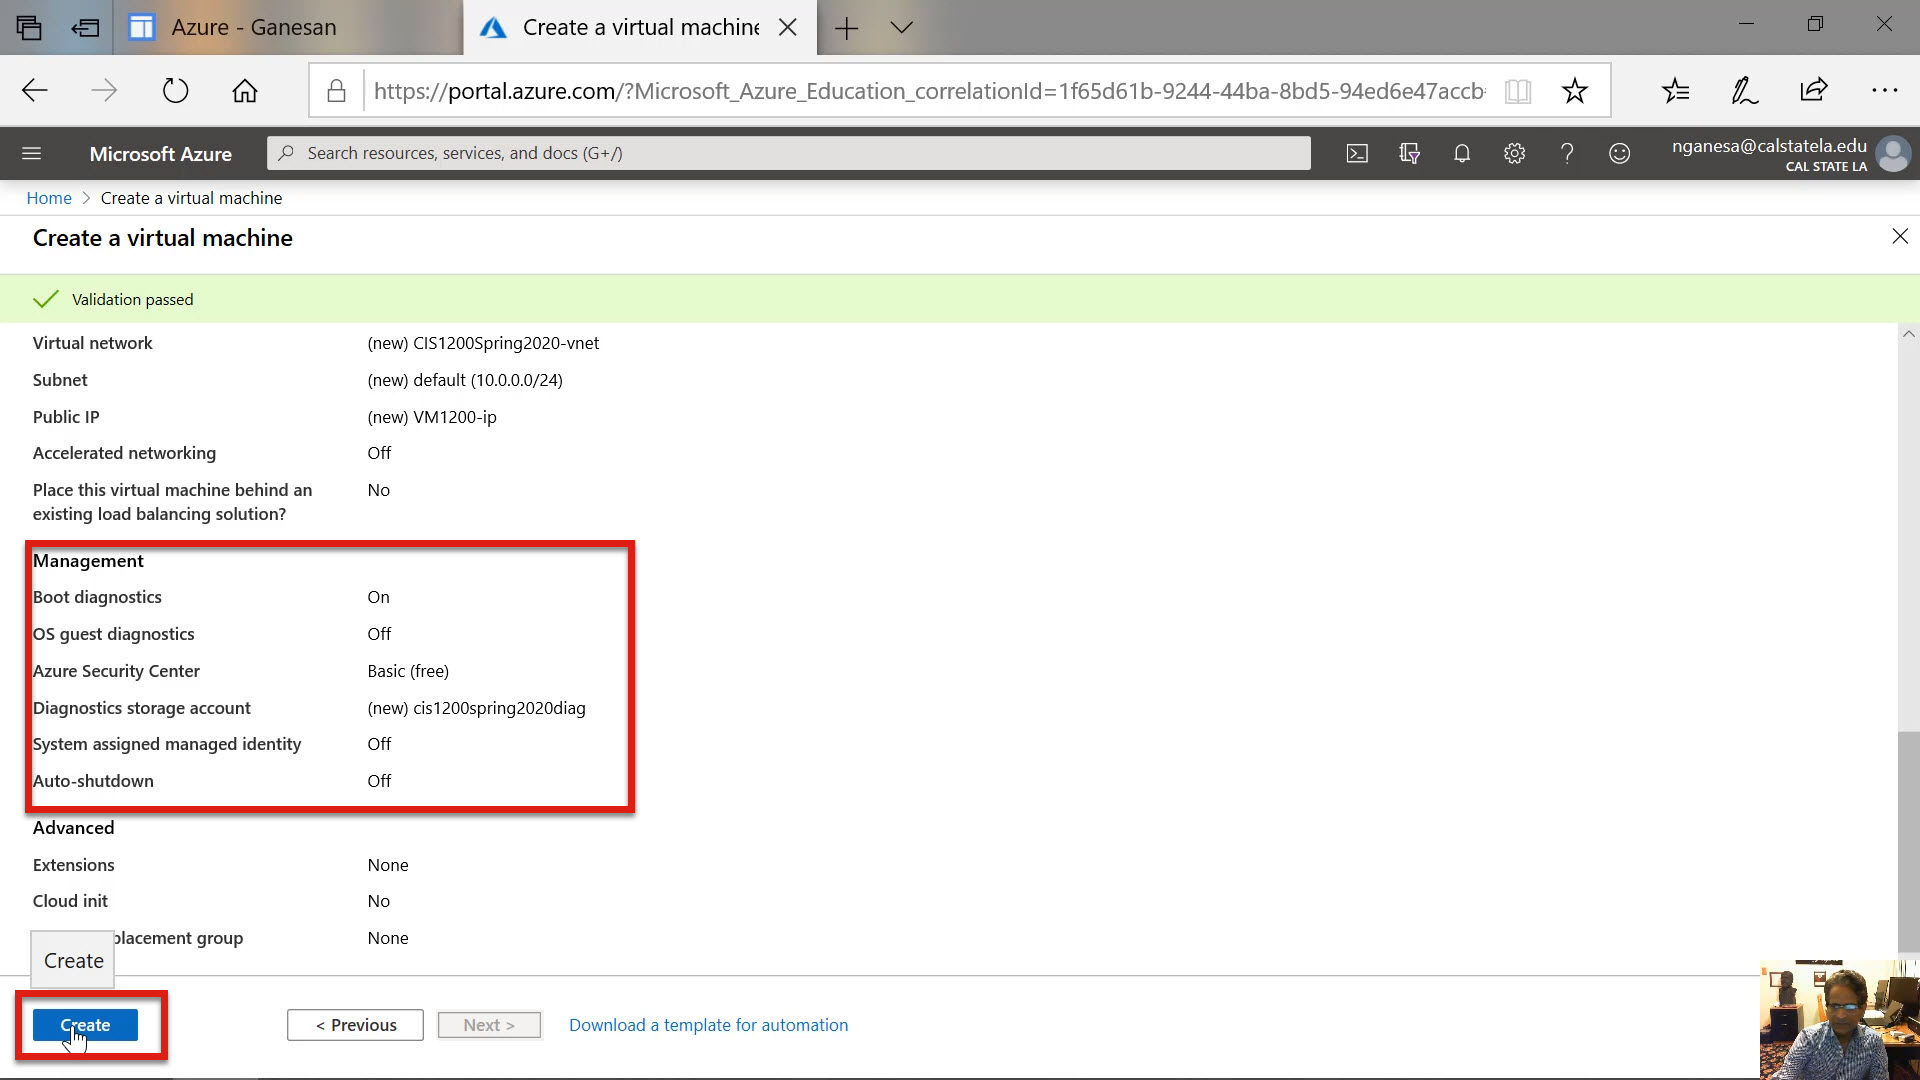
Diagram 30 Summary Three of the Parameters Defined
Step 11: Initialization, Configuration and Deployment of the VM
Once the selections are reviewed and confirmed, the next step would be to click the create button to initialize and deploy the VM. When the initialization process is complete, the resources needed to operate the virtual machine will be created along with the virtual machine itself. The next three diagrams show the initialization, the creation of resources, and the deployment of the VM. As the creation process progress, the relevant messages are displayed, one after another, on the top right-hand corner of the screen, as shown in the next three diagrams.
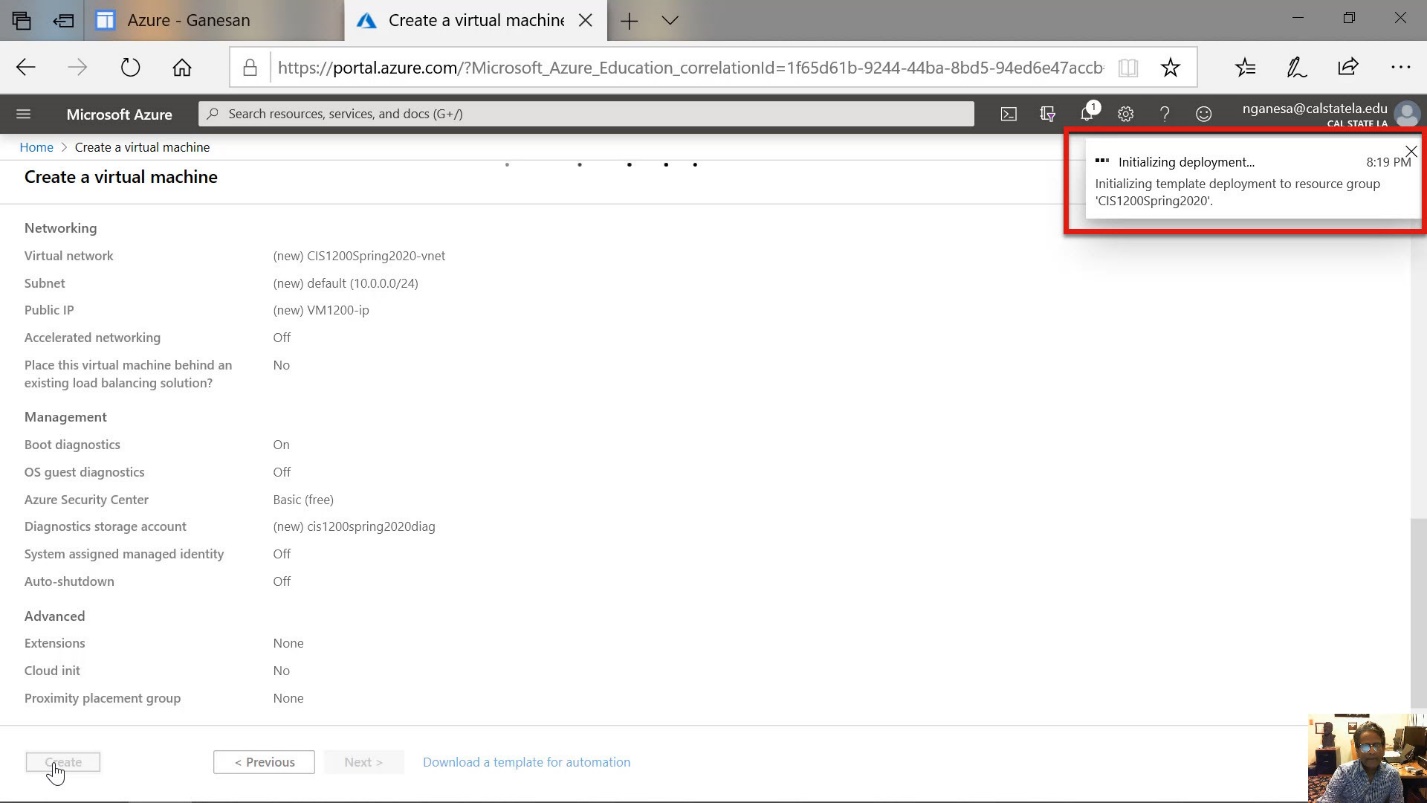
Diagram 31 Initializing Deployment
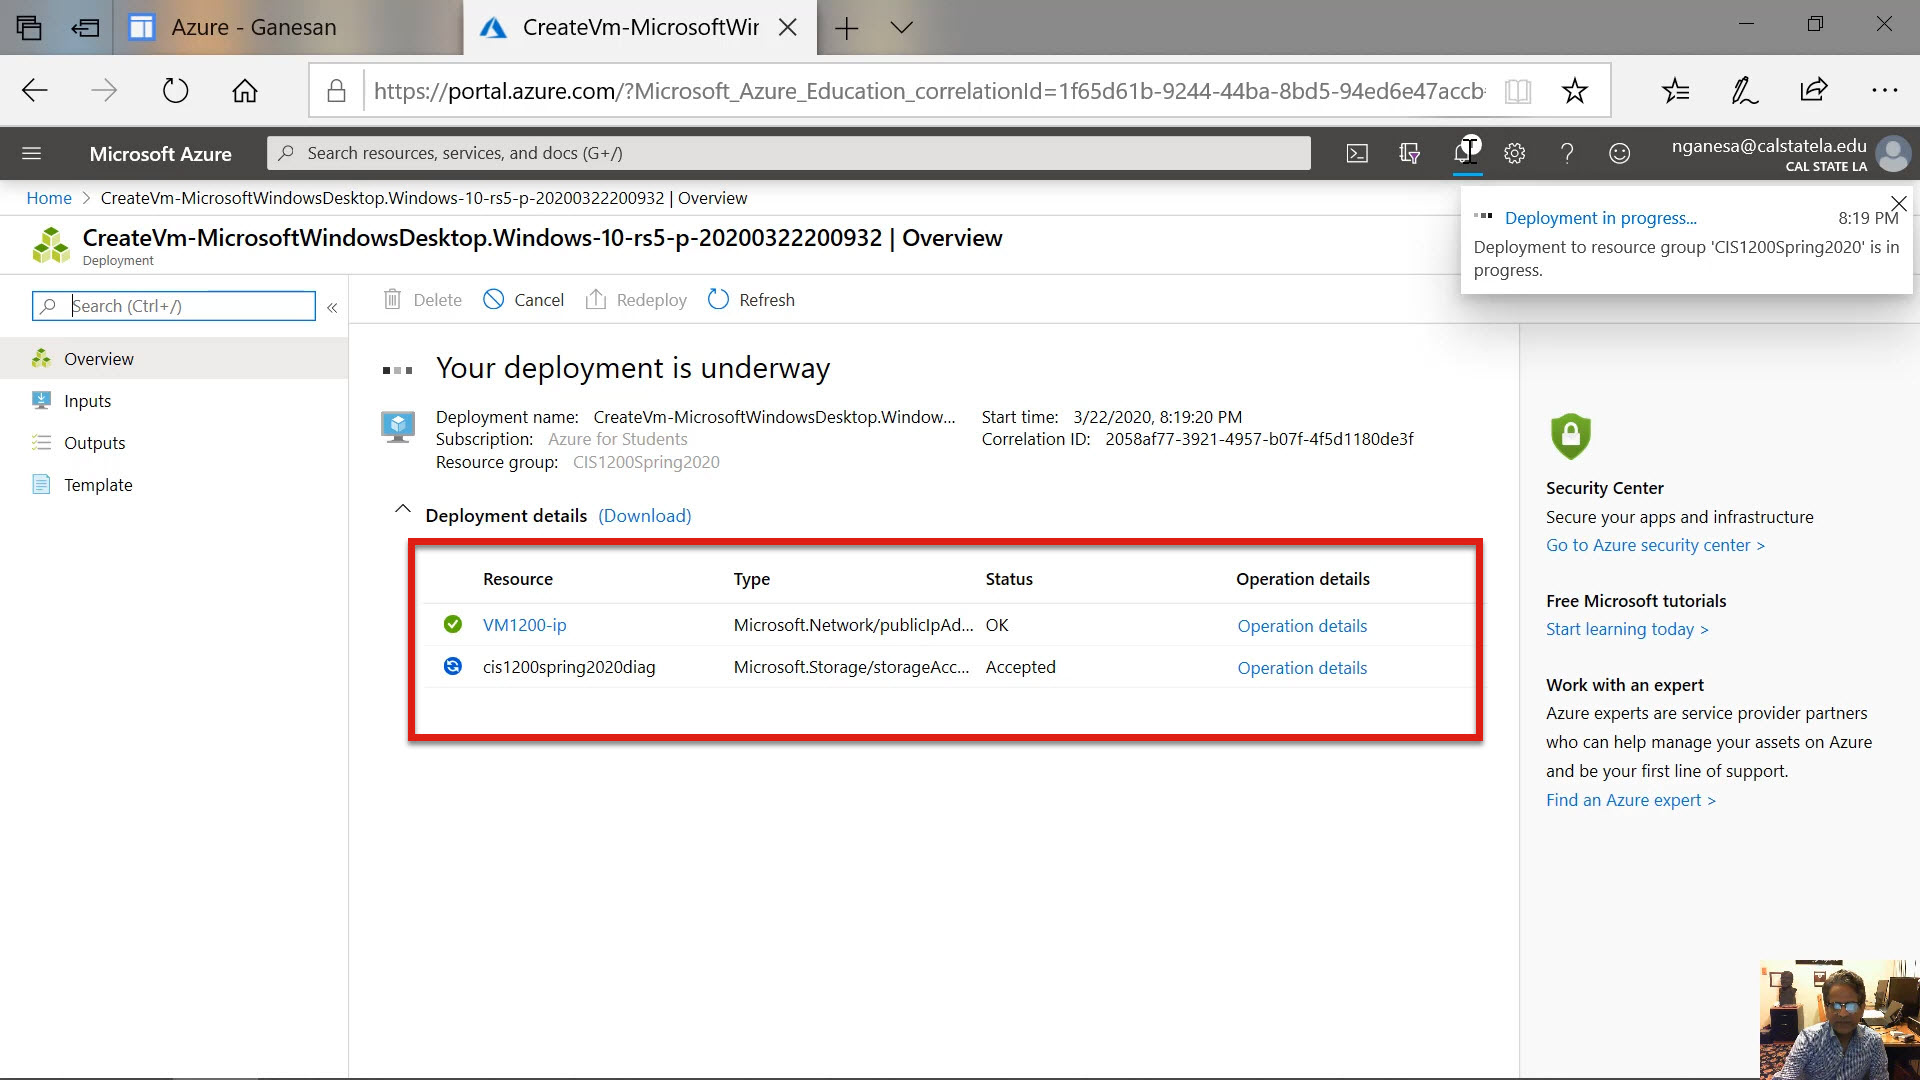
Diagram 32 Deployment in Progress with Resources Being Created

Diagram 33 Deployment in Progress Continued
Once the virtual machine is deployed, the message stating that the virtual machine has been created and deployed is displayed. The next diagram shows the message indicating the successful creation of the virtual machine. At any time, these messages can be viewed by clicking on the bell icon located on the top banner entitled Microsoft Azure. When the message Successfully Deployed is displayed, the initialization, creation, and deployment of the virtual machine are completed. In this case, a Windows 10 Pro virtual machine has been successfully created for use as any other physical Windows 10 machine. In a subsequent tutorial, managing and using the virtual machine will be discussed.
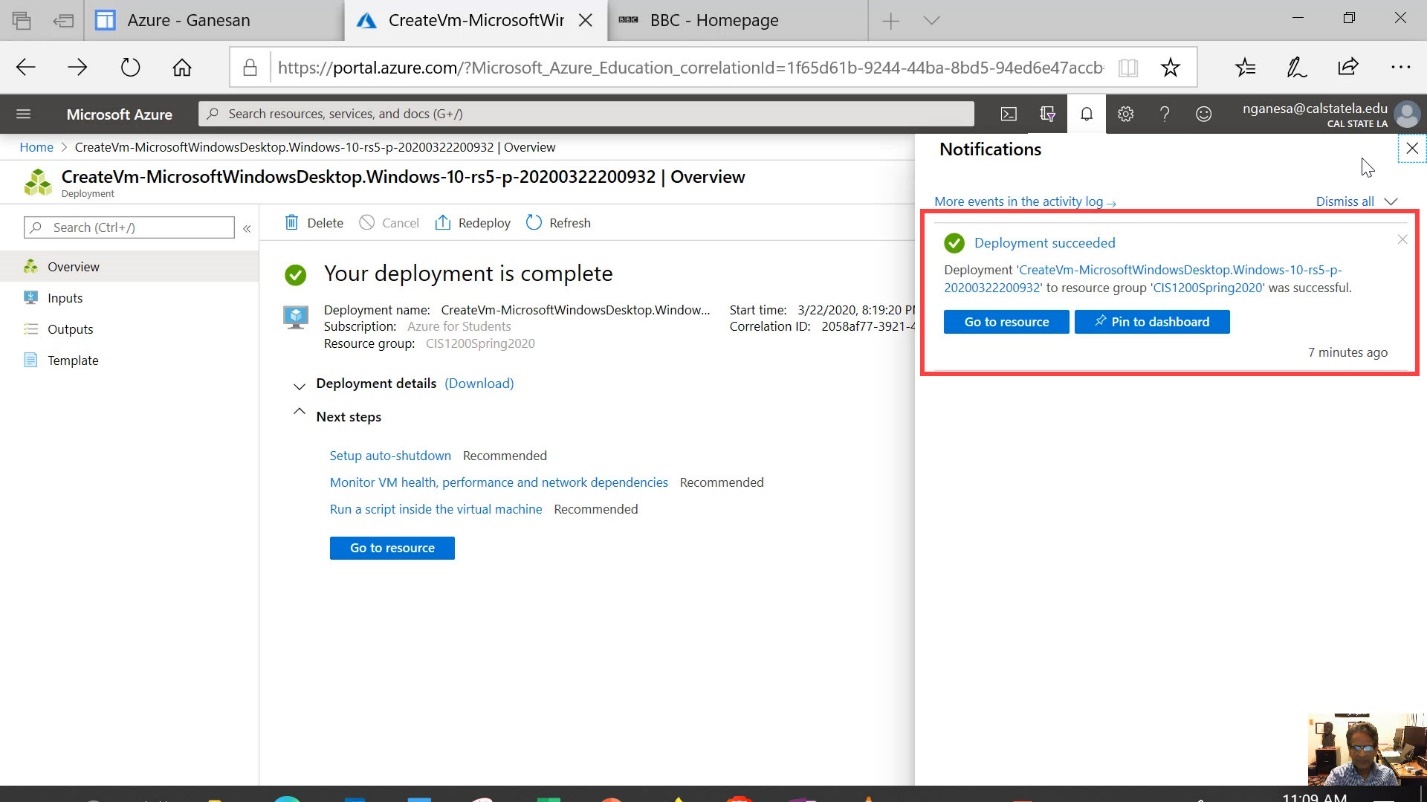
Diagram 34 Deployment Succeeded