Parallels Apps Server
Parallels Apps Server
Nanda Ganesan PhD, CSULA
What is Parallels?
The purpose of the Parallels server is to host applications for employees of an enterprise to access them remotely. One or more applications can be hosted on the server. An example of an application that could be hosted on the server is Microsoft Access. The campus has set up an application server based on the Parallels platform supporting several specialized software. In order to access the application server, a parallels client must be installed on the computer from which the server is accessed. This can be a tablet, laptop, or desktop computer running different operating systems. There are different Parallels apps for different operating systems. For example, the Parallels app is available on the Windows Store for the Windows computers and on the Apple store for Apple computers. The ITS web page provides links to apps on the respective stores and links to directly download the Parallel apps for different operating systems.
Overview of the Steps
Diagram 1 summarizes the steps that are required to install the Parallels client, whereas Diagram 2 outlines the steps for connecting to the Parallels server in different ways.
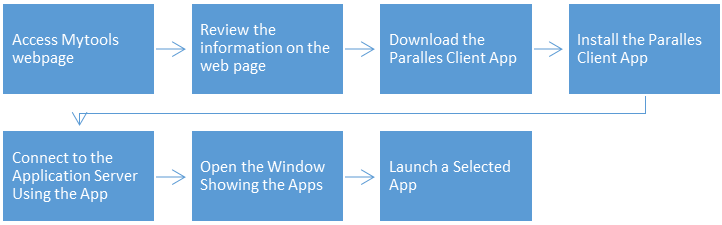
Diagram 1 Steps for installing and using the parallels client
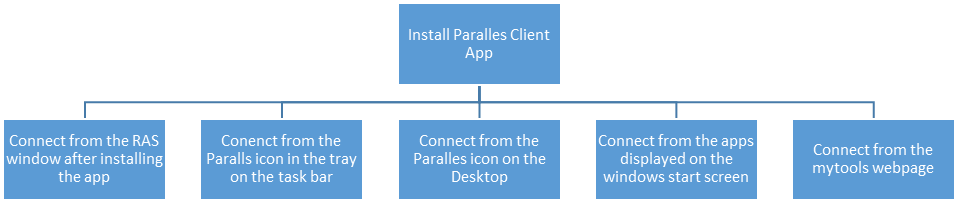
Diagram 2 Different ways to connect to the Parallels application server
Step 1: Background Information
First, the students should become familiar with some background information on Parallels that would help them understand the Parallels client and the Parallels application server. In this tutorial, at times, the Parallels application server is termed as the remote access server. The background information provided on the ITS webpage would also help the students troubleshoot problems that they may encounter while installing or using the software.
The website on Parallels hosted by the Information Technology Support division outlining the steps for the installation and use of the Parallels application server contains very useful information. To search for the link to the page, use the keywords CSULA and "mytools" in the Google search bar as shown in the next diagram. Click on the first item on the search results entitled MyTools Support I Cal State LA to access the support page.

Diagram 3 Accessing my tools support page
The ITS’s “mytools”" support page will be displayed as shown in the next diagram. Scroll down to review all the information listed on the page.
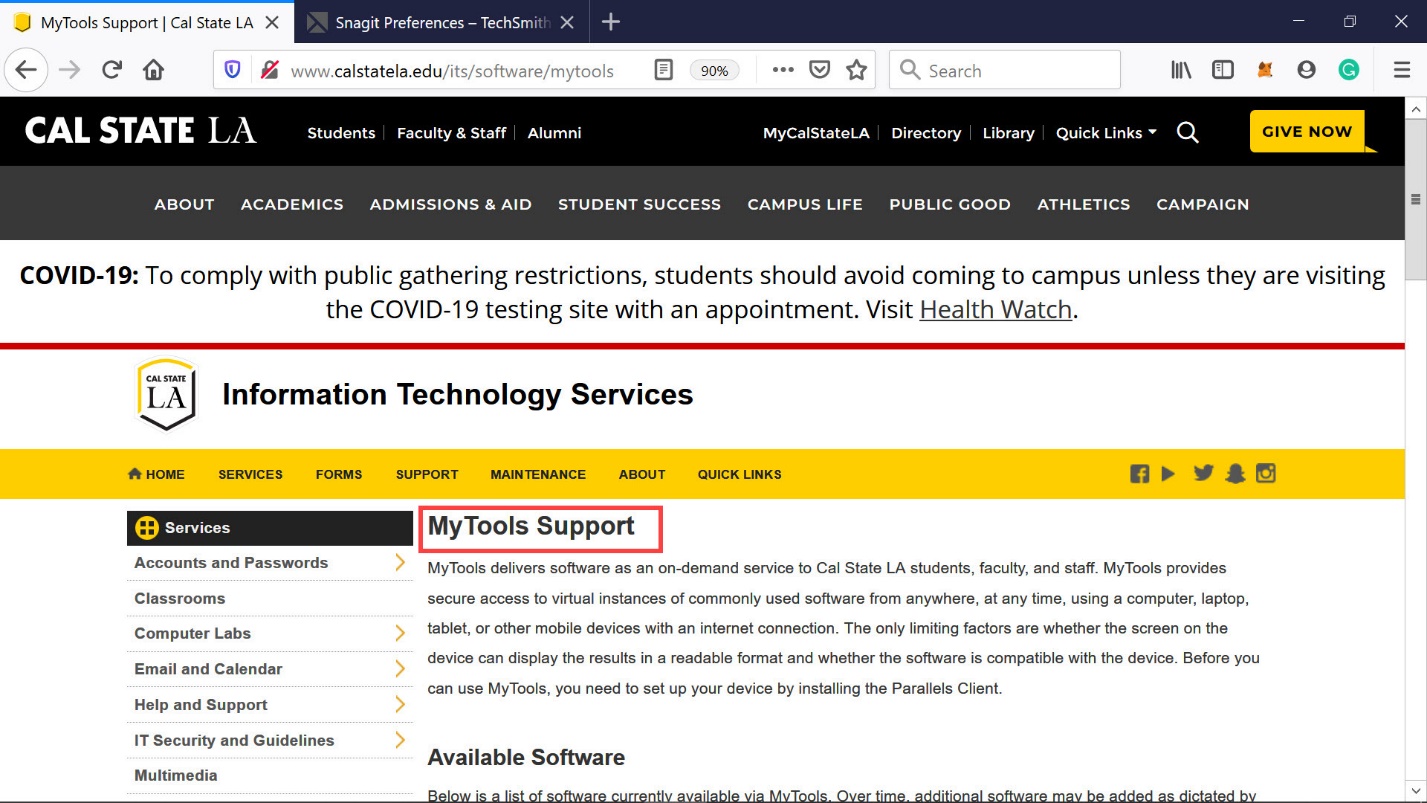
Diagram 4 My tools support page
In the middle of the page, there are two dropdown menus for listing the software available for use by the students and the faculty members, respectively. The link to the dropdown menu is shown in the following diagram. Further down the screen, there is another link for logging in to the “mytools” application server. But, before logging into “mytools”, the Parallels client must be installed. The procedure to install the client will be as outlined in a later section of this tutorial.
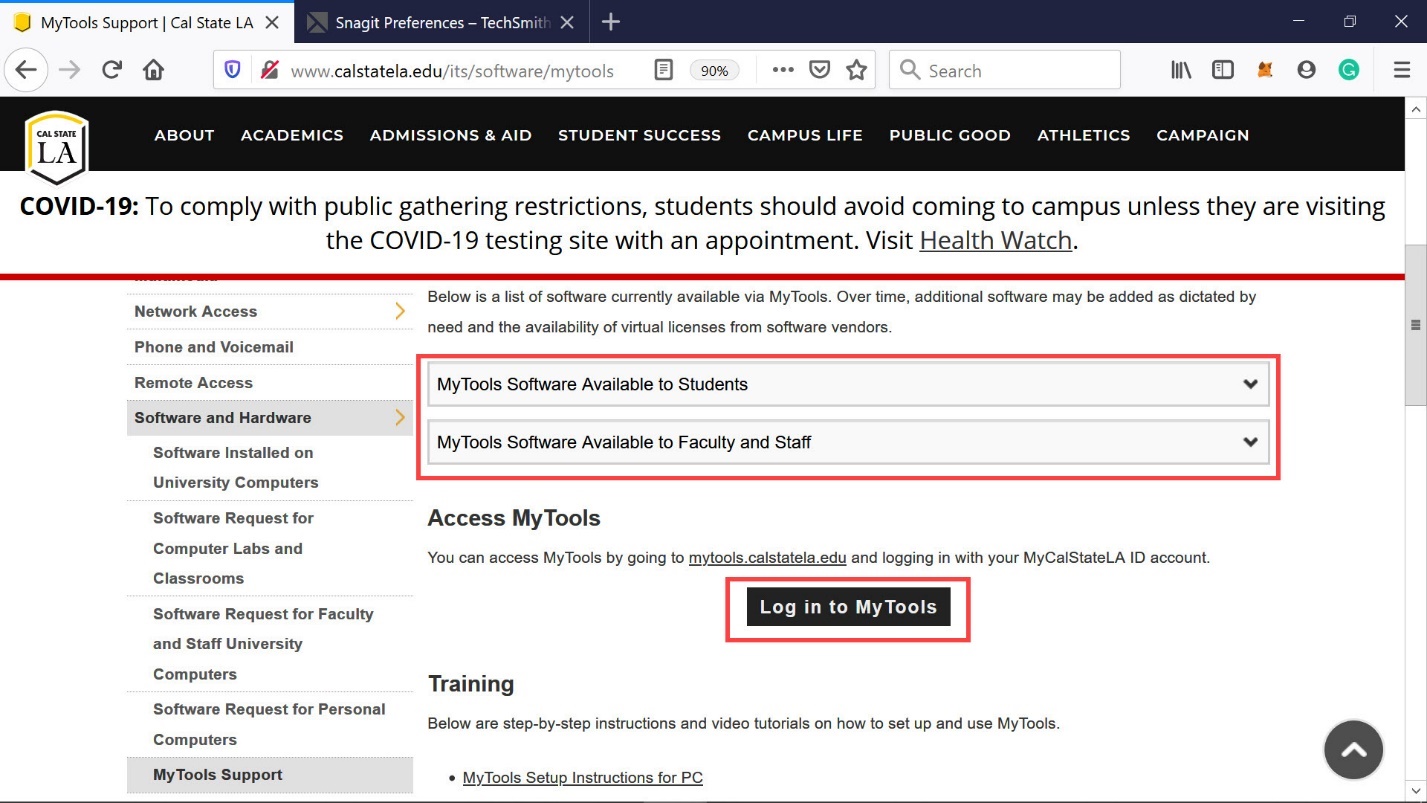
Diagram 5 Software available on the remote application server
In the next two diagrams, the list of software available for students and faculty members is displayed, respectively.
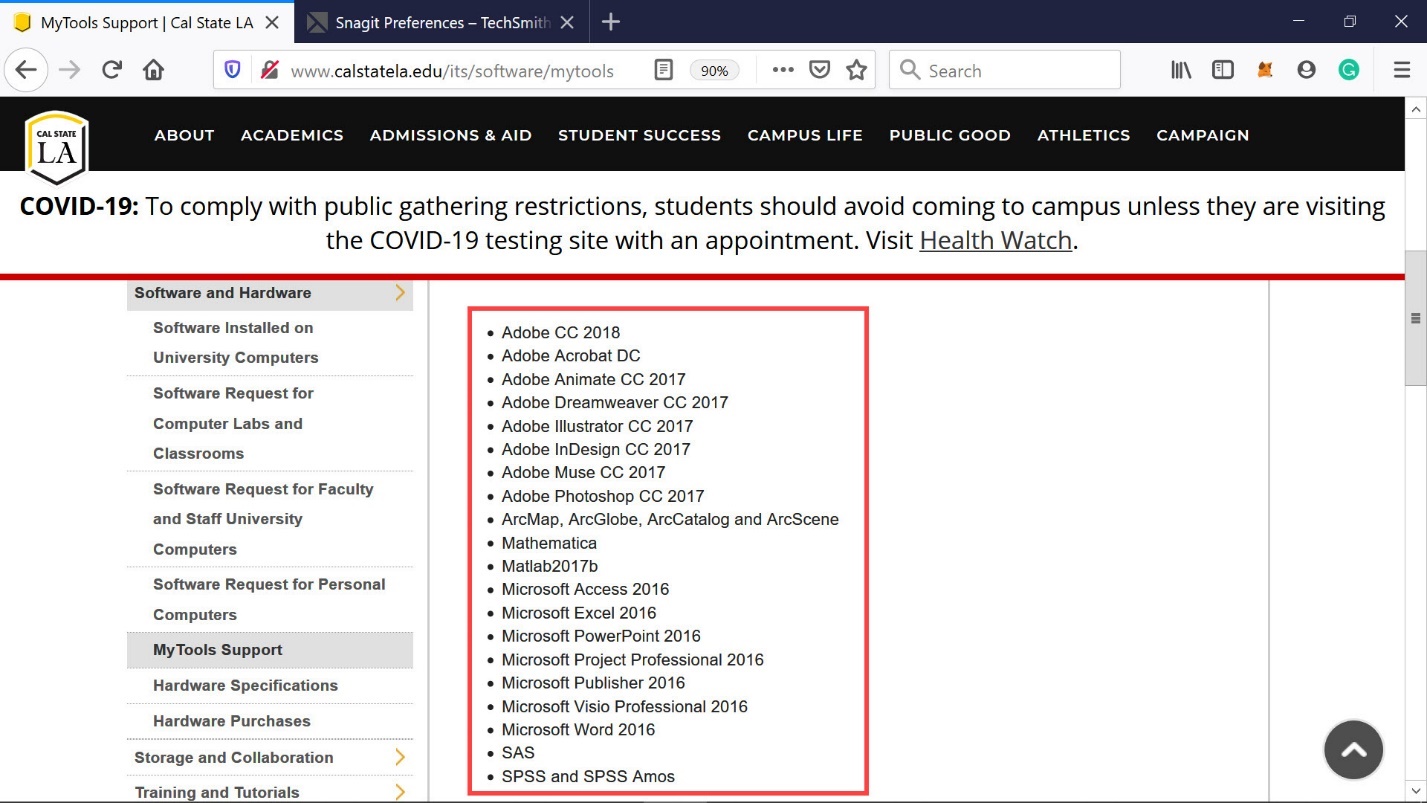
Diagram 6 Software available for students

Diagram 7 Software available for faculty members
On the “mytools” support page, the links to the training materials for installing and using Parallels are listed as shown in the next diagram. There are two sets of documents on each topic, one applicable to Windows computers and the other to Mac computers. In each case, there is a written tutorial and a video tutorial. For the most part, students should be able to follow the tutorials, provided they have some knowledge of computers and some familiarity with application servers.
The purpose of this tutorial, therefore, is to provide additional information to business students who may not have a good understanding of application servers and remote access software.
The steps described will also be helpful in troubleshooting any problems that may occur while installing the Parallels client and subsequently using the application server. Also provided in this tutorial are additional details on managing the Parallels client by describing, for example, different ways of connecting to the application server.
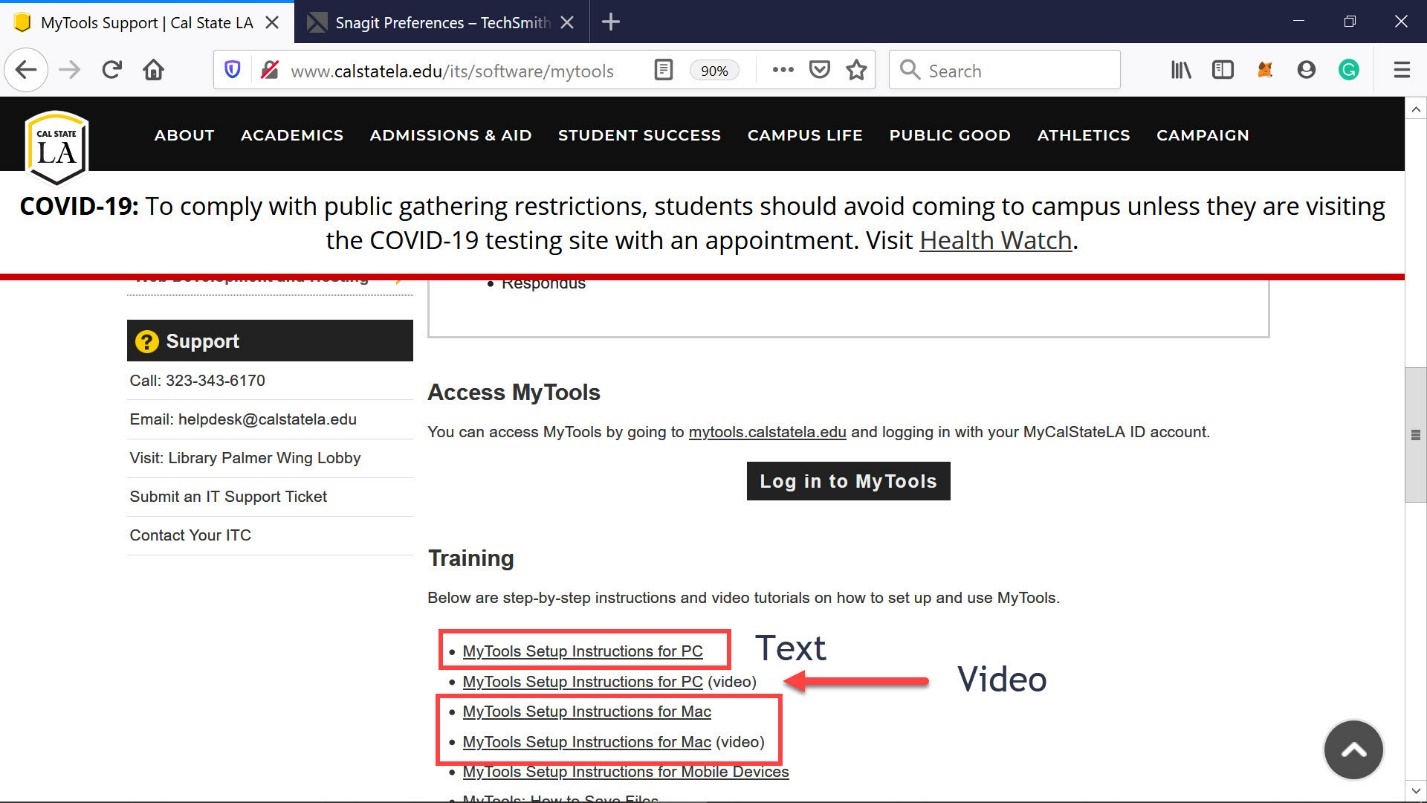
Diagram 8 Training material for Windows and Apple computers
In addition to the help material provided on installing and using the Parallel client, there is an audio and a video training guide showing how to save a file created while using one of the applications on the application server. Access links to the training materials are highlighted in the next diagram. For this example, the Microsoft Access application will be used later in this tutorial to demonstrate how a database file created in the Access DBMS can be stored on the local computer. It is important to note that the application server will not allow, for security reasons, any user-created files to be stored on the server. Therefore, such files need to be stored on the user’s local computer. Finally, the last link on the screen in the next diagram has a link to the FAQ webpage containing answers to many of the frequently asked questions.
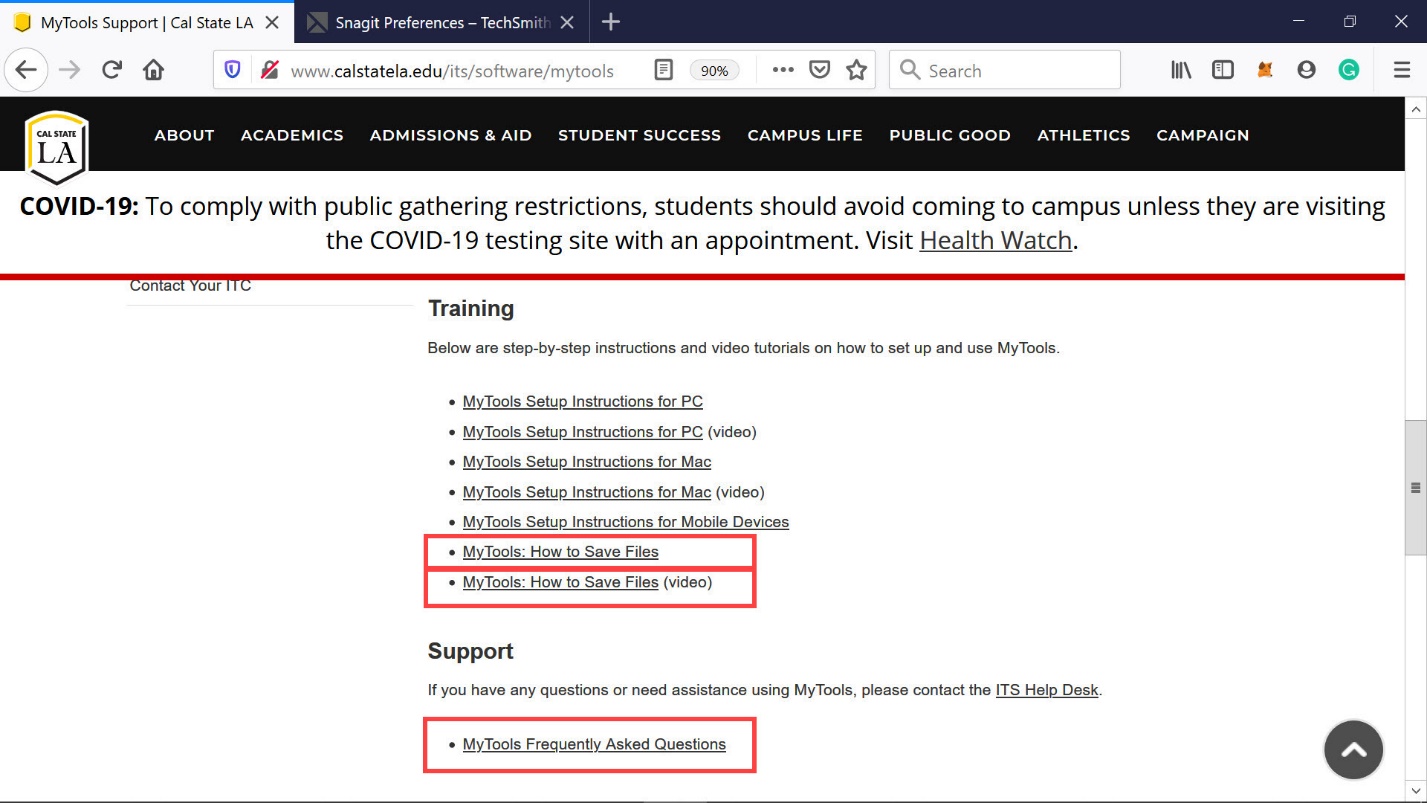
Diagram 9 Instructions for saving files and link to the FAQ page
Click on the FAQ link to display the “mytools” FAQ page shown in the next diagram and scroll down to become familiar with the answers to some of the FAQs.
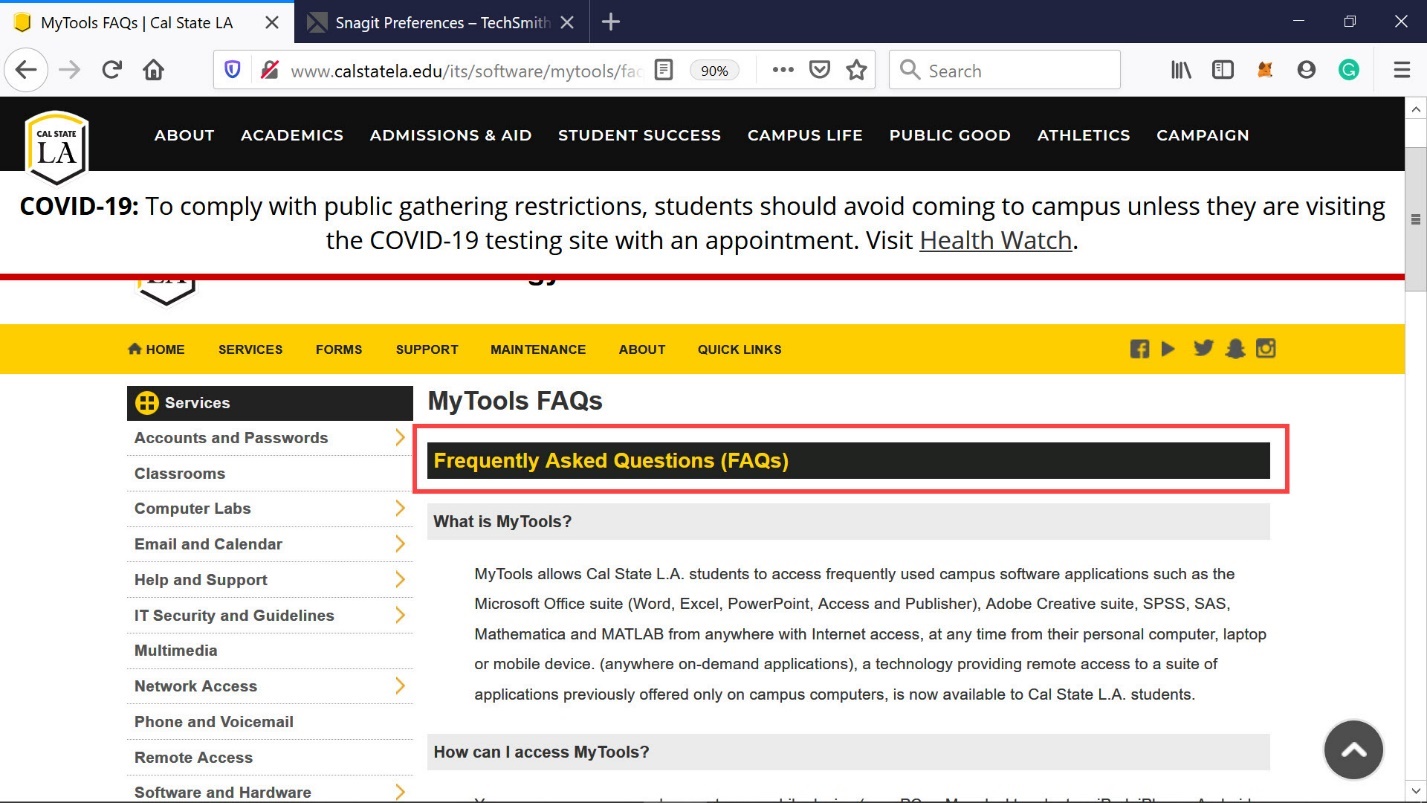
Diagram 10 FAQ page
Step 2: Downloading and installing the Parallels client
Reviewing some of the training material mentioned in the previous step would provide a better understanding of downloading and installing the Parallels client. In order to download the client, the “mytools” webpage must be accessed by typing the web address, mytools.calstatela.edu, on the browser as shown in the next diagram.
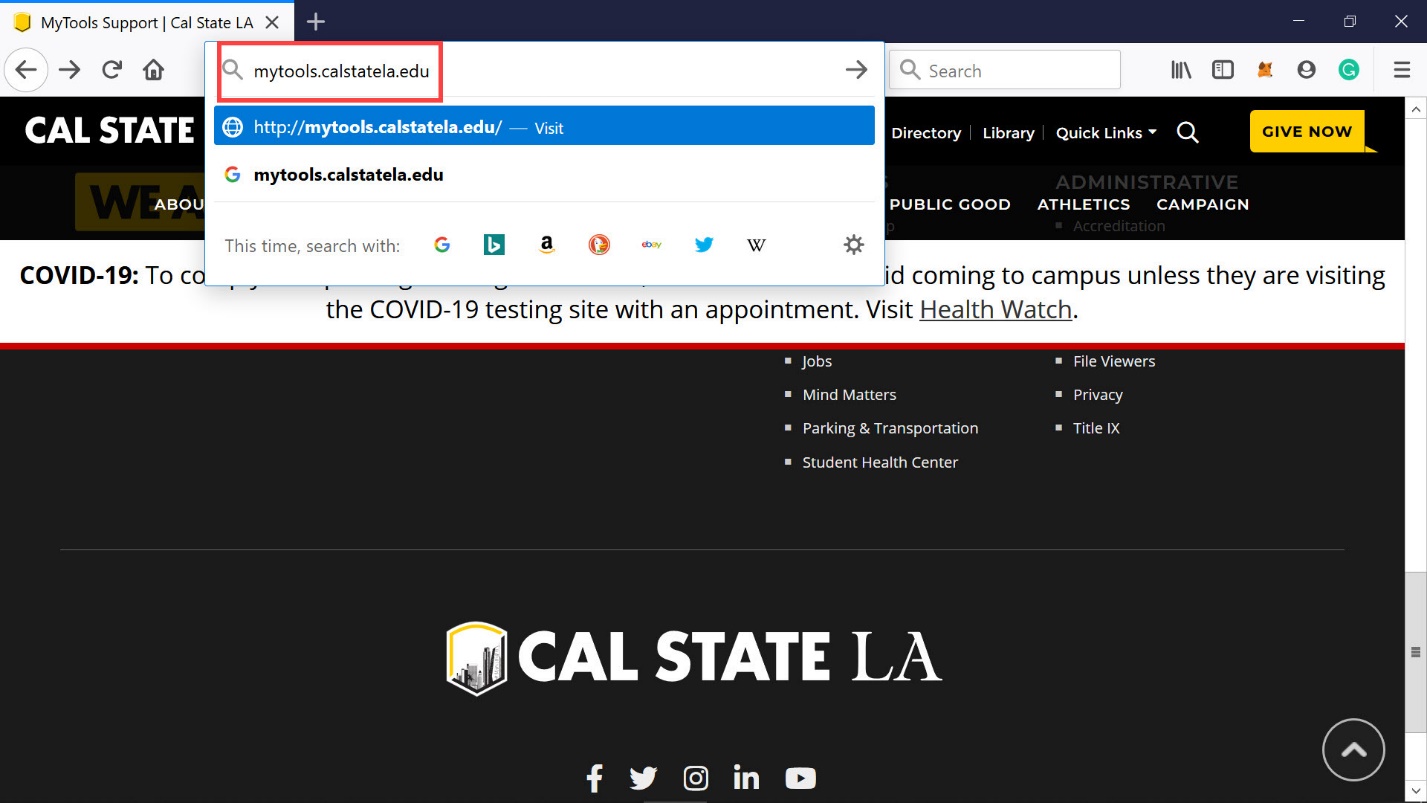
Diagram 11 Accessing my tools web page
Now, the “mytools” web page for logging into the remote application server will be displayed as shown in the next diagram. Click on the download client navigation link on the page to download and install the Parallels client.

Diagram 12 Initiating the downloading of parallels app
A new screen will now be as shown in the next diagram. Click on the download button to start the actual download process. In this case, the Parallels client will be downloaded for a Windows computer. In other words, the app that will be downloaded by clicking on the download button highlighted can only be installed on a windows computer. The procedure to download and install the Parallels client app for a Mac computer will be discussed later.

Diagram 13 The download button
Once the download button is clicked, A window will appear as shown in the next diagram. Click on the button labeled Save File to proceed to save the file that will be downloaded.
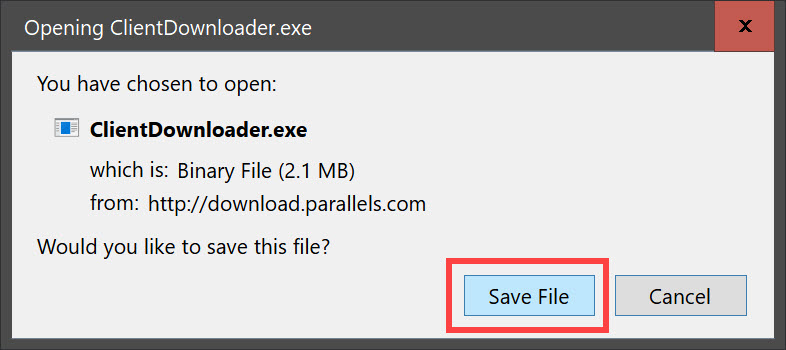
Diagram 14 Window prompting to save the file
The file can now be downloaded and saved in the download folder of the computer. The procedure to download add execute the downlodaded app differs from one browser to another. In this example, the Firefox browser is used for the demonstraion.
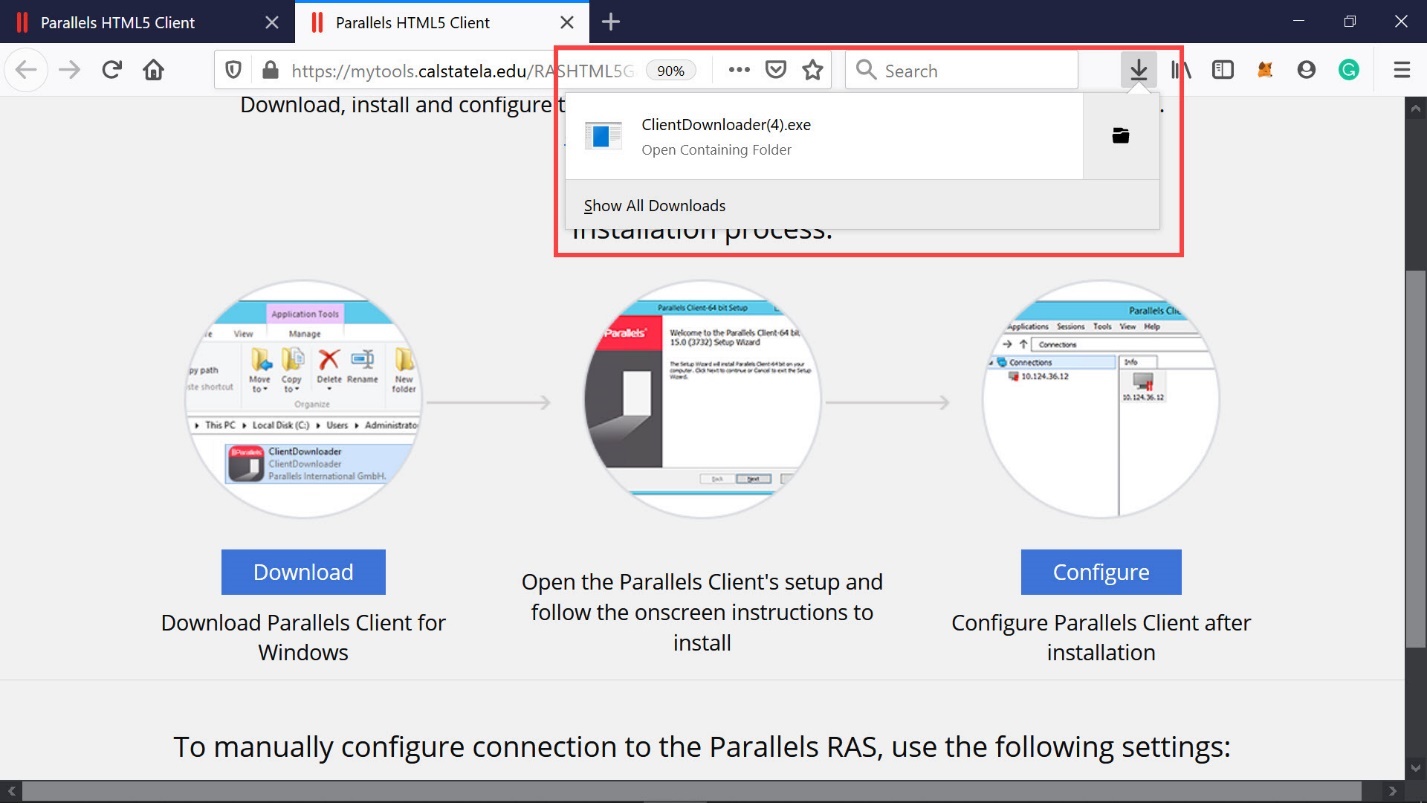
Diagram 15 The app file saved in the download folder
When the downloading of the app is complete, open the folder that contains the app. Click on the highlighted executable file listed in the Downloads folder as shown in the next diagram.
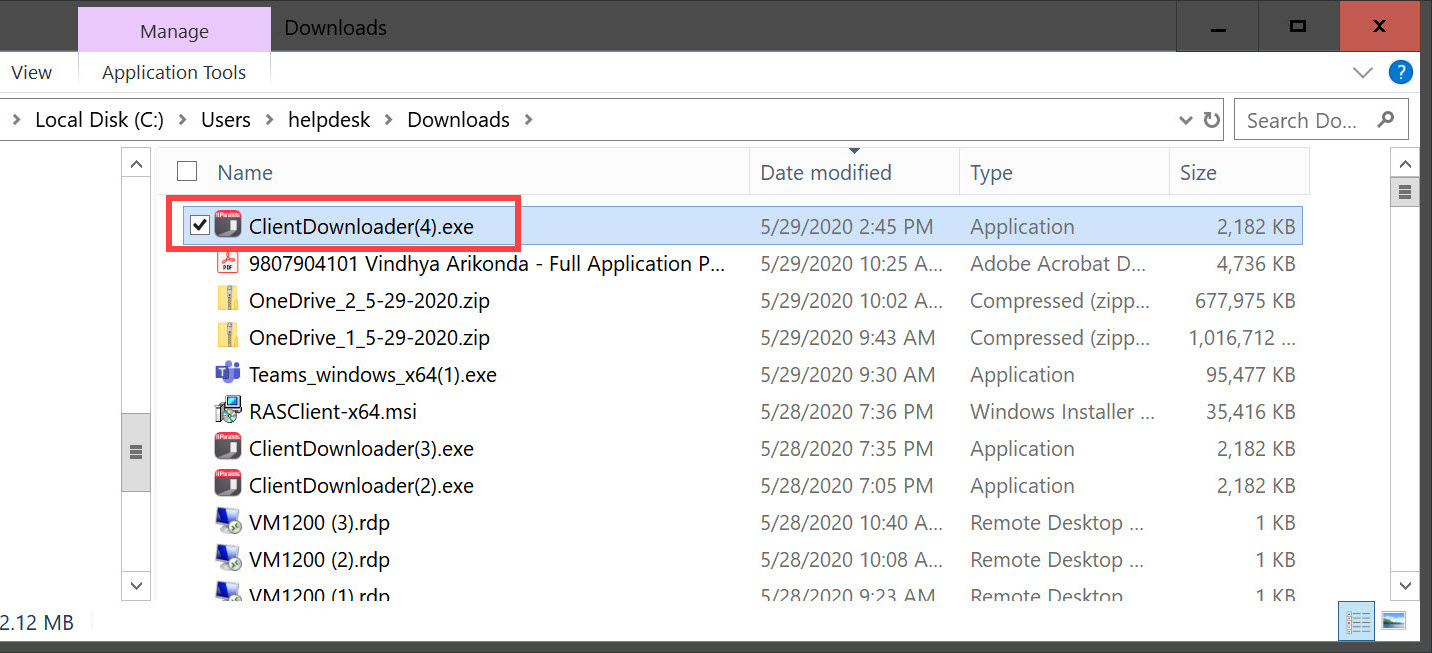
Diagram 16 Clicking and executing the client app file
Click on the Install Full Client button that appears on the next screen as shown in the following diagram.

Diagram 17 Initiating the installation of the Parallels app
The setup wizard will now start as shown in the next diagram. Click on the Next button on the screen.
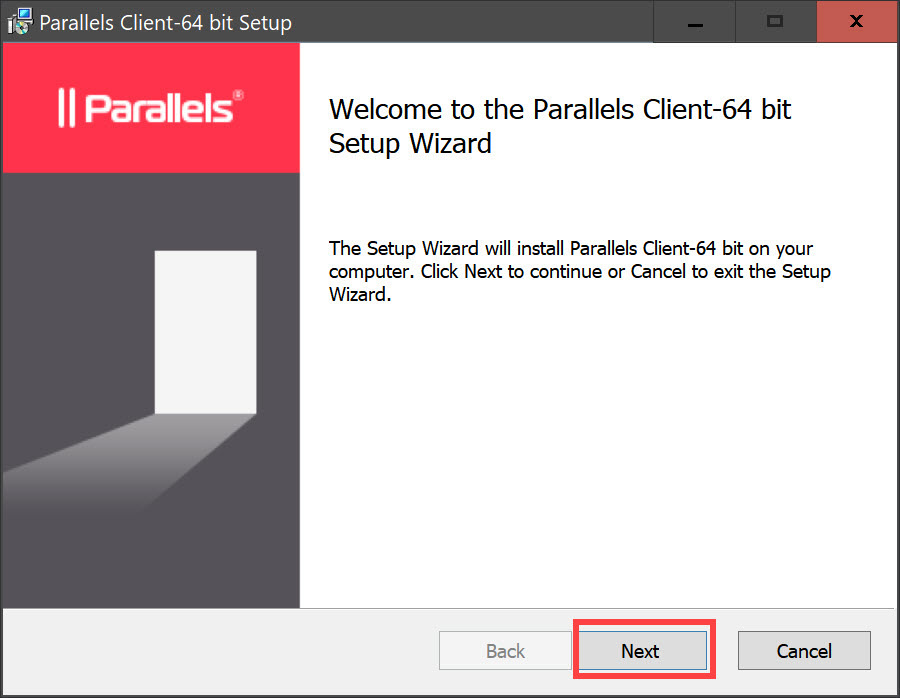
Diagram 18 Starting the setup wizard
Click on the entry “accept the terms” shown in the next diagram and then click on the Next button to proceed to the next step.
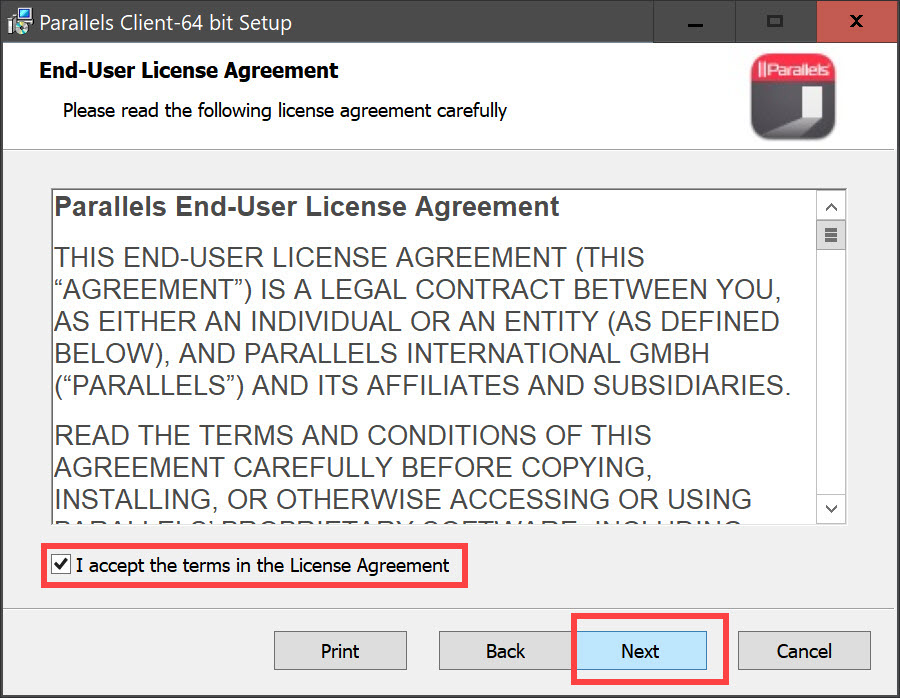
Diagram 19 Accepting the terms in the license agreement
The screen will now show the default installation folder for the Parallels client app. Click on the Next button.
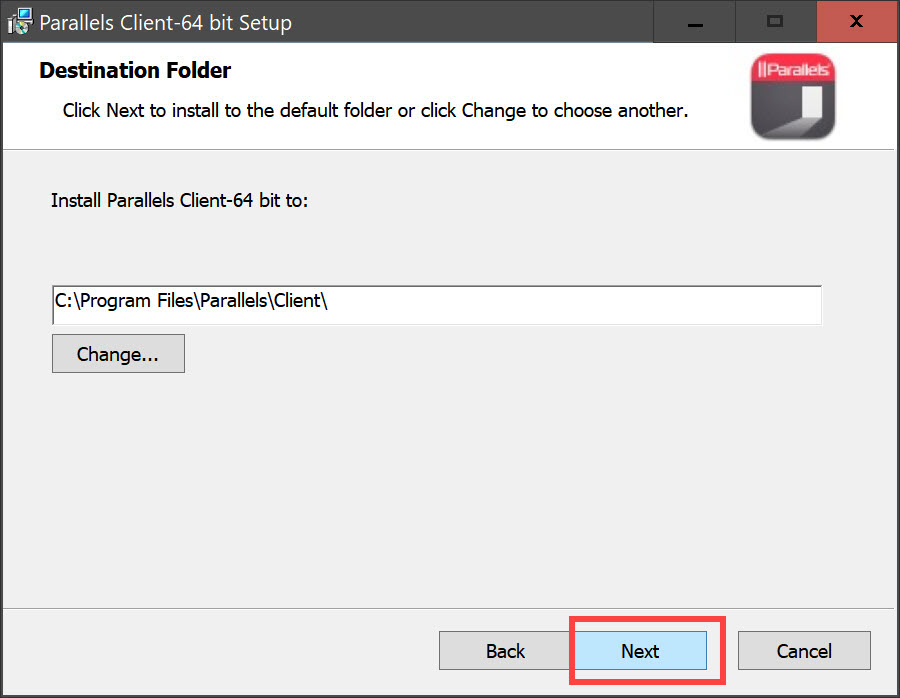
Diagram 20 Default location for the program files
A screen for selecting, if appropriate, the single sign-on component will now be presented. For this example, select the “do not install single sign-on component” by clicking on the appropriate radio button. Click the Next button to proceed to the next step.
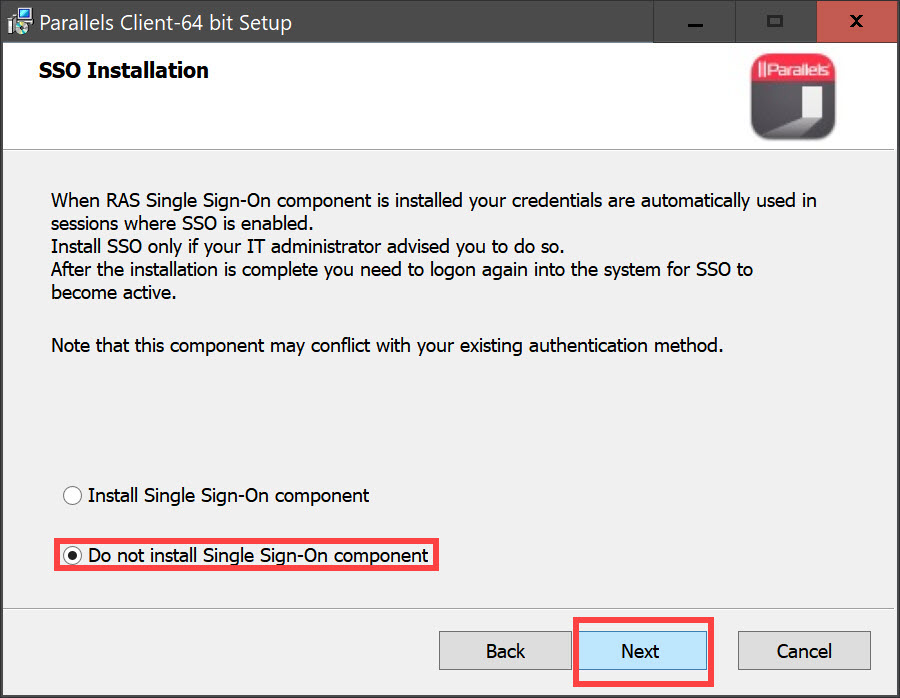
Diagram 21 Selecting the do not install the single sign-on component
The computer is now ready to install the Parallels client, which incidentally is a 64-bit version of the app. Click the Install button shown in the next diagram to commence the actual installation process.
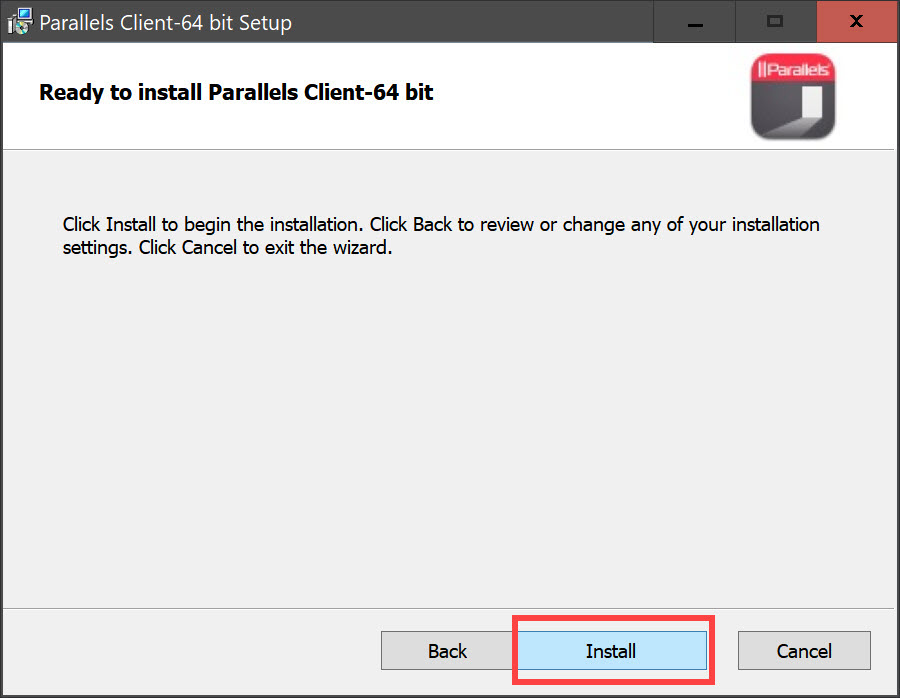
Diagram 22 Initiating the final installation
Once the installation is complete, the final screen pertaining to the installation process will appear as shown in the next diagram. Leave the selection labeled Launch Parallels Client checked and click on the Finish button to proceed to the next step.
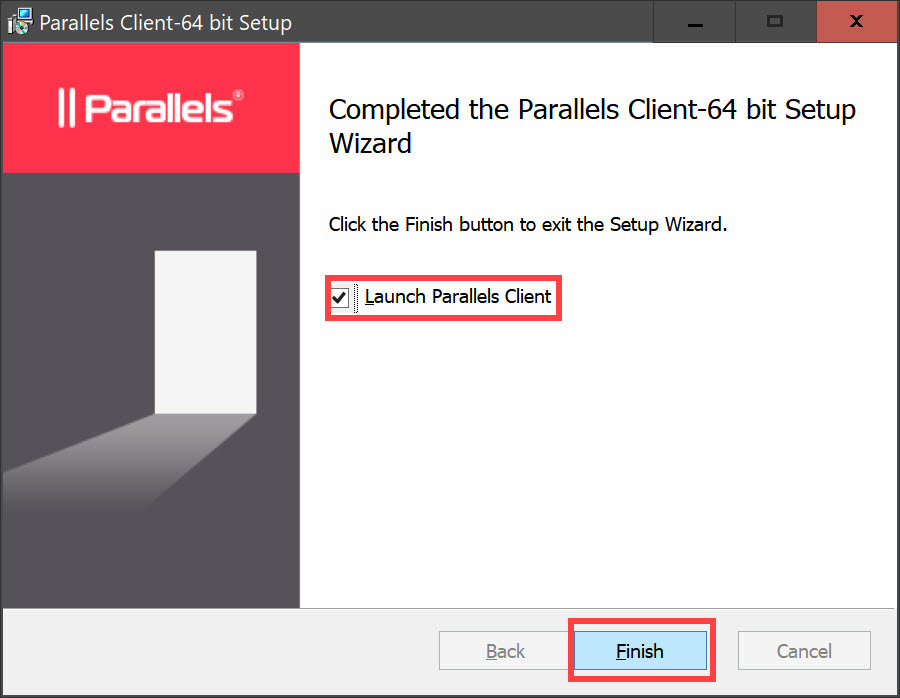
Diagram 23 Completing the installation and launching the parallels client
The CSULA icon displayed in the next screen will confirm that the Parallels client has been installed and a connection has been established to the CSULA Parallels remote access server as shown in the next diagram.
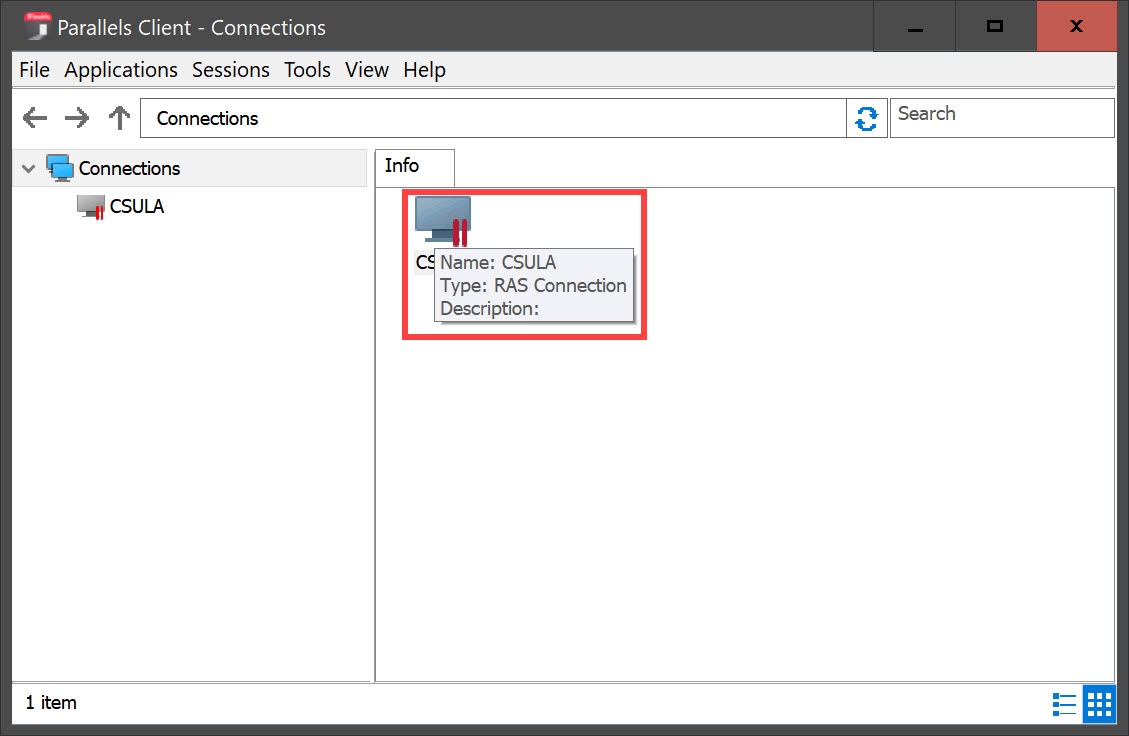
Diagram 24 Screen confirming the remote access server connection
Click or double click on the CSULA icon shown in the previous diagram. This would lead to the next screen for entering the credentials.
Step 3: Connecting to the Parallels Application Server and Launching Microsoft Access
Now, enter the username and password provided by the University and click the button labeled Connect as shown in the following diagram to move to the next step.
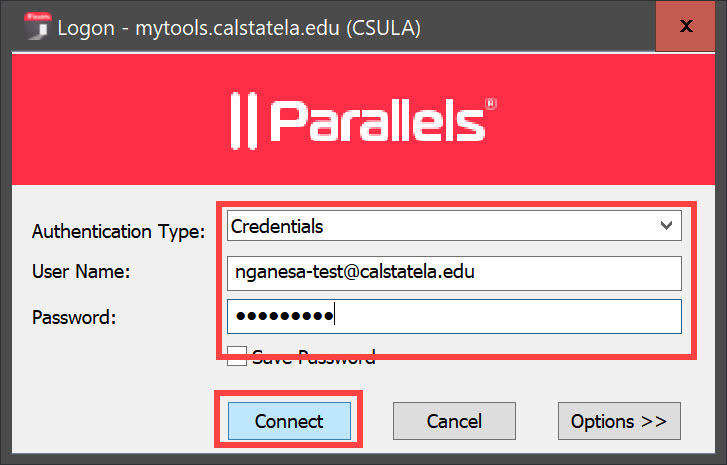
Diagram 25 Logging into the remote access server
The user will now be logged into the application server as shown in the next diagram. All the applications that are available to the user on the application server will now be displayed as shown in this diagram.
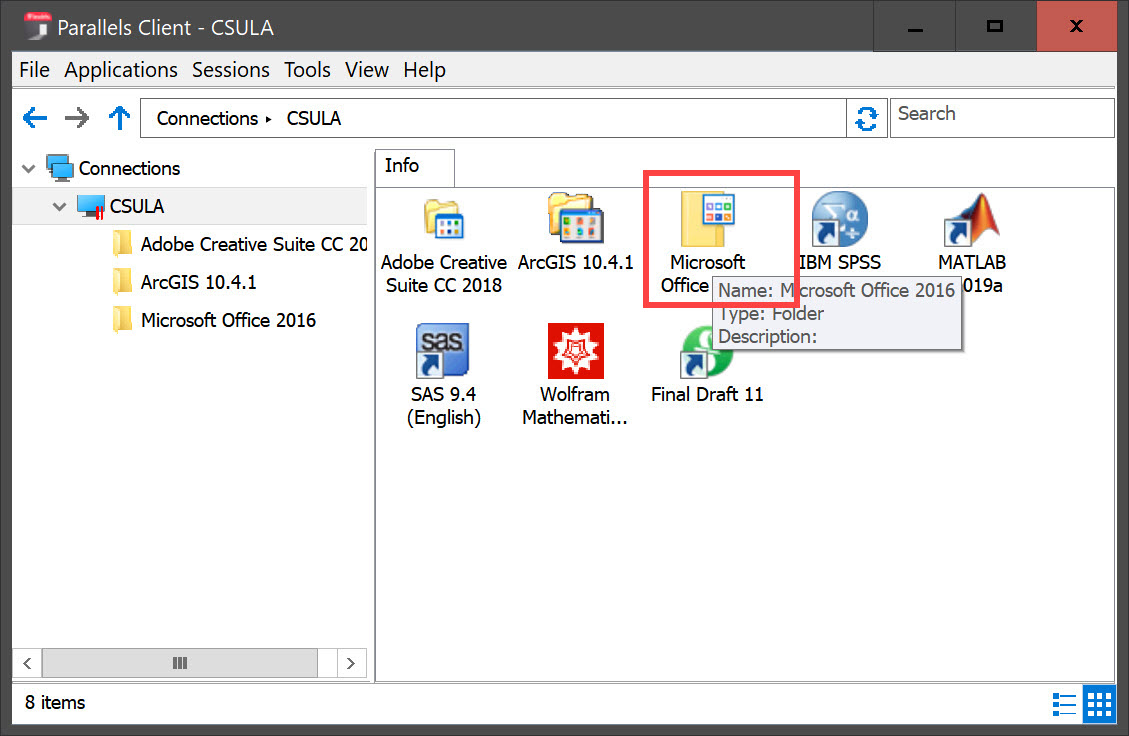
Diagram 26 Groups of applications supported on the remote application server
The applications supported under the group entitled Microsoft Office 2016 will contain the Microsoft Access Database Management System (DBMS). Double-click on the highlighted icon to open the next screen. The Microsoft Office applications there are supported on the Parallels remote access server will now be displayed as shown in the next diagram. For this example, the Access 2016 application needs to be accessed and opened. This is done by double-clicking the icon labeled Access 2016 as shown in the next diagram.
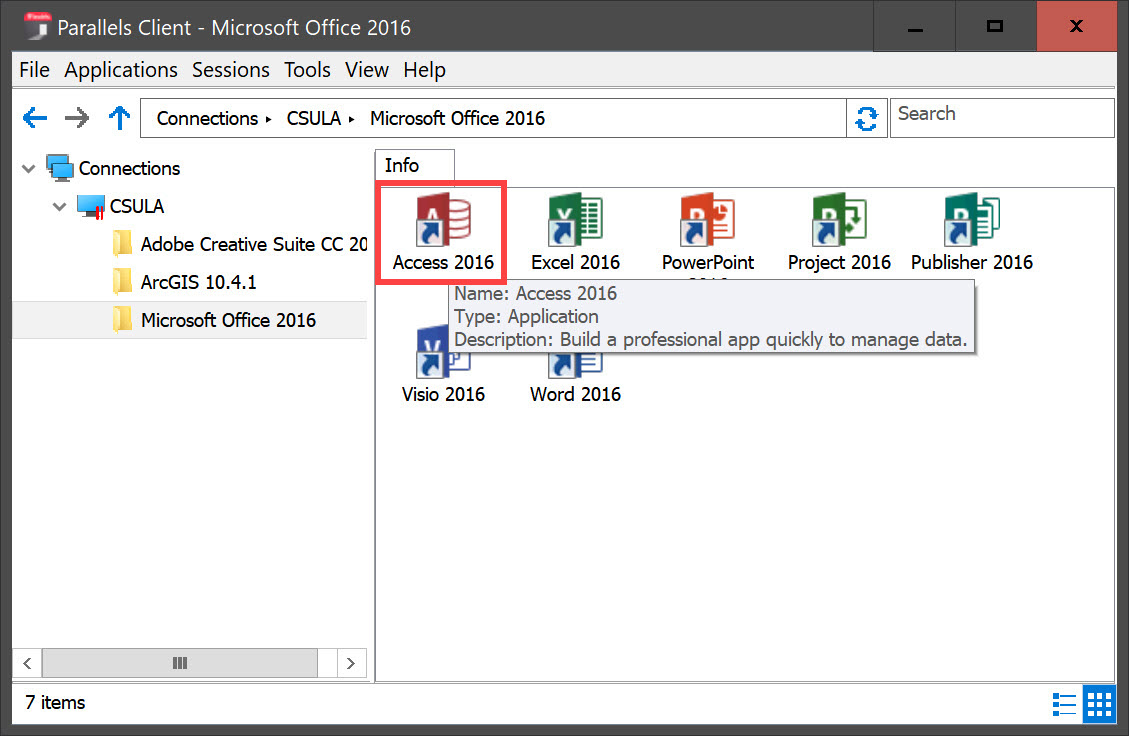
Diagram 27 Access 2016 supported on the remote application server
The Access database management system will now open as shown in the next diagram. Now, a name for the access database to be created and a location to store the database file need to be specified. At this time, attention must be paid to selecting an appropriate folder on the local computer to store the database file. If a local folder is not available to store the database, a new folder needs to be created. It must be borne in mind that the database cannot be stored on the remote access server because the user does not have the privilege to store any files on the remote access server. Therefore, the database file that will be created while using the Access software needs to be stored on the user’s local computer.

Diagram 28 Launching the access DBMS
Step 4: Storing the Data File
Click on the folder icon shown in the previous diagram to specify a name for the database and to select the storage location for the database. An error message will now be displayed, as shown in the next diagram, indicating that the user has no privilege to store the database file on the remote application server. Bypass this message by clicking on the button labeled OK.
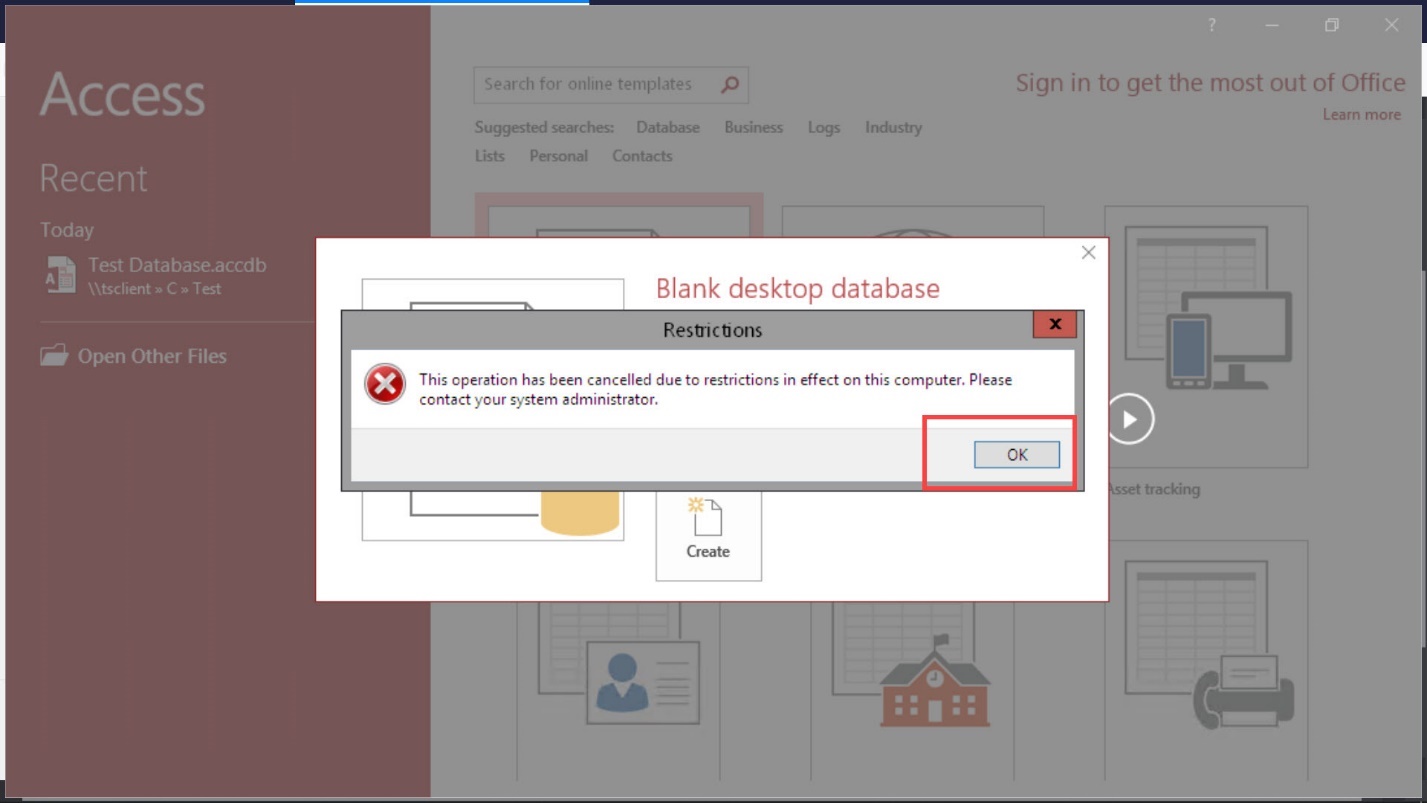
Diagram 29 Display of restriction preventing the storage of the file on the application server
The Windows Explorer screen for storing a file will now be displayed as shown in the next diagram. In this diagram, the icon labeled This PC represents the local computer and not the application server. Double-click on this icon to display the locations on the local computer where the database file could possibly be stored.
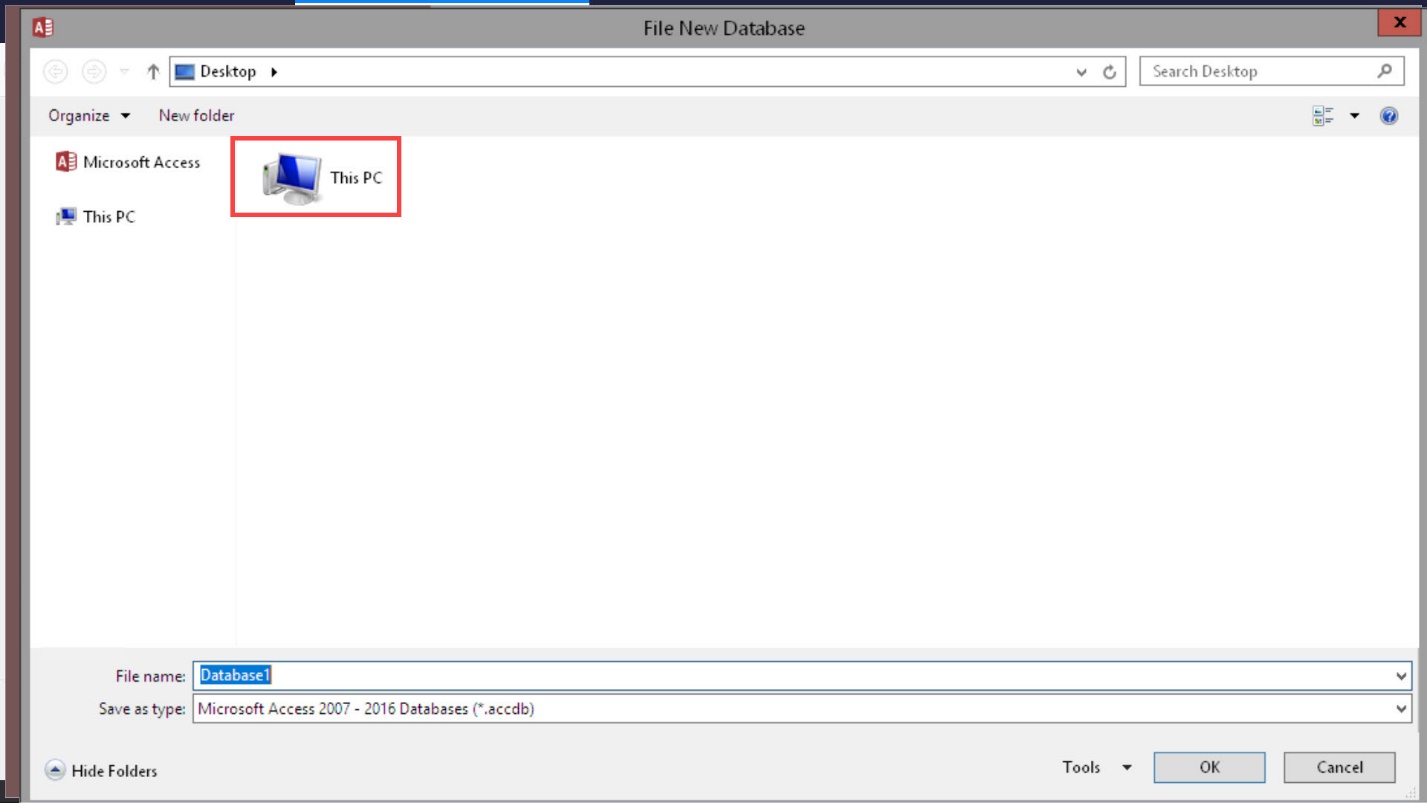
Diagram 30 The local PC icon
At this time, care must be exercised to store the database file on the C drive of the local computer.
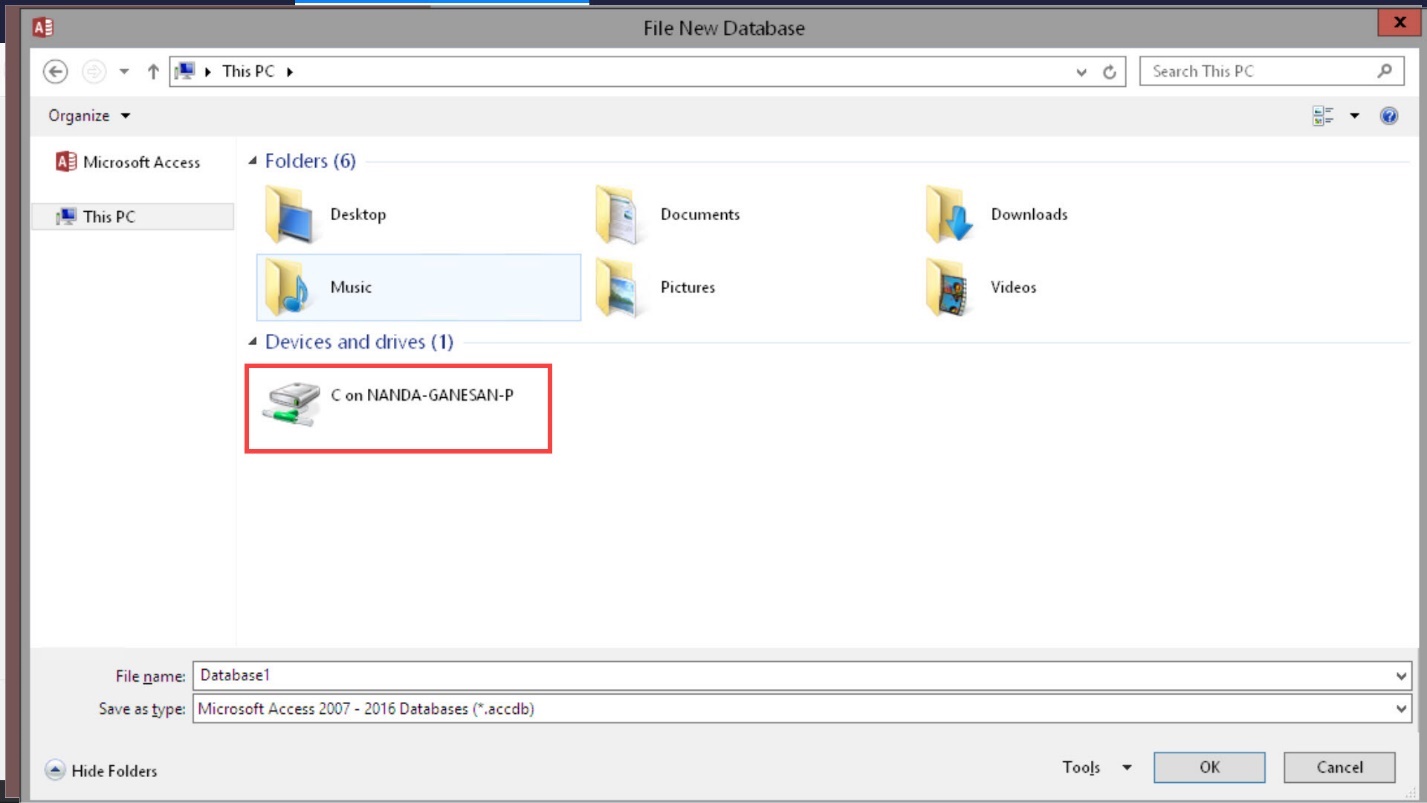
Diagram 31 Selecting the local C drive to store the fire
Click on the C drive icon shown in the above diagram to display the contents of the C drive as shown in the next diagram. In this example, the database file will be stored in the Test Folder. Open the folder by clicking on the folder icon displayed and highlighted in the diagram.
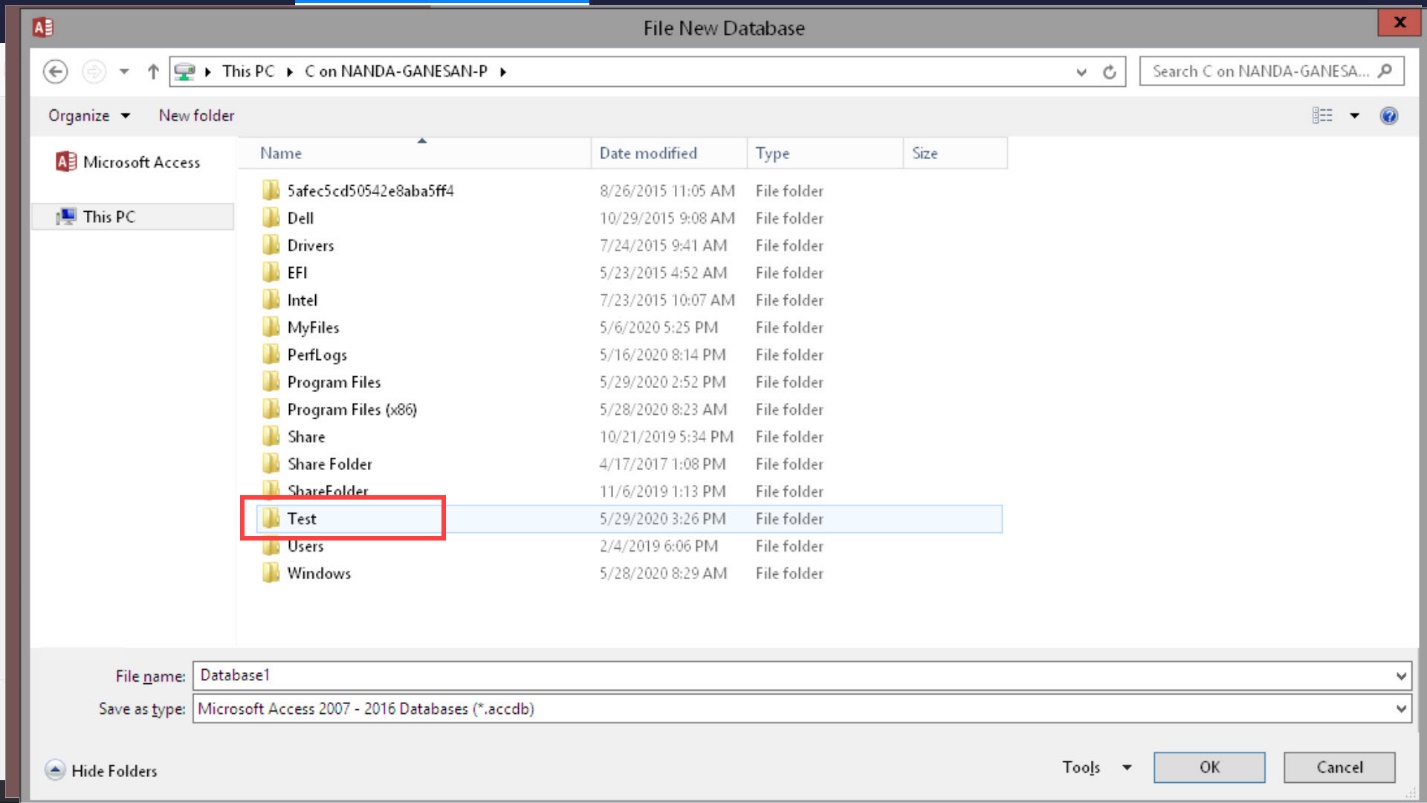
Diagram 32 Selecting the folder to store the file
Now, provide a name for the database file and click on the button labeled OK shown in the next diagram to move to the next step.
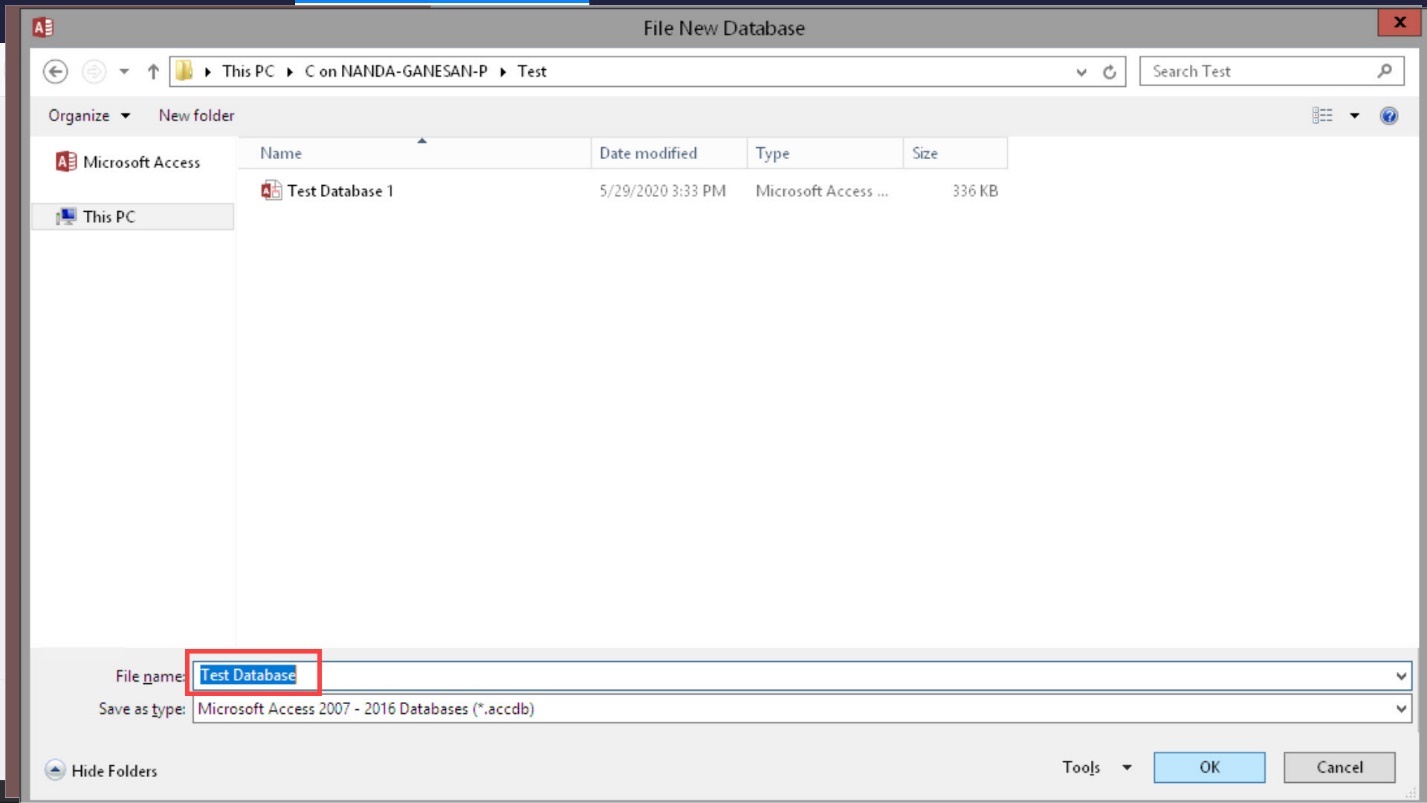
Diagram 33 Providing a name for the database application and confirming the location restore the application file
The initial database creation window will appear again, displaying the database name and the correct folder name on the local computer to store the database. Now, click the Create button highlighted in the next diagram to start using the Access program.
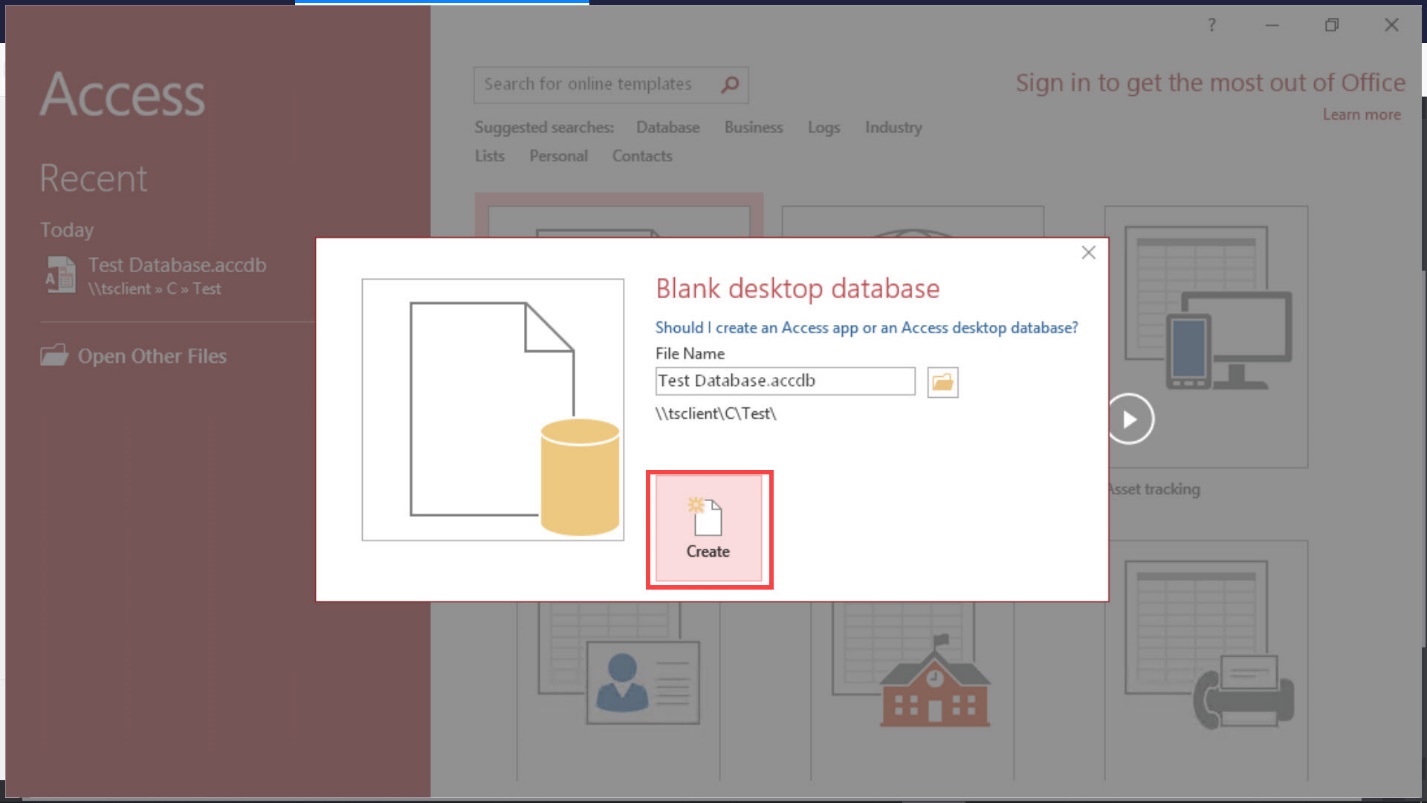
Diagram 34 Creating the database
The screen as displayed in the next diagram will now show that the Access DBMS is launched and ready to use.
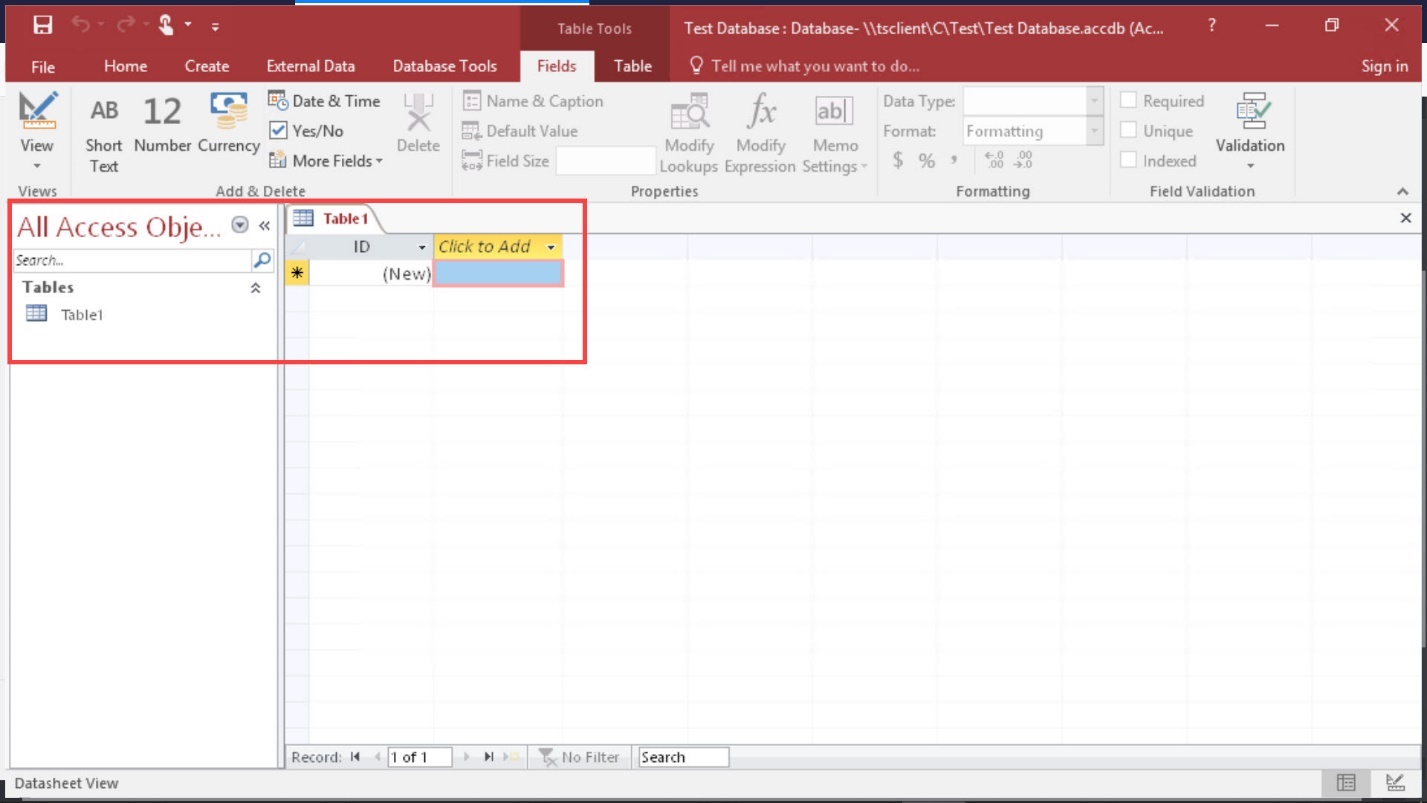
Diagram 35 Database is launched and ready to use
There might be instances where clicking on the Create button may result in an error message being displayed as shown in the next diagram. Ignore this message by clicking on the button labeled OK. Afterwards, follow the steps described earlier to specify the name of the database file and the location of the local folder where the database file should be stored.
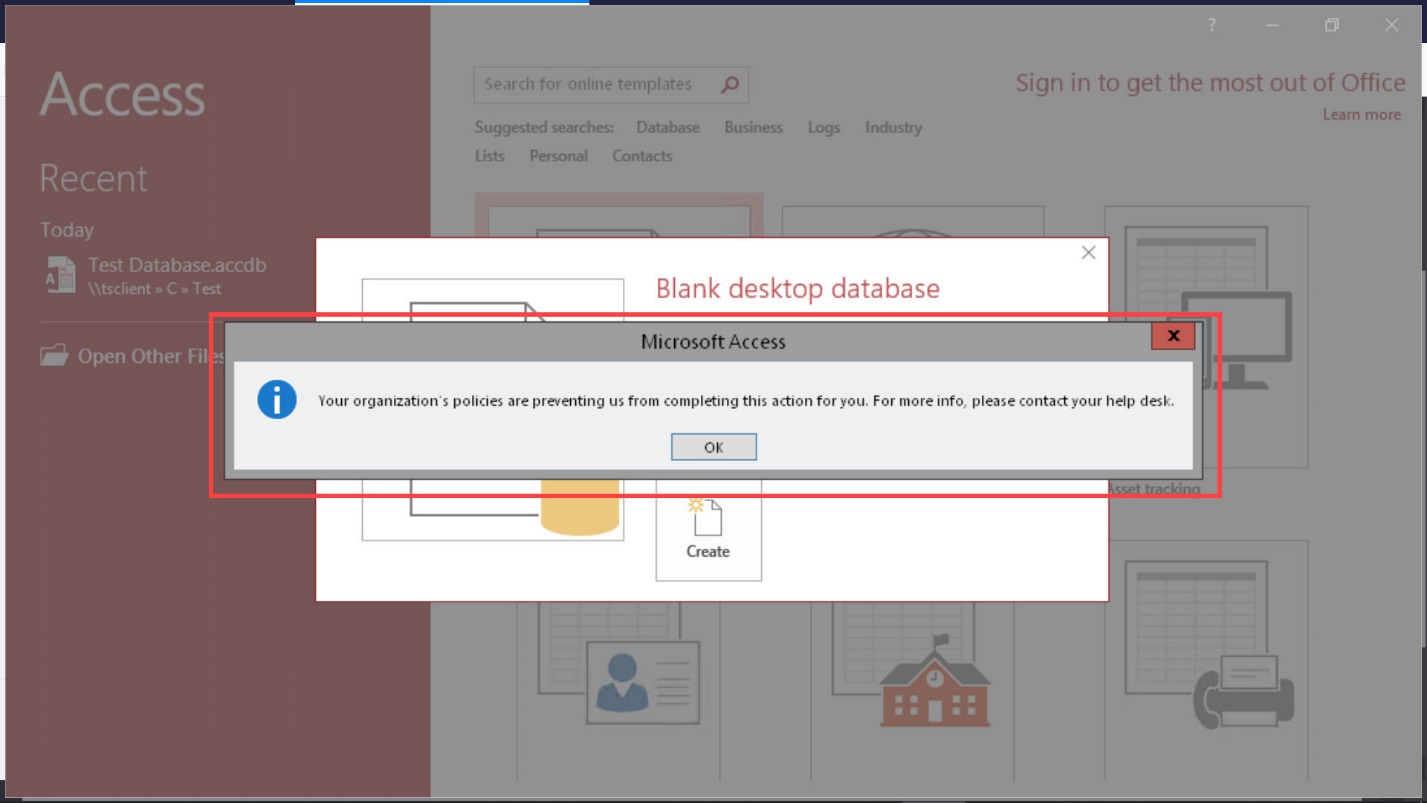
Diagram 36 Error message to be ignored
Step 5: Managing the Parallels App
A handful of details on troubleshooting and managing the Parallels client will now be presented. After using and closing an application on the Parallel application server, the Parallels client may still be running on the local computer unless it has been stopped explicitly. In order to check whether the Parallels app is still running, the task tray icons need to be visually examined as shown in the next diagram. The diagram shows that the icon depicting the Parallels client is visible in the tray. If the icon visible in the task tray, then it is an indication that the Parallels app is running in the background.

Diagram 37 Checking whether the parallels app is still running
Double-clicking on the icon will open a screen displaying all applications supported on the remote access server. Incidentally, these are the same applications that were displayed earlier on a similar screen.
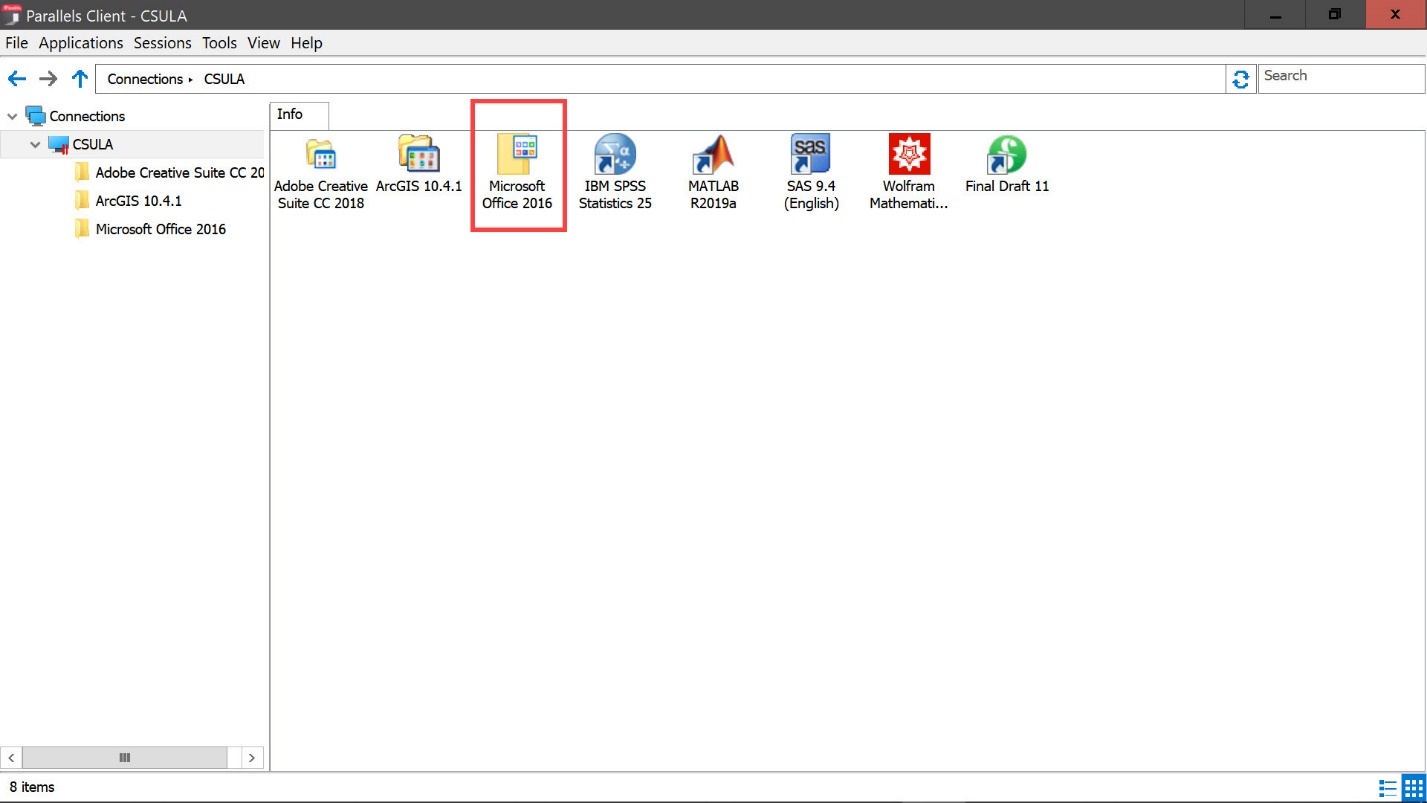
Diagram 38 Accessing the applications from the icon in the tray
Clicking on any one of the icons will open the applications supported under the group of applications represented by the icon. On the other hand, right-clicking the Parallels icon in the tray will result in the display of a popup menu from which the applications could be accessed. This is another way to open the applications on the remote access server. From the popup menu shown in the following diagram, click on the entry CSULA to display the applications that are supported on the remote access server. It would now be possible to select one group of applications and then select one application from that group to be launched. This is yet another way of starting an application, such as for example, Microsoft Access.
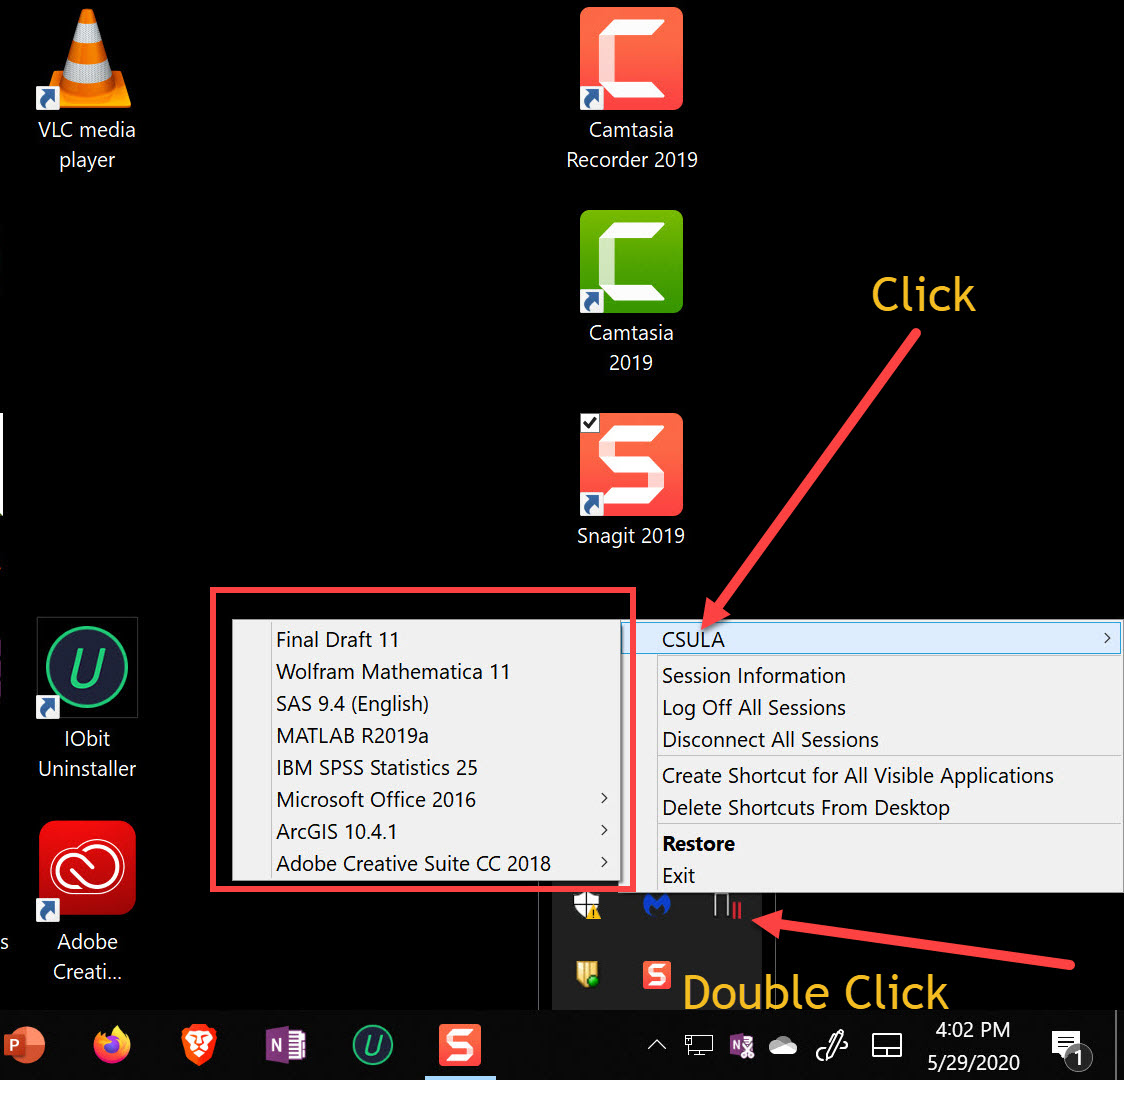
Diagram 39 Listing the applications available on the application server
In order to avoid any confusion or conflict while using the Parallels app, the best practice would be to log off from all sessions after using a software application on the remote access server. It can be achieved by clicking on the Log Off All Sessions entry on the popup menu as shown in the next diagram. It is important to note that although the user is logged off from all sessions, the Parallels client may still be running in the background.
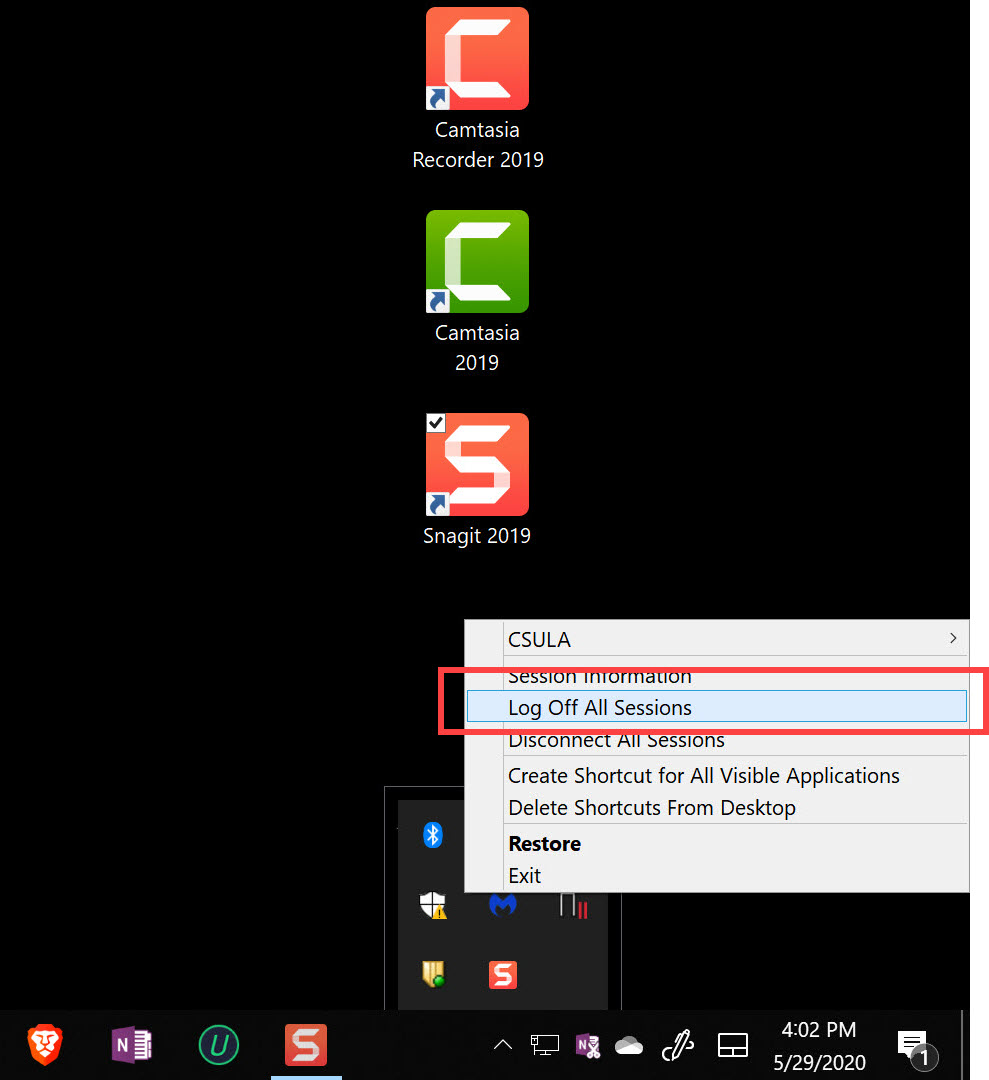
Diagram 40 Logging off from all active sessions
Therefore, to completely stop the Parallels client from running on the computer, the Exit option on the popup menu should be selected as shown in the next diagram to stop the Parallels app.
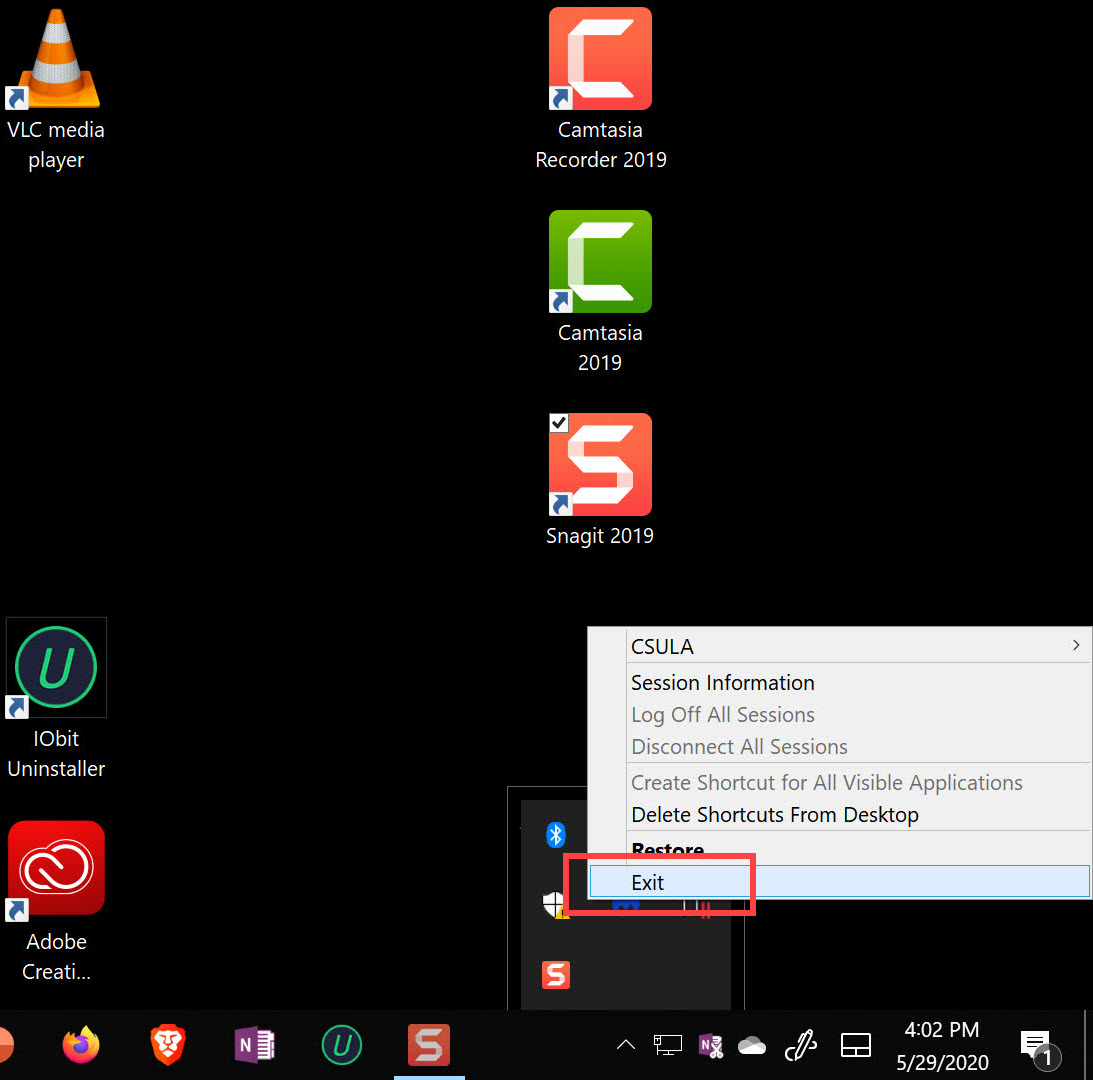
Diagram 41 Stopping the parallels app
Step 6: Connecting to the Application Server from Windows and Launching an App
Also, it is important to note that after stopping the Parallels apps, it needs to be started whenever it is to be used the next time. This can be done in two different ways. One is to launch the app by clicking on the Parallels shortcut displayed on the Desktop as shown in the next diagram.
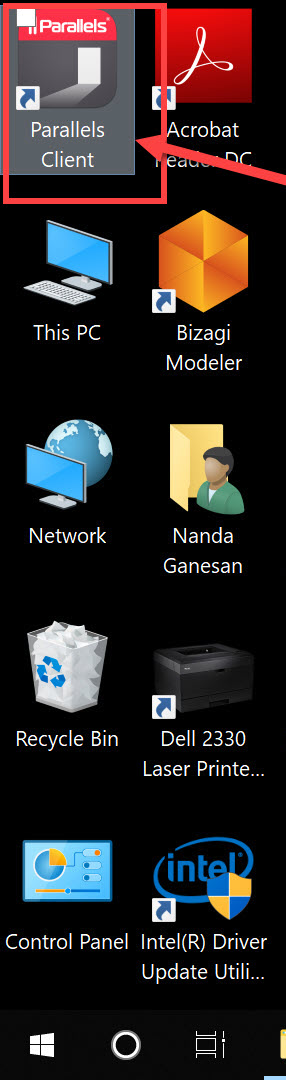
Diagram 42 Launching the parallels app from the Desktop
The other approach would be to go to the Windows start button at the bottom left-hand corner of the screen and search for the Parallels app. Click on the Parallels app listed on the screen as shown in the next diagram to launch the app.
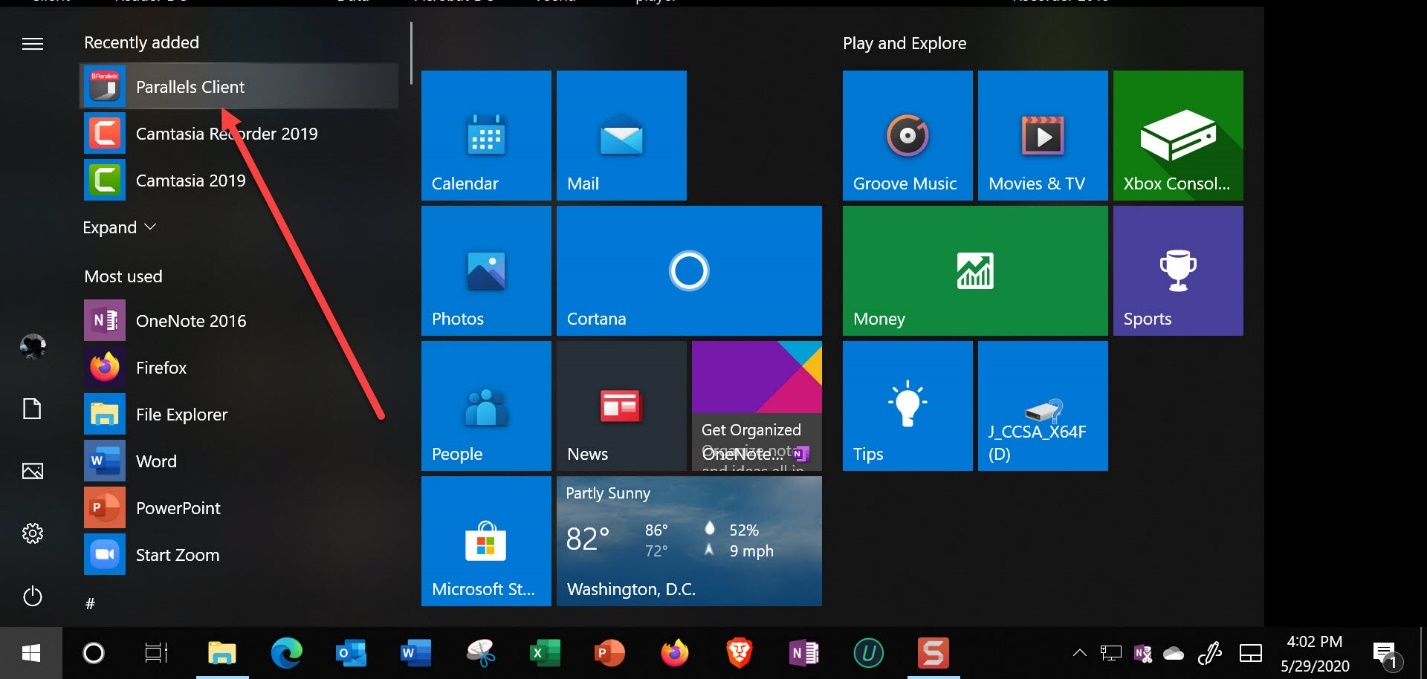
Diagram 43 Launching the parallels app from the start button
The screen shown in the next diagram will appear displaying the icon labeled CSULA confirming that the connection to the remote access server has been established. Establishing the connection is not the same as logging into the server to use the applications on the server. Click on the highlighted icon to move to the next step to log into the remote access server.
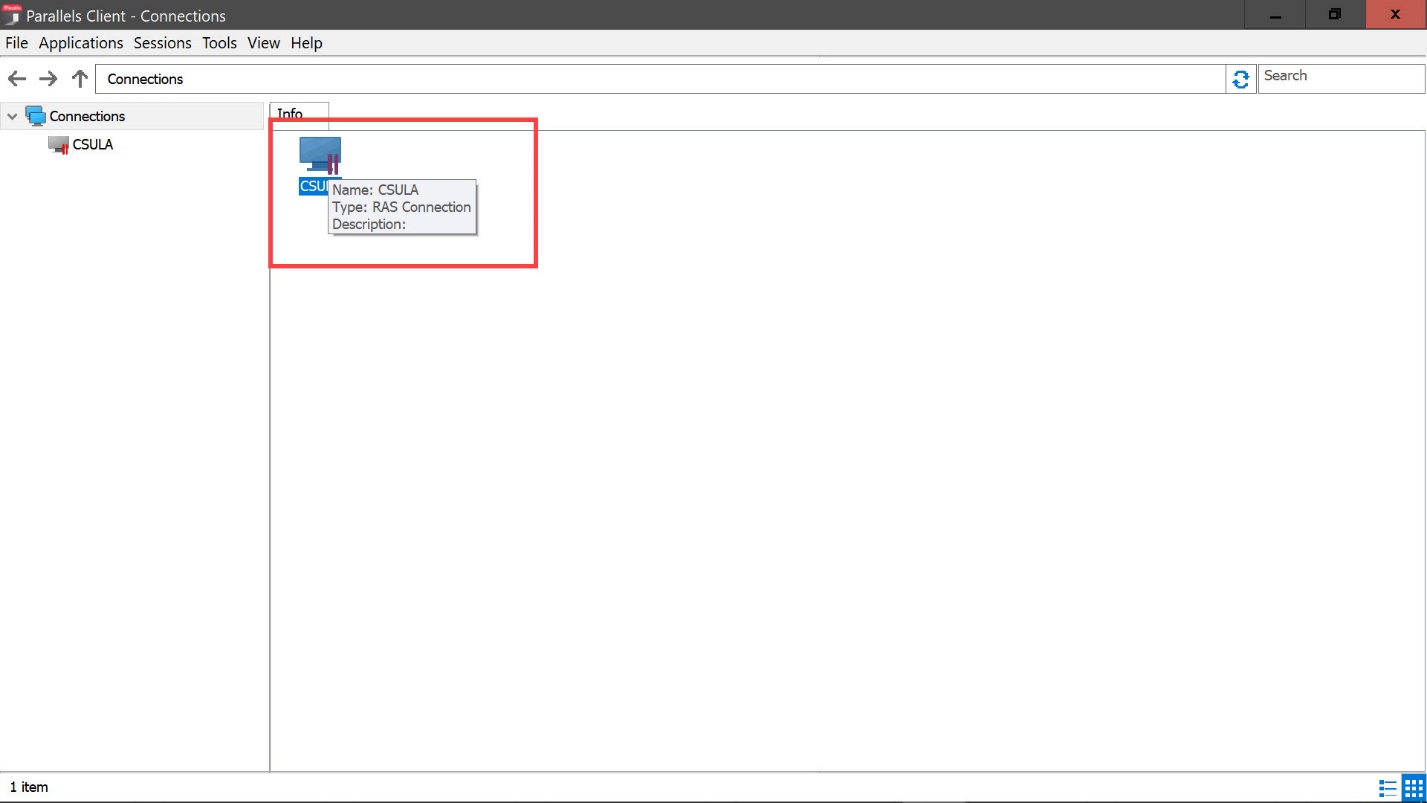
Diagram 44 Connection established to the remote application server
As before, the screen for entering the credentials will be displayed. Enter the University provided username and password to log into the remote application server as shown in the next diagram.
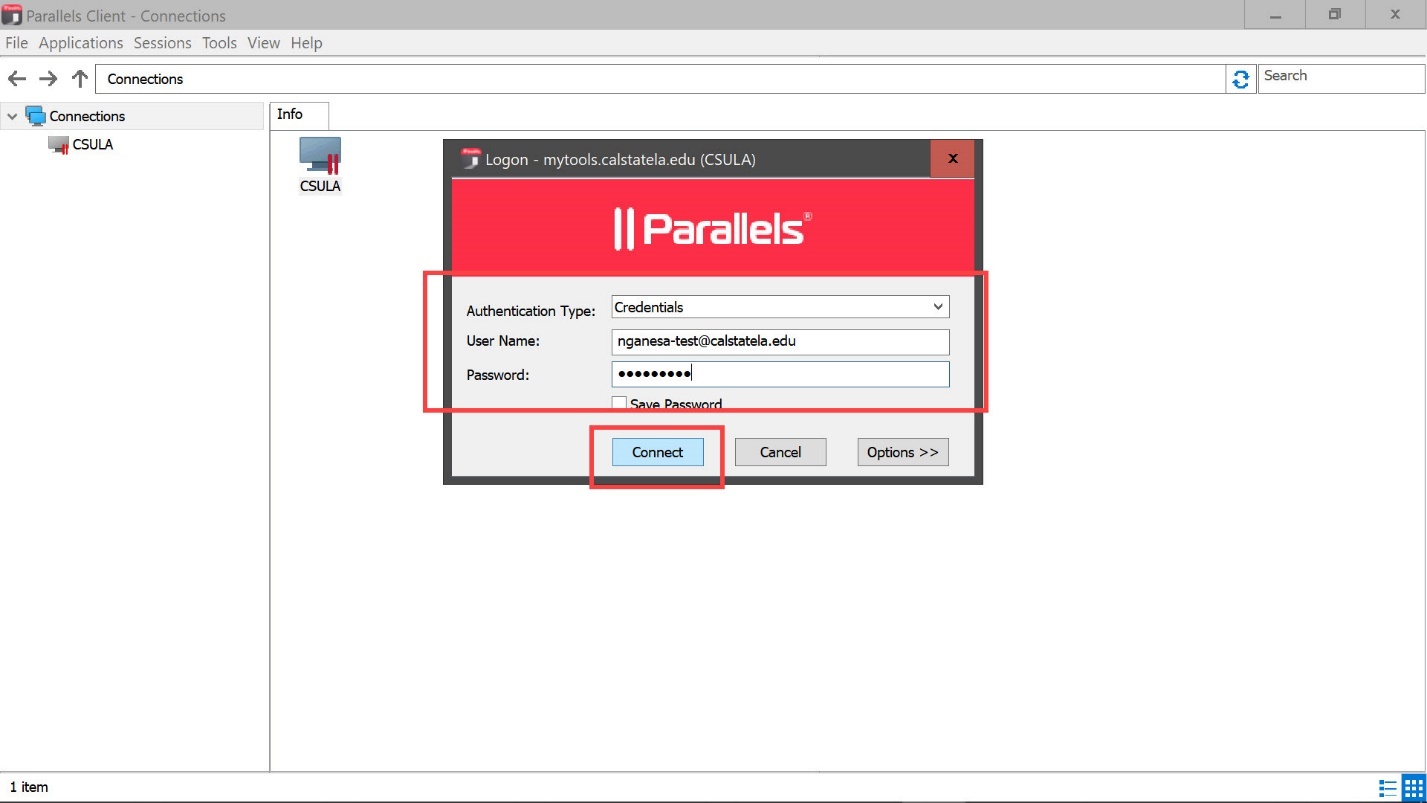
Diagram 45 Logging into the remote application server
Once again, several groups of applications will be displayed on a new screen as shown in the following diagram. From this screen, one can navigate to the required application, such as for example, Microsoft Access, by first clicking on the icon group labeled Microsoft Office 2016 as shown in the next diagram. Microsoft Access can then be launched by clicking on the Microsoft Access icon that would appear on the next screen. The procedure to launch and use Microsoft Access is similar to the procedure explained earlier in this tutorial.
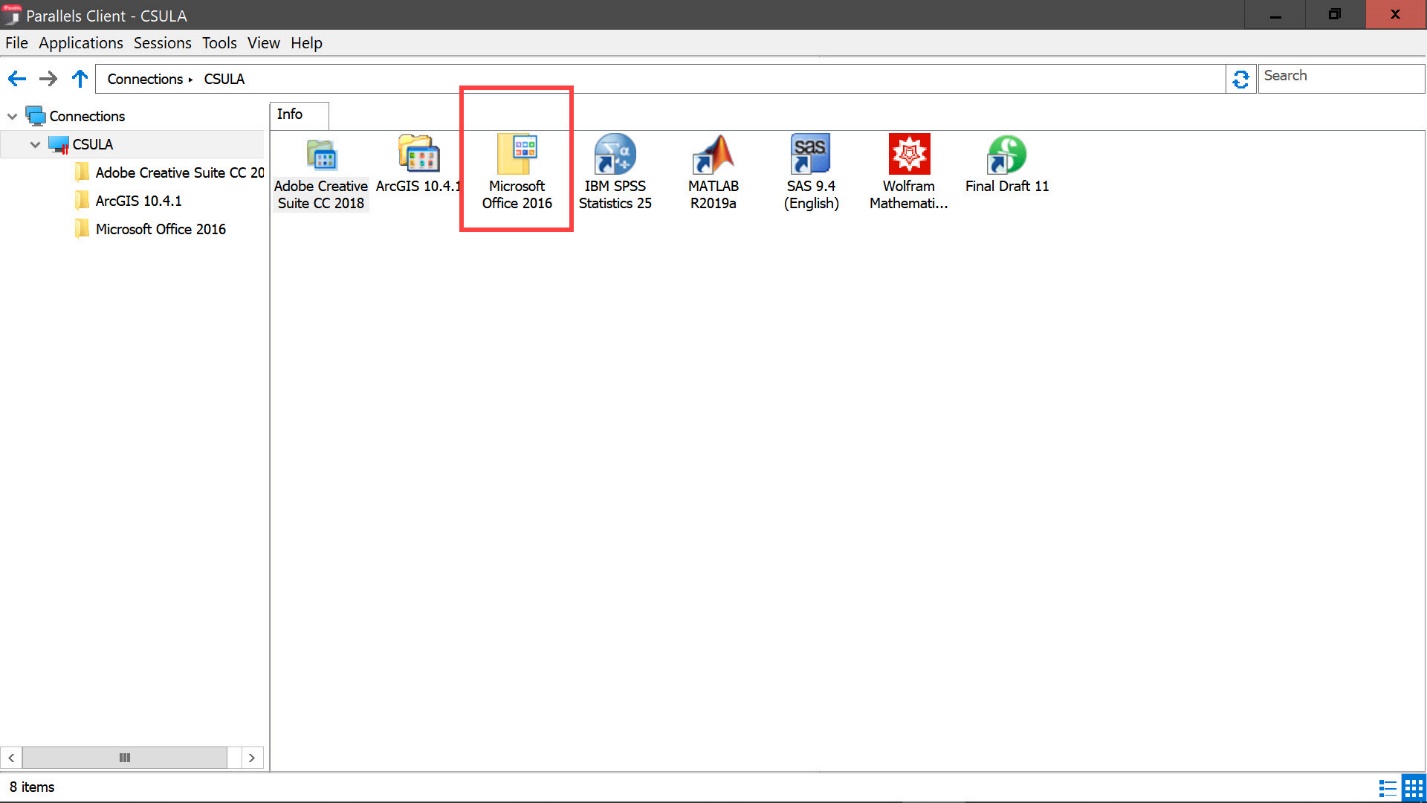
Diagram 46 Accessing the Microsoft Office 2016 group of applications
The fact that the Parallels client is currently running is confirmed, once again, by the Parallels icon that would appear in the taskbar tray as shown in the next diagram.
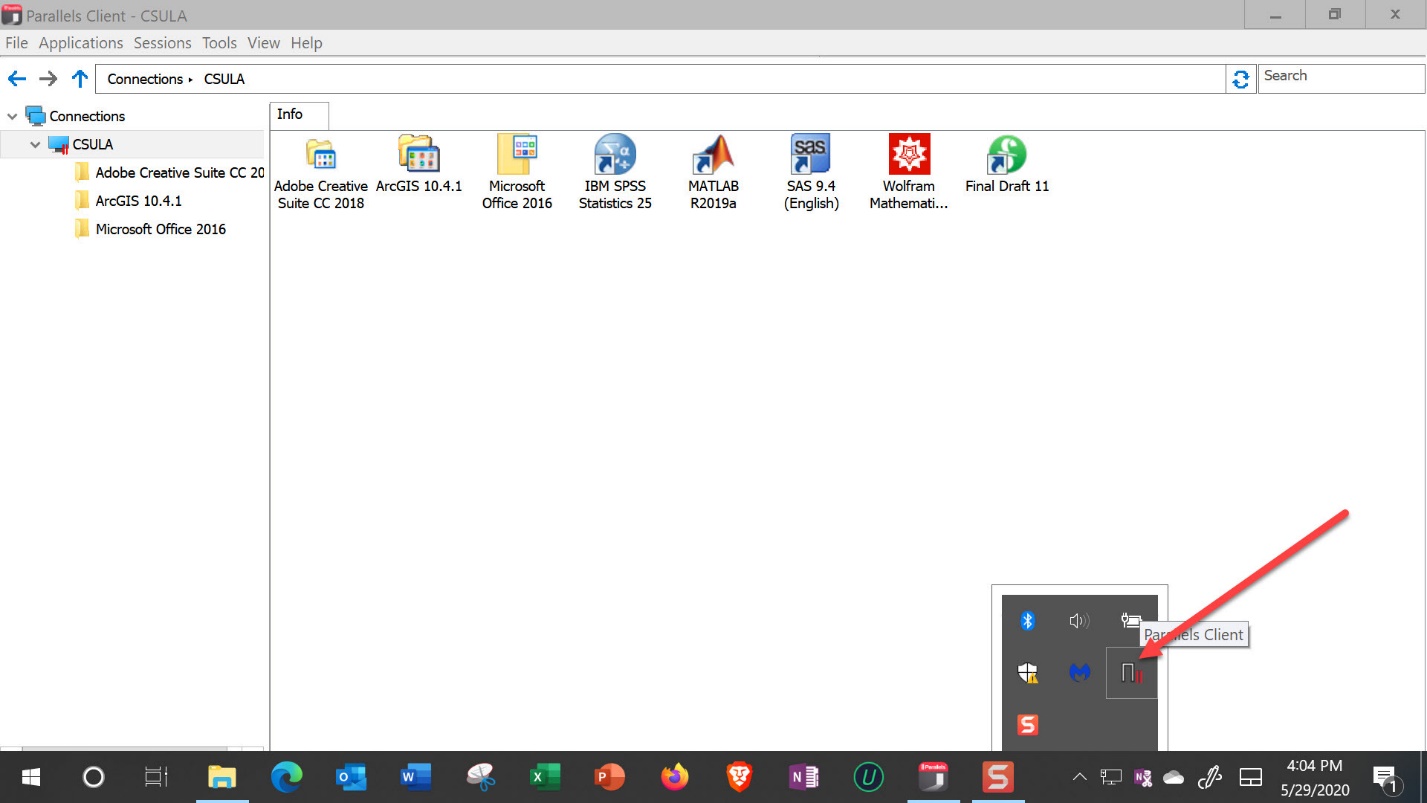
Diagram 47 Icon indicating that parallels app is still running
As mentioned before, it is important to log off from all sessions after using the Microsoft Access application on the remote access server by selecting the appropriate entries on the popup menu shown in the next screen. Incidentally, the popup menu will appear when the Parallels Client icon is right-clicked.
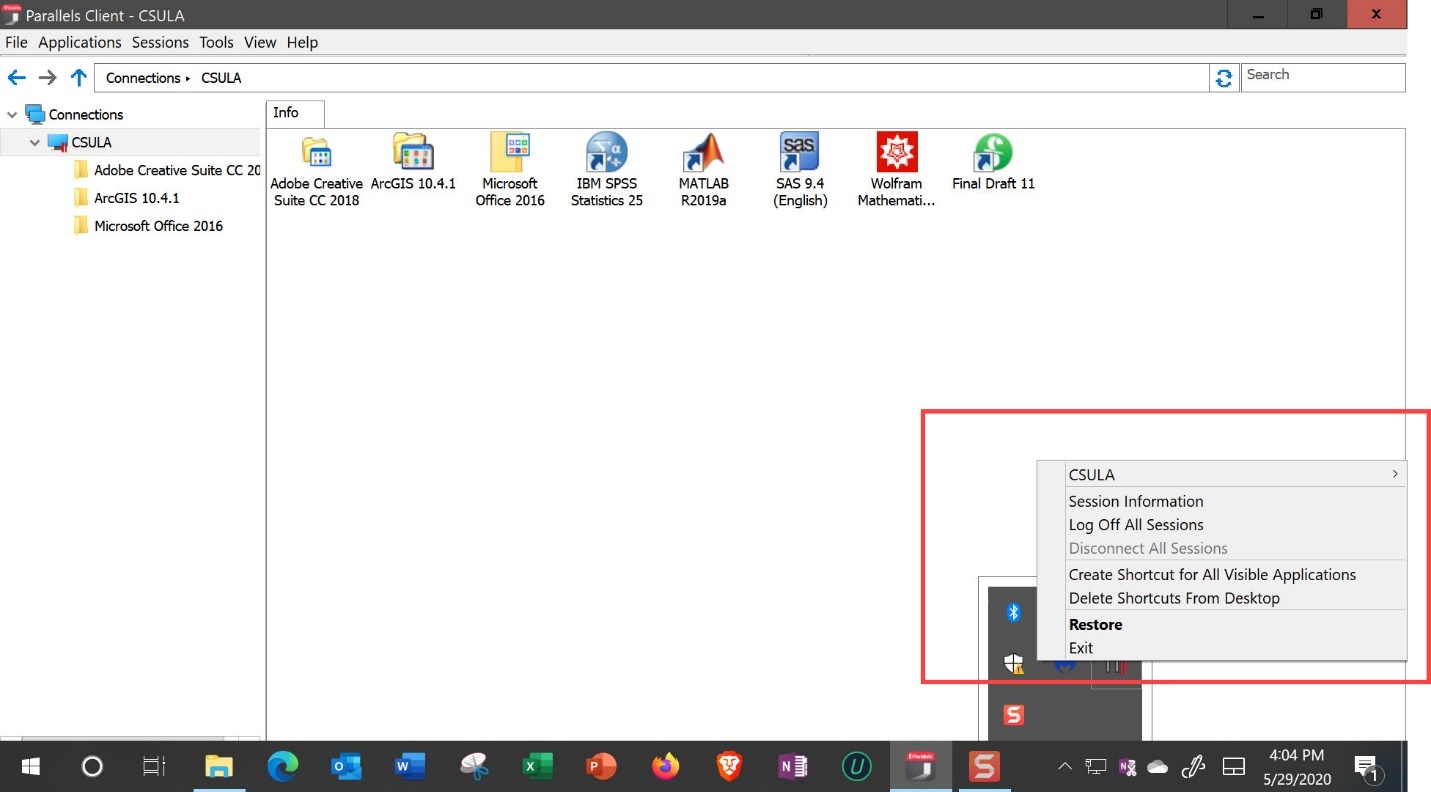
Diagram 48 Popup menu for logging off and stopping the parallels app
Step 7: Connecting to the Application Server Through the Web and Launching an App
Now yet another method for accessing and using the applications on the remote access server will be described. The first step, in this case, would be to enter the web address, mytools.calstaetla.edu, on a browser as shown in the next diagram.
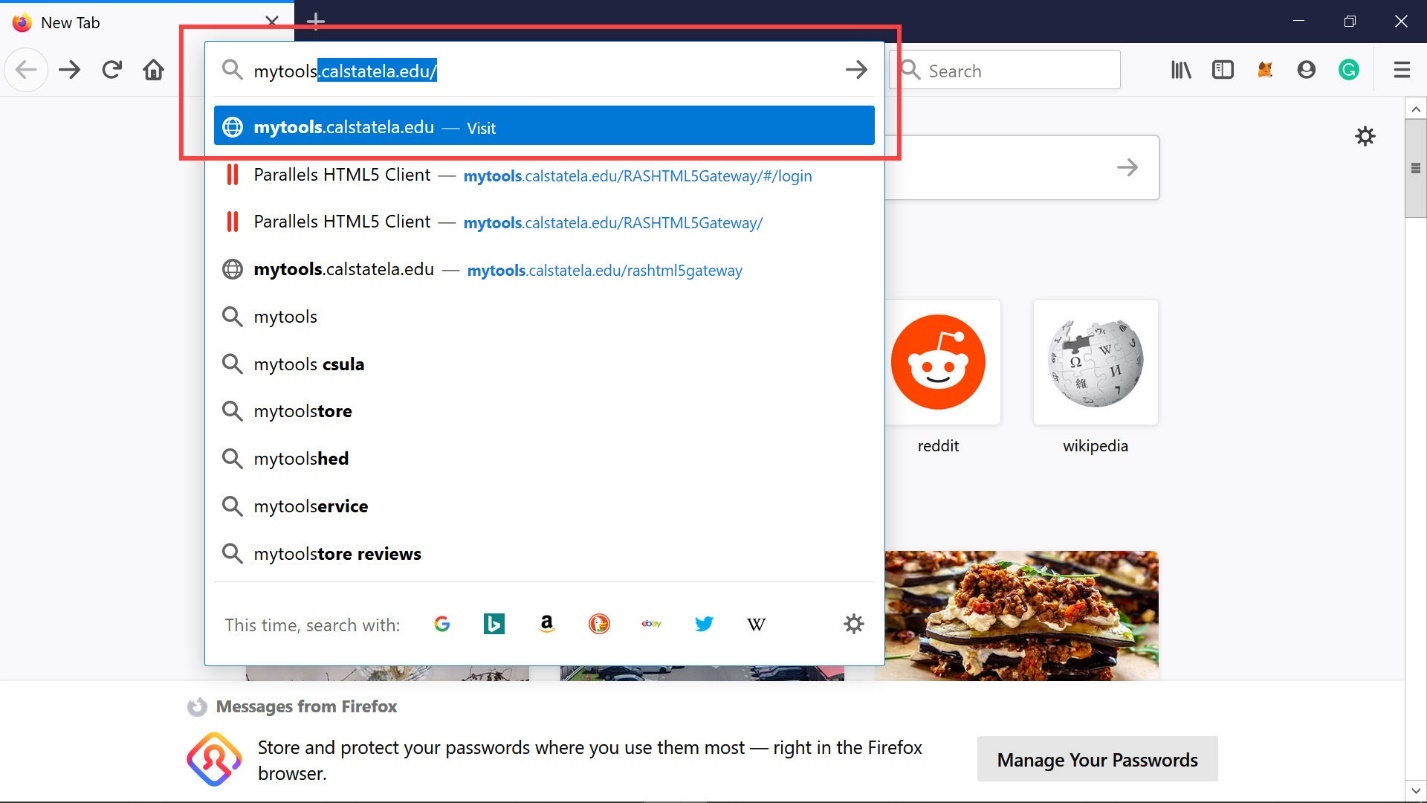
Diagram 49 Accessing the log into my tools web page
When the address is entered, the screen shown next will be displayed. Enter the University login credentials to log in to the remote application server.

Diagram 50 Log into my tools webpage displayed
The next diagram shows the screen after entering the username and password.
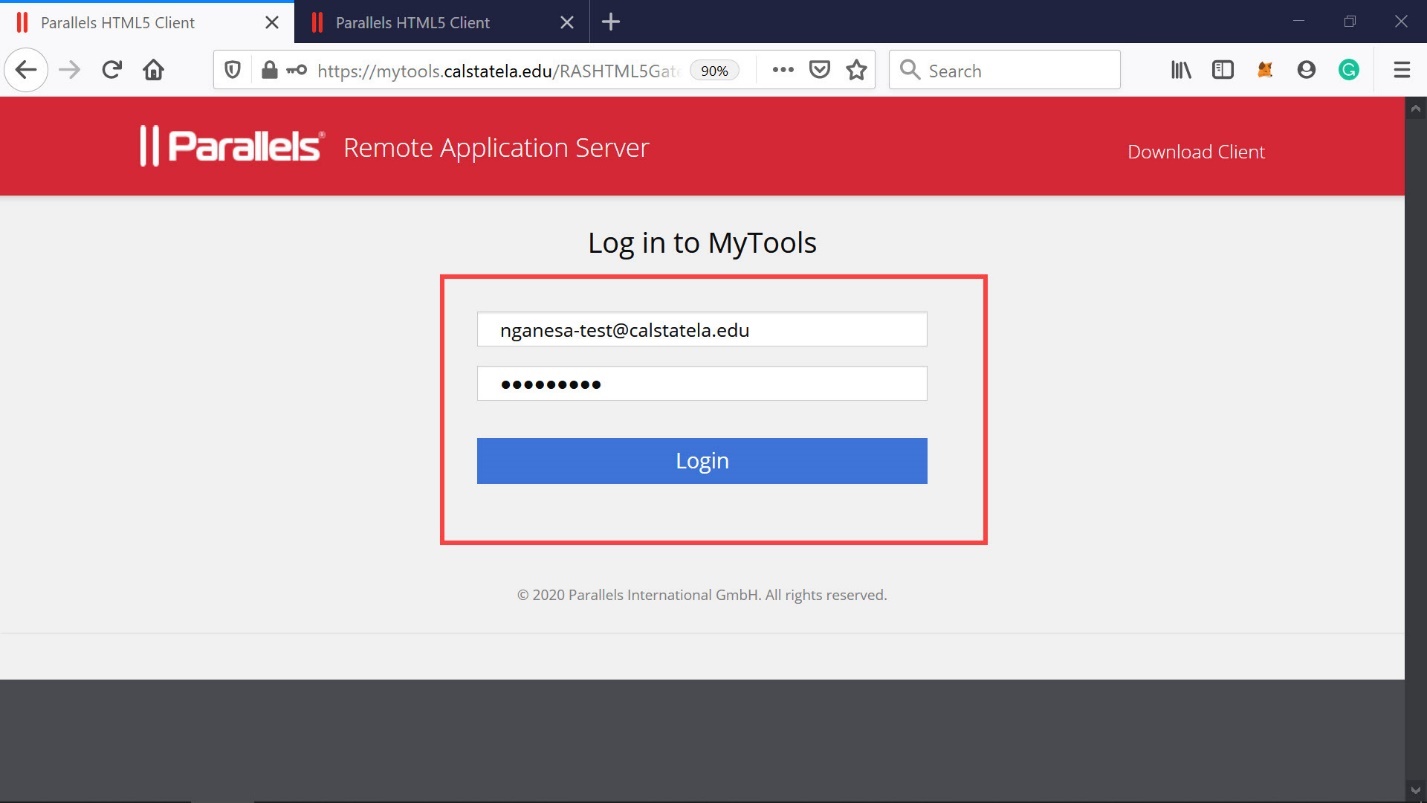
Diagram 51 Providing the credentials to log into the application server
Click on the login button to log into the remote access server. The screen shown in the next diagram will now be displayed. Click on the button labeled Open Link to connect to the remote access server. Since the option that indicates “remember my choice” is ticked, this box will not appear the next time when logging into the server.
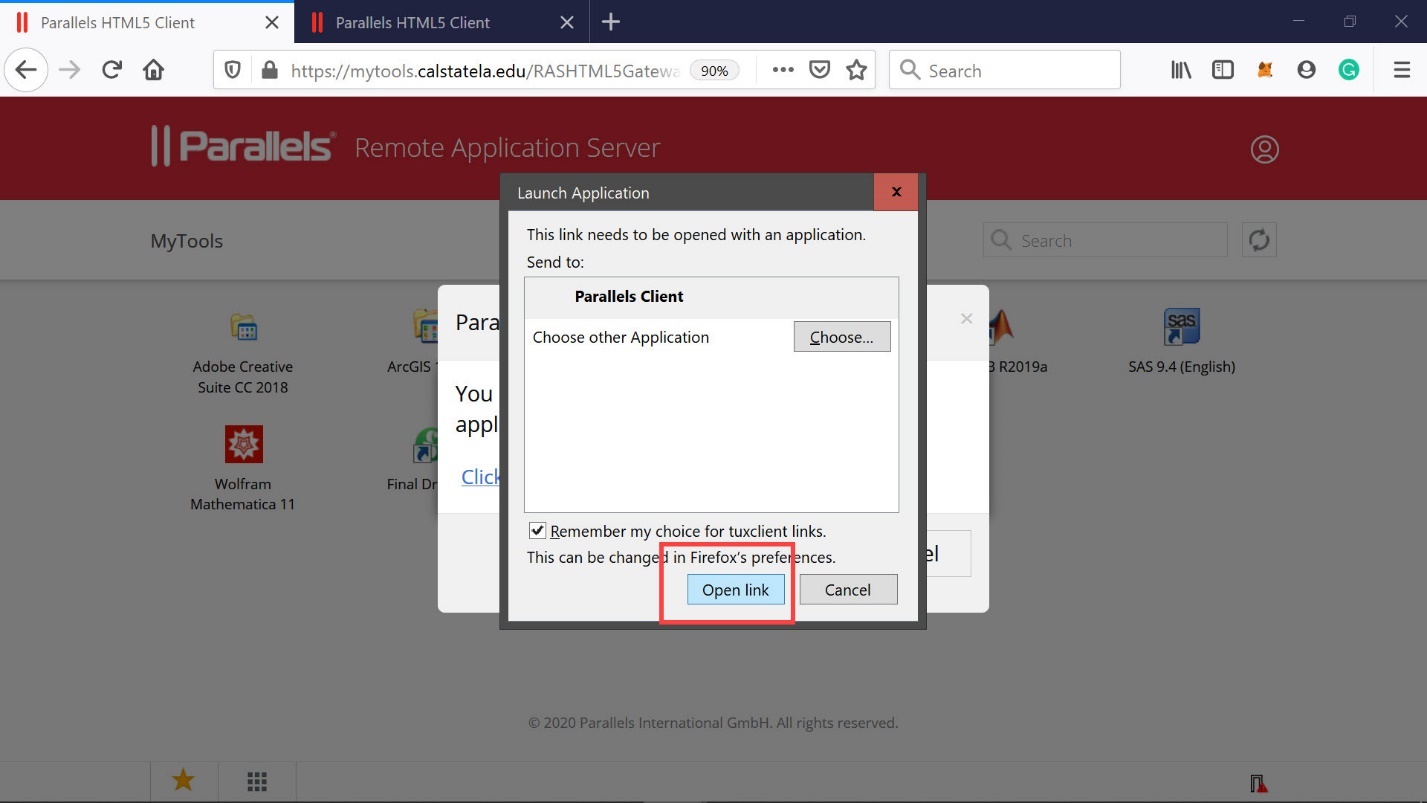
Diagram 52 Opening the link to access the application server
If a message similar to the one shown in the next diagram appears, ignore the message by clicking on the Cancel button.
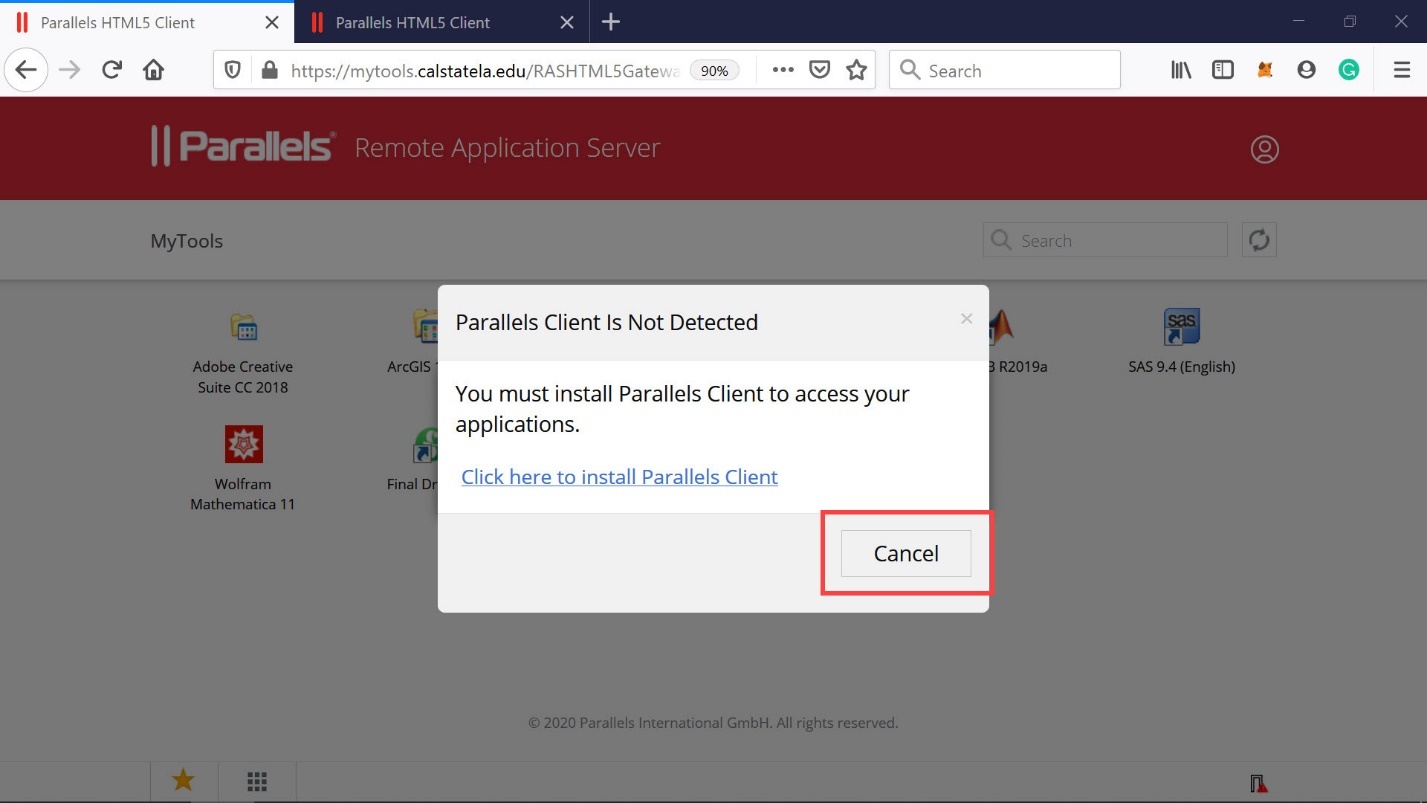
Diagram 53 Canceling the message since the application is running
Now, the groups of applications available on the remote access server will be displayed as shown in the next diagram. The individual applications under each group can now be accessed as explained before.
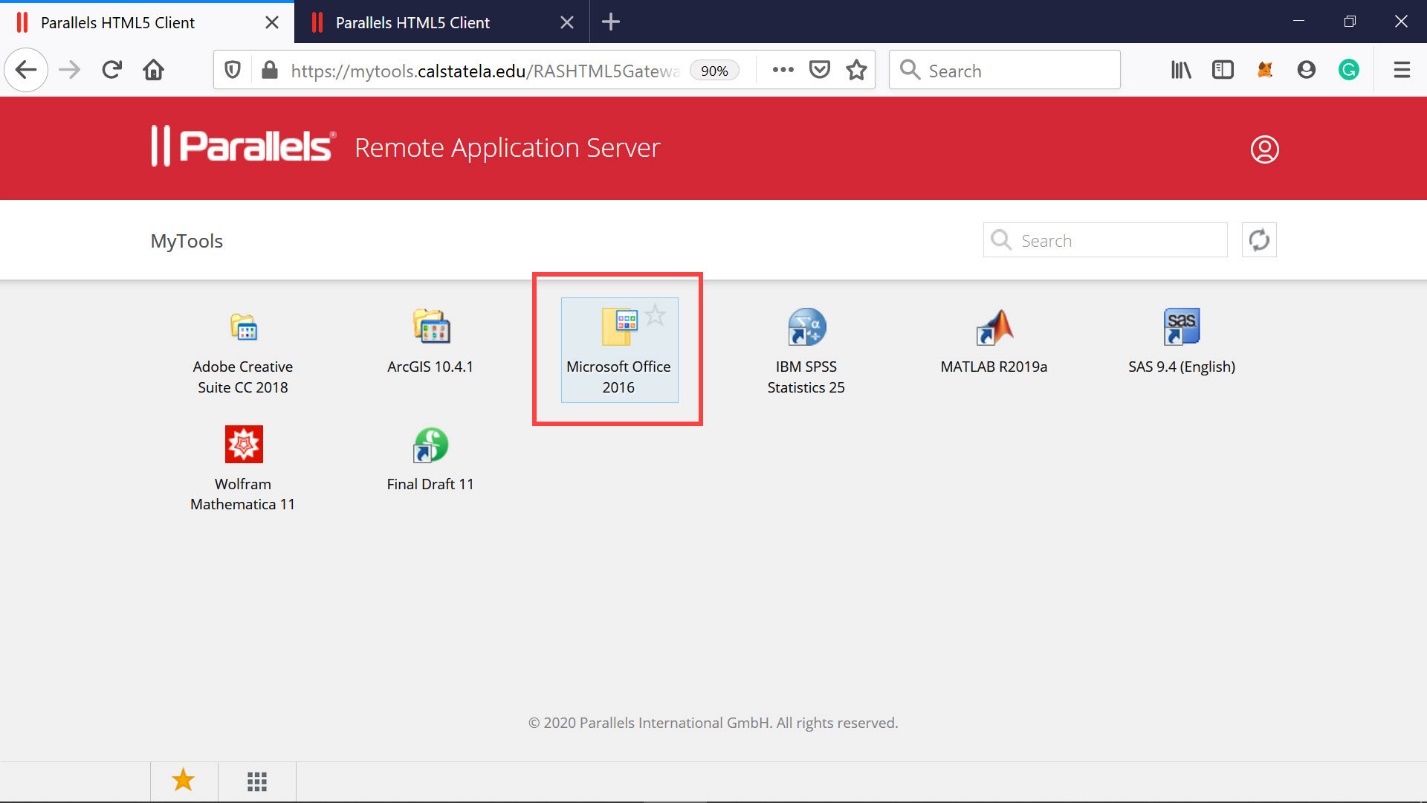
Diagram 54 Accessing the Microsoft Office 2016 group of software
Once again, the Microsoft Access DBMS software can be accessed by double-clicking the Microsoft Office 2016 icon shown in the previous diagram and then clicking on the Microsoft Access icon that would appear on the next screen as shown in the following diagram.
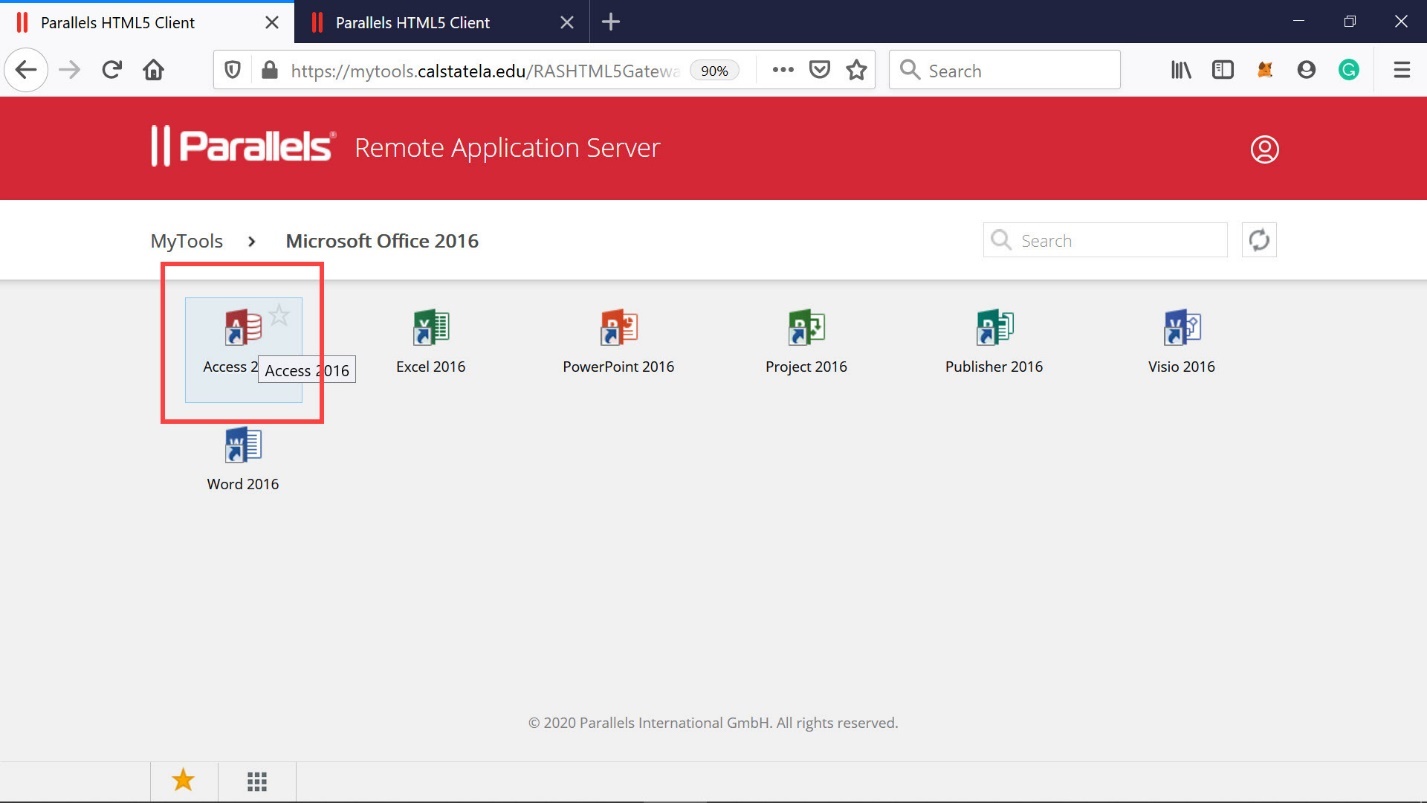
Diagram 55 Selecting the access 2016 DBMS
The next three diagrams show the Access DBMS being launched.
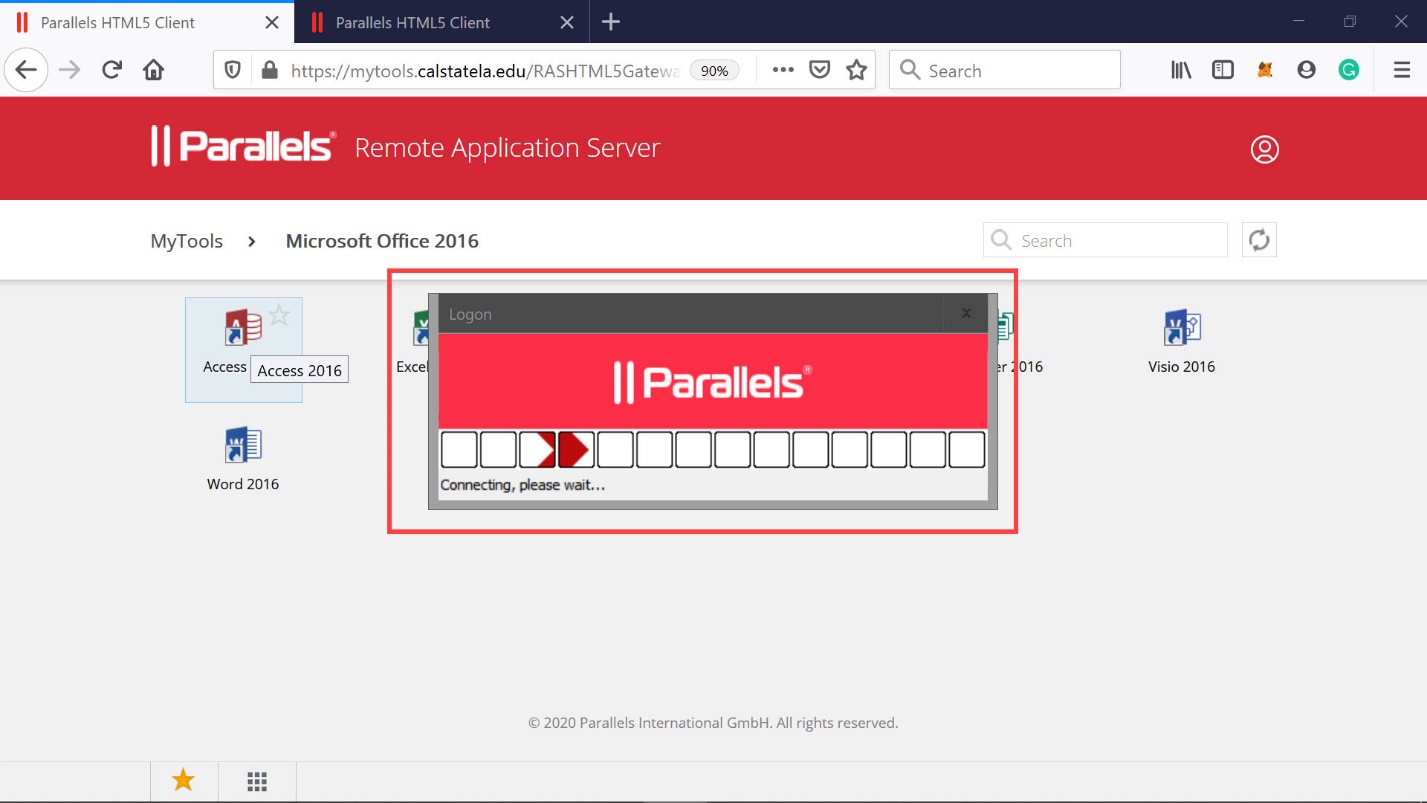
Diagram 56 Parallels initiating the launch of Microsoft Access