
Lab 2 How to take a soil sample?
Lab 2 How to take a soil sample?
Soil testing lies at the foundation of soil health and sustainable nutrient management. Just like doctors diagnose health issues based on expressed symptoms and blood analyses, soil scientists and agronomists rely on soil testing to optimize soil health and plant nutrition. The first step in soil testing is taking a representative soil sample. Watch the video to learn how to take a soil sample.
- What is the typical cost of a soil probe?
- Why should the tools you use for soil sampling be clean and free of rust?
- Why do we typically sample the top 6 inches of soil, and why is it important to target this soil layer?
- Why do you think the farmer in the video cut a core-like shape out of the soil slice that was taken with a shovel?
- What does 'representative' sample mean?
- How does the grower in the video make the judgement call on how many samples to send for analysis?
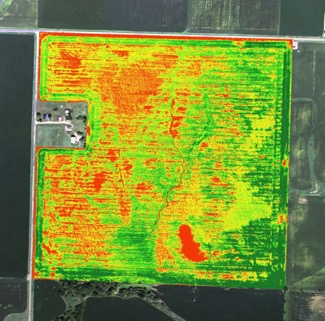
If you want to manage a whole block or field in a uniform way, you can collect a representative composite sample, taken along a W or Z shaped pattern stretched over the entirety of the field. With increasing precision agriculture technology, many growers have options for site-specific treatment within a field, for example by the use of variable rate technology during fertilizer application. To use such technologies, site-specific or spatially explicit soil data that shows the variability in the field is required, as shown in the picture below.
Therefore, a sampling strategy that can capture and show that variability will be required. There are options for the collection of spatially explicit soil data: (1) grid sampling and (2) zone sampling.
Grid sampling
For grid sampling, the field or block is dividid into grids of equal size, as shown in the picture.
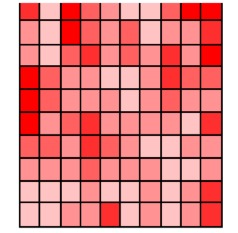
Grid sampling involves systematic soil sampling in each grid cell. Within each grid cell of 2-3 acres, 8-10 soil cores are collected, 2-3 feet from each grid point. The grid point can be defined as the line intersection or the center of a cell.
Zone sampling
In contrast to grid sampling where the field is systematically but blindly divided into cells of equal size, zone sample strategically delineates areas of the field that are expected to be different from other areas of the field. These areas or zones could be delineated based on yield maps, soil survey maps, aerial imagery, landscape positioning, or land use history.
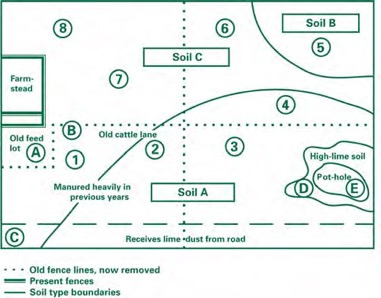
With the increase in remote sensing technology, zone sampling has gained popularity in recent years. The advantage of zone sampling compared to grid sampling is that the variability in the field may be captured adequately with less sample analysis, saving costs associated with soil testing.
- Under what conditions would you recommend grid sampling over collecting one representative composite soil sample?
- Based on the information provided about grid sampling, explain your soil sampling strategy to collect data to inform variable rate nitrogen application in a 100 acre corn field.
- List advantages and propose potential disadvantages of zone sampling as compared to grid sampling
For decades, soil test labs have provided indispensable information to support nutrient management decisions in agriculture. While these tests are well standardized and calibrated and will continue to be an integral part of nutrient management, it is important to reflect on the fact that these tests only assess soil chemical properties. Meanwhile, we know that plant health and productivity is not only affected by soil chemical properties, but also strongly affected by soil biological and physical properties. Many of these properties can be assessed directly in the field, if you know what to look out for. In the following video, you will be walked through how you can assess soil health in the field, with an approach dubbed as 'The spade test'. Watch the video and answer the corresponding questions.
- What can irregular root growth be an indicator of?
- List 3 potential objectives of the spade test
- Why is it important to sample to 45cm (ca. 18inches) deep?
- What can dark, bluish, and okra colors tell you about your soil?
- Which group of organisms produces the earthy smell of the soil?
- Which soil structure is indicative of severe compaction?
The spade test is a very visual test of soil health in the field. In addition, various low cost tests have been developed worldwide and modified for local conditions to assess physical, chemical and biological soil health in the field. This information can be collected in soil health cards. Information on soil health cards by the US Natural Resources Conservation Service (NRCS) can be found here. Watch the video for a visualization of these tests in Australia, and answer the questions to the right.
Match the test with the soil function or property they represent
| Soil test options |
| Estimate percent ground cover |
| Count macroorganisms |
| Penetrometer test |
| Water infiltration test |
| Visually assess rooting depth |
| Aggregate stability |
| Earthworm count |
| Soil pH |
| Leaf color |
| Soil functions and properties |
| Can be assessed as an indication of nutrient deficiencies |
| Assesses soil structure. Good infiltration is important to avoid flooding, runoff and erosion |
| Assesses the acidity of the soil. Most plants like a pH between 5.5 and 6.5. In this pH range, availability of many nutrients maximizes |
| Assesses soil structure. In particular, it checks for compaction issues |
| Checks for organisms referred to as ecosystem engineers. They dig channels in the soil and help build soil structure |
| Assesses biodiversity |
| Assesses the soil's ability to maintain good structure after wetting |
| Protection from erosion |
| Deep root growth helps to build soil structure and also indicates a favorable soil environment for your plant |
This part of the lab assignment is to be completed during the in-person lab
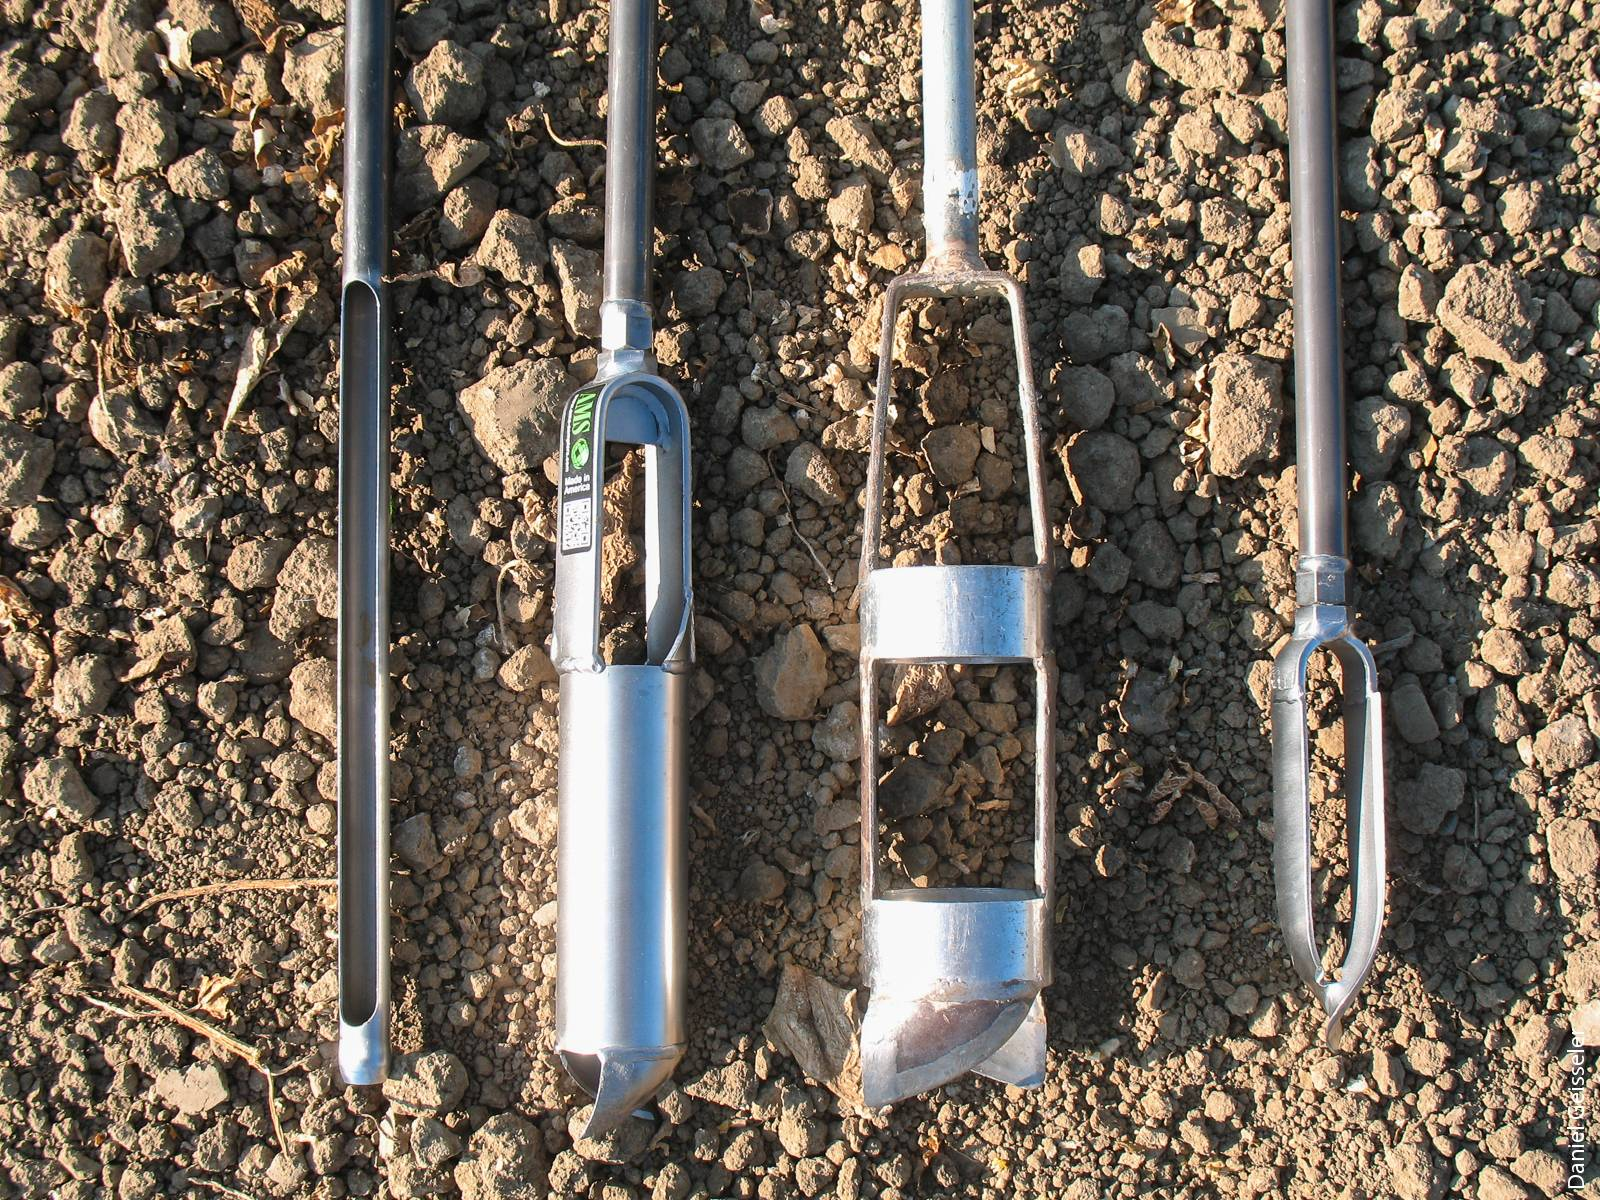
We practice taking a representative soil sample in the lemon orchard. First, we will take a look at the different tools available to take soil samples. Your instructor will demonstrate the different tools and list advantages, disadvantages and applications for each of them.
There is currently a cover crop field trial ongoing in the lemon orchard. we will keep our sampling to the buffer zone, and pretend the buffer zone is the size of the field.
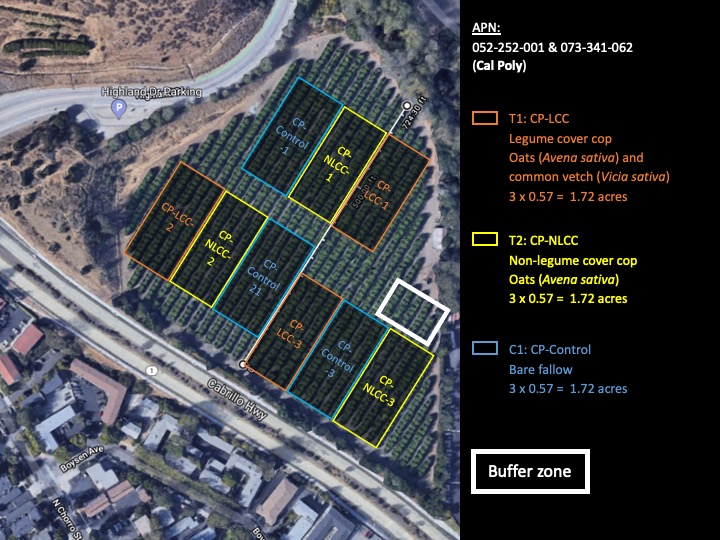
Each group will take a representative composite soil sample for the tree row and a representative composite soil sample for the tractor row.
Once you have collected your representative soil sample, sieve the soil through 2mm and collect in a paper bag. The soil will be air-dried and used for future lab activities.
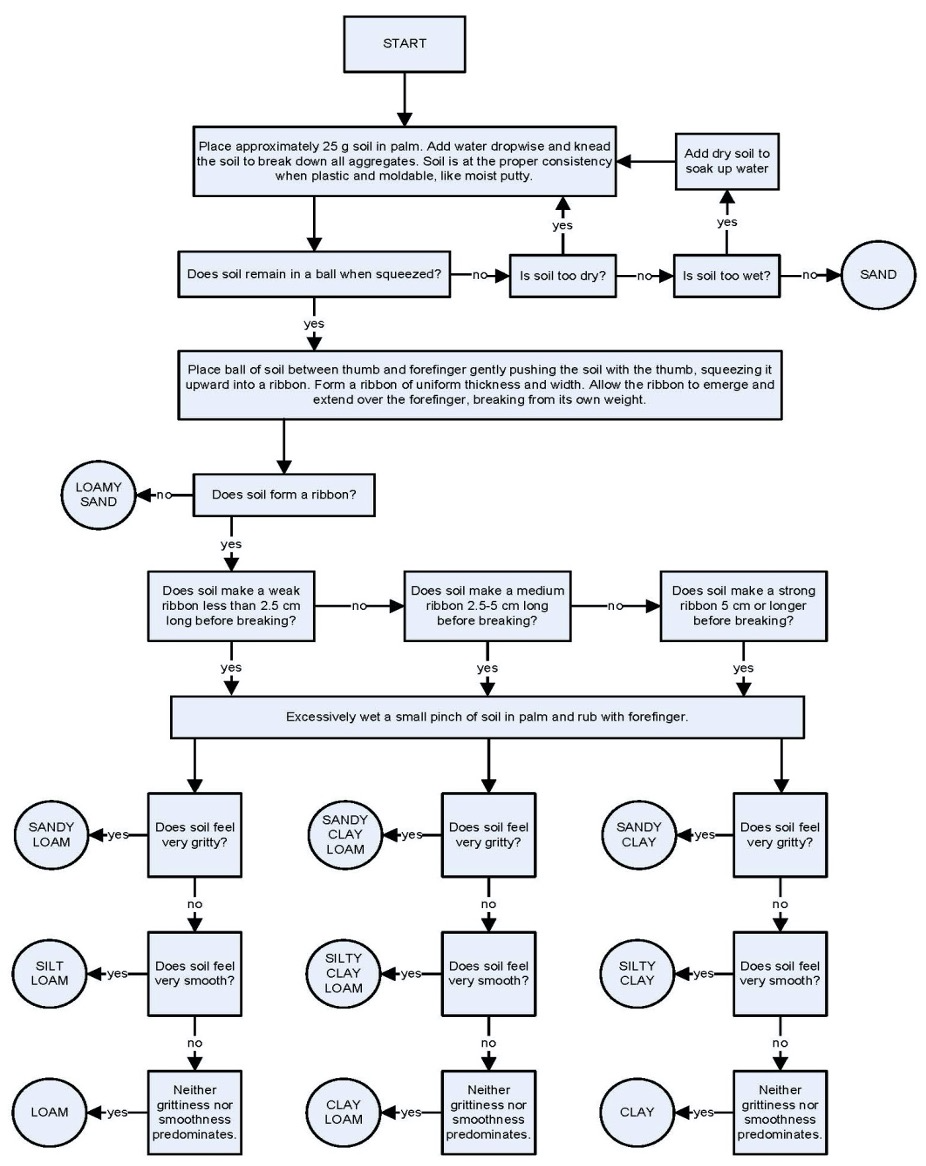
Take some of the 2mm sieved soil and follow the flow chart to determine texture by feel.
Lastly, we will have a peak at the health in the different treatments using the spade test as shown in the previous stimulus.
- Name 5 tools for soil sampling. For each of them, describe advantages, disadvantages, and relevant applications.
- Describe how you will go about collecting a representative soil sample in the buffer zone. List the number of samples, the tools used, the sampling depth, the sampling location. Provide a rationale for your decisions.
- What texture did you find for your soil using the texture by feel method? Does it match the texture class listed on the web soil survey?
- Do you observe any difference in physical soil properties in the spade test samples from the legume cover crop, non-legume cover crop and control treatment in the field experiment?